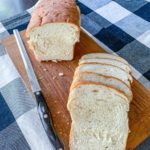
Easy Homemade Sandwich Bread
This easy sandwich bread recipe uses just five simple ingredients to make two soft, golden loaves. It is almost fail-proof and ready in under 3 hours, perfect for sandwiches, morning toast, and everything in between.
Servings: 24 slices
Calories: 141kcal
Equipment
- 2 loaf pans 1 1/2 pound loaf pans, or smaller loaf pans
Ingredients
- 2 ¼ cups warm water 95º-100ºF temperature
- 4 ½ teaspoons active dry yeast (2 packets)
- ¼ cup sugar
- ¼ cup melted butter or cooking oil
- 1 tablespoon salt
- 6 cups all purpose flour
Instructions
- Activate the yeast. In a large bowl, or the bowl of your stand mixer, stir together the warm water and sugar. Sprinkle the yeast over the top and let it sit for 10 minutes, until the surface looks foamy. That foam is how you know your yeast is alive and ready to work.
- Make the dough. Add the melted butter and salt to the yeast mixture and stir to combine. Add the flour one cup at a time, mixing well after each addition. After the sixth cup, watch the dough. It should pull away from the sides of the bowl and form a soft ball. If it is still sticking, add up to 1/4 cup more flour, a little at a time. Go slowly here, since too much flour makes a dry, dense loaf.
- Knead the dough. In a stand mixer fitted with the dough hook, knead on medium speed for 5 to 7 minutes. By hand on a lightly floured surface, knead for at least 7 minutes. You want dough that is tacky but not sticky, smooth like the inside of your cheek, and stretchy enough to pull 3 to 4 inches without tearing.
- First rise. Cover the bowl with a clean, damp kitchen towel and let the dough rise until doubled, about 45 to 60 minutes.
- Shape the loaves. Punch the dough down to deflate it and fold the edges into the center. Lightly grease your loaf pans, even nonstick ones. Lightly flour your work surface and divide the dough: two equal pieces for 1 1/2-pound pans, or three pieces for smaller 4 x 8-inch pans. Flatten each piece into a rectangle about 6 x 12 inches. Starting at a short end, roll the dough into a log. Cup your hands around the middle and slide the log toward you a few inches to tighten it the roll, then repeat. This keeps the loaf from splitting on the sides as it bakes. Place each log in a pan, seam side down.
- Second rise. Cover the pans and let the dough rise for about 30 minutes, until it crests at least an inch above the rim of the pan. If you are not sure it is ready, use the poke test in the notes below. While the dough finishes rising, preheat your oven to 375ºF.
- Bake. Bake standard loaves for 30 to 35 minutes, checking at 30 minutes. Bake smaller loaves for 20 to 25 minutes, checking at 20 minutes. The bread is done when the crust is firm and golden, the underside sounds hollow when tapped, and the internal temperature reads 195ºF to 205ºF.
- Cool. Remove the loaves from the pans right away and let them cool on a wire rack before slicing or storing.
Notes
Can I use whole wheat flour instead of all-purpose? You can, with a small trade-off. Whole wheat makes a heartier, denser loaf, so start by swapping just half the flour to keep things soft. You may also need a touch more liquid, since whole wheat drinks it up.
A note on your mixer. Kneading dough is hard on mixers. If yours is not heavy-duty, you risk burning out the motor when you use it for bread regularly. I recommend a stand mixer that is rated for bread making.
Flour amounts vary. Things like humidity and the season can change how much flour your dough needs, so trust the look and feel of the dough over the exact cup count.
The poke test for bread dough. Gently poke the dough about half an inch deep into the corner of the loaf:
- Springs back quickly and completely: it needs more time, not ready yet.
- Springs back slowly and only about halfway: perfectly proofed, ready to bake.
- Does not spring back at all and leaves a permanent dent: overproofed, get it in the oven right away.
Nutrition
Serving: 1slice | Calories: 141kcal | Carbohydrates: 26g | Protein: 3g | Fat: 2g | Saturated Fat: 1g | Polyunsaturated Fat: 0.2g | Monounsaturated Fat: 1g | Trans Fat: 0.1g | Cholesterol: 5mg | Sodium: 308mg | Potassium: 40mg | Fiber: 1g | Sugar: 2g | Vitamin A: 59IU | Vitamin C: 0.002mg | Calcium: 6mg | Iron: 1mg
