
I struggled with homemade bread for years. My loaves came out dense and heavy every single time, and I could never figure out what I was doing wrong. It turns out I was adding way too much flour, I had no idea that kneading is what stretches the dough and gives bread its soft, pillowy texture, and I never knew how long to let it rise. So I gave up, more times than I can count, and went right back to the store-bought loaf.
But here is the thing. If you have ever flipped over a bag of sandwich bread and tried to read the ingredient list, you already know why homemade is worth another try. Half of those words are impossible to pronounce. This recipe asks for just five simple things you probably have in your kitchen right now: water, yeast, sugar, butter, salt, and flour. No bread machine, no sourdough starter to name and feed, and no special skills. Just two soft, golden loaves, ready in under 3 hours, perfect for school lunches, morning toast, or that first warm slice with a little butter melting into it.
Here is the best part. You do not need to understand any of the science I struggled with for years, because I have broken it all down for you. I will walk you through every step, with clear cues for what to look for and all the little tips I learned the hard way. By the time we are done, you are going to wonder why you ever bought sandwich bread at all.
Content Covered Here
What You Need to Make Homemade Bread
Equipment & Supplies
Here is everything you need to set yourself up for success:
- A stand mixer with a dough hook for kneading (optional, but helpful)
- An instant-read thermometer
- Fresh, unexpired yeast
- 1 1/2-pound loaf pans, or smaller loaf pans
Stand Mixer for Kneading
You can make amazing bread by hand, but a stand mixer makes quick work of the kneading. And kneading matters more than almost anything else, because improper kneading is one of the most common reasons homemade bread fails. If you are just starting out, a stand mixer takes a lot of the guesswork off your plate and keeps things nearly fail-proof.
So what is kneading actually doing? It warms and stretches the dough into something springy and elastic, presses out the gas pockets so your bread bakes up with an even texture, and works the yeast through evenly so it can do its job. In other words, those few minutes of kneading are what stand between you and a dense, heavy loaf.
🎯 TFN Pro Tip
Kneading dough is hard on mixers. If yours is not heavy-duty, you risk burning out the motor when you use it for bread regularly. See my recommended mixers below.
Instant Read Thermometer
I rely on an instant-read thermometer because, left to my own judgment, I always overheat the water. And water that is too hot will kill your yeast before it ever gets going, which means no rise and no bread. So take a moment to check that your water sits right around 95º to 100ºF before adding it to the yeast. It is a small step that saves a whole loaf.
A thermometer also earns its keep at the finish line, letting you check that the inside of your bread has reached 195º to 205ºF so you never end up with a gummy center.
Fresh Yeast
This was another one of my early mistakes. I would buy a few packets of yeast, tuck them in the fridge and reach for them months later without a second thought that it might be expired. Old yeast simply will not rise.
If you use packets, check the expiration date before you start. If you keep yeast in a jar, mark the date you opened it with a Sharpie and toss it after 6 months. A little habit like that makes sure your dough rises every single time.
If you like making bread (or even our 30 minute hamburger buns or 30 minute hot dog buns, then you need a jar or even a pound of yeast. I keep my pound of yeast in my freezer where it can live for years!
Loaf Pans
Having enough pans to bake both loaves at once is handy, but not required. If you are short a pan, you can freeze half the dough (see the notes in the recipe) and bake it another day, so even one or two pans will do the trick. Keeping dough in the freezer is a nice head start on other treats too, like a quick pizza night or a warm batch of cinnamon rolls.
Homemade Bread Ingredients
Just five simple ingredients, plus the water to bring it all together:
- Active dry or instant yeast gives your bread its rise. Either kind works here.
- Granulated sugar feeds the yeast and adds the faintest hint of sweetness.
- Melted butter or cooking oil keeps the crumb soft and tender.
- Salt brings out the flavor, so your bread never tastes flat.
- All-purpose flour is all you need, though bread flour works too. If you love a heartier, whole grain loaf, my whole wheat sourdough sandwich bread is a wonderful next bake. For a whole wheat swap in this recipe, see the FAQs below.
How To Make 5 Ingredient Bread
Step 1: Wake Up Your Yeast
In a large bowl, or the bowl of your stand mixer, stir together the warm water and sugar. Sprinkle the yeast over the top and let it sit for about 10 minutes. Walk away and start tidying the kitchen. When you come back, the surface should look puffy and foamy, almost like the top of a root beer float.
That foam is the whole point. It is your yeast waking up and telling you it is alive and ready to work.
Helpful tip: Your water should feel warm to the touch, never hot. Think of a comfortable bath, around 95º to 100ºF. Water that is too hot will kill the yeast before it ever gets started, and if you do not see any foam after 10 minutes, your yeast may be old. Start fresh rather than hoping for the best, because tired yeast is the number one reason bread does not rise.
🎯 TFN Pro Tip
Factors like the level of humidity or even the season of the year can affect how much flour you need.
Step 2: Build the Dough
Add the melted butter and salt to your foamy yeast and stir to combine. Now add the flour one cup at a time, mixing well after each cup. This slow and steady approach matters more than it seems, because it lets the flour soak up the liquid evenly.
After the sixth cup, stop and look at your dough. It should start pulling away from the sides of the bowl and gathering into a soft ball. If it still feels wet and sticky and clings to the sides, add up to a quarter cup more flour, just a sprinkle at a time.
Helpful tip: Go easy with that extra flour. It is tempting to keep adding until the dough feels perfectly dry, but too much flour is what gives you a heavy, dense loaf. The dough should stay a little soft. You can always add more, but you cannot take it back out.
Step 3: Knead Until Smooth
Kneading is where the magic happens. It builds the structure that gives your bread that lovely, sliceable texture.
If you are using a stand mixer, attach the dough hook and knead on medium speed for 5 to 7 minutes. If you are kneading by hand, turn the dough out onto a lightly floured surface and work it for at least 7 minutes. Push it away with the heel of your hand, fold it back over, give it a quarter turn, and repeat. It is wonderfully relaxing once you find your rhythm.
You will know the dough is ready when it feels tacky but not sticky, looks smooth like the inside of your cheek, and stretches 3 to 4 inches without tearing.
Helpful tip: If your mixer starts to feel warm or sound strained, give it a rest. Kneading dough is hard work for a motor, and only heavy-duty mixers are built to handle it regularly. When in doubt, finish the last minute or two by hand.
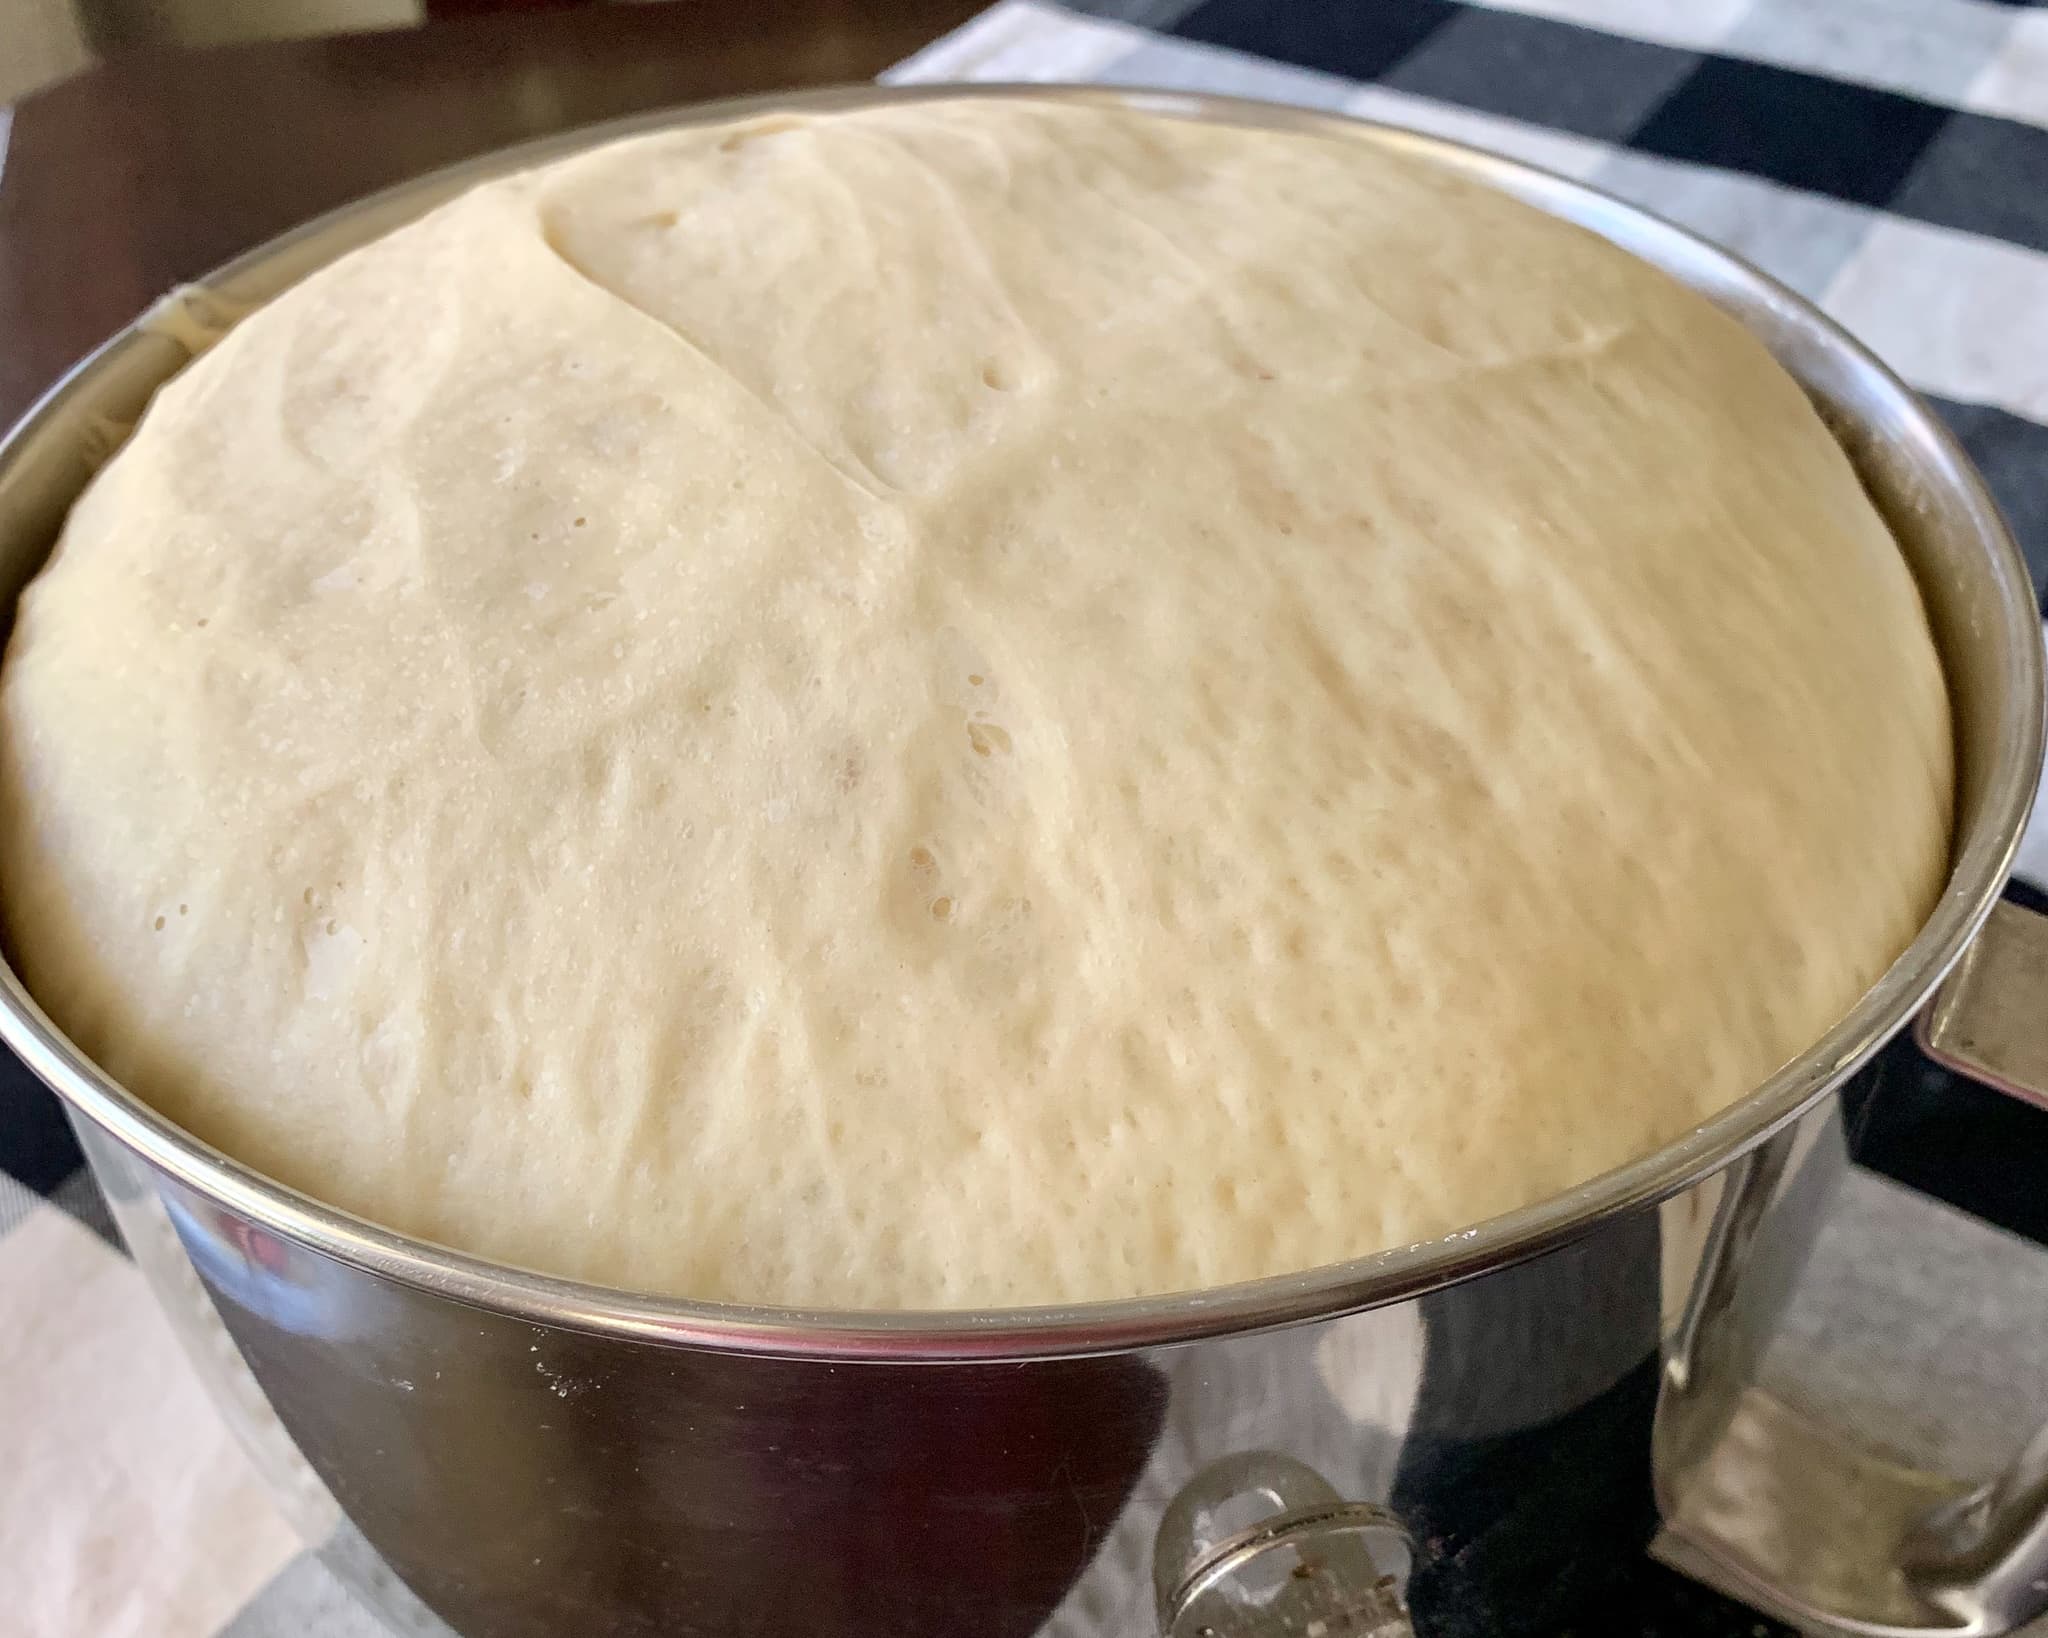
Step 4: Let It Rise
Cover the bowl with a clean, damp kitchen towel and set it somewhere cozy and out of the way. Let the dough rise until it has doubled in size, about 45 to 60 minutes.
Helpful tip: Yeast loves warmth. If your kitchen runs cool, set the bowl on top of the stove while the oven preheats, or pop it inside the oven with just the light on. A warm, draft-free spot helps your dough rise faster and more evenly. And do not panic if it takes a little longer than an hour, since humidity and the season can both slow things down.
Step 5: Shape Your Loaves
Once your dough has doubled, gently punch it down to release the air, then fold the edges into the center. Lightly grease your loaf pans, even if they are nonstick, and lightly flour your work surface.
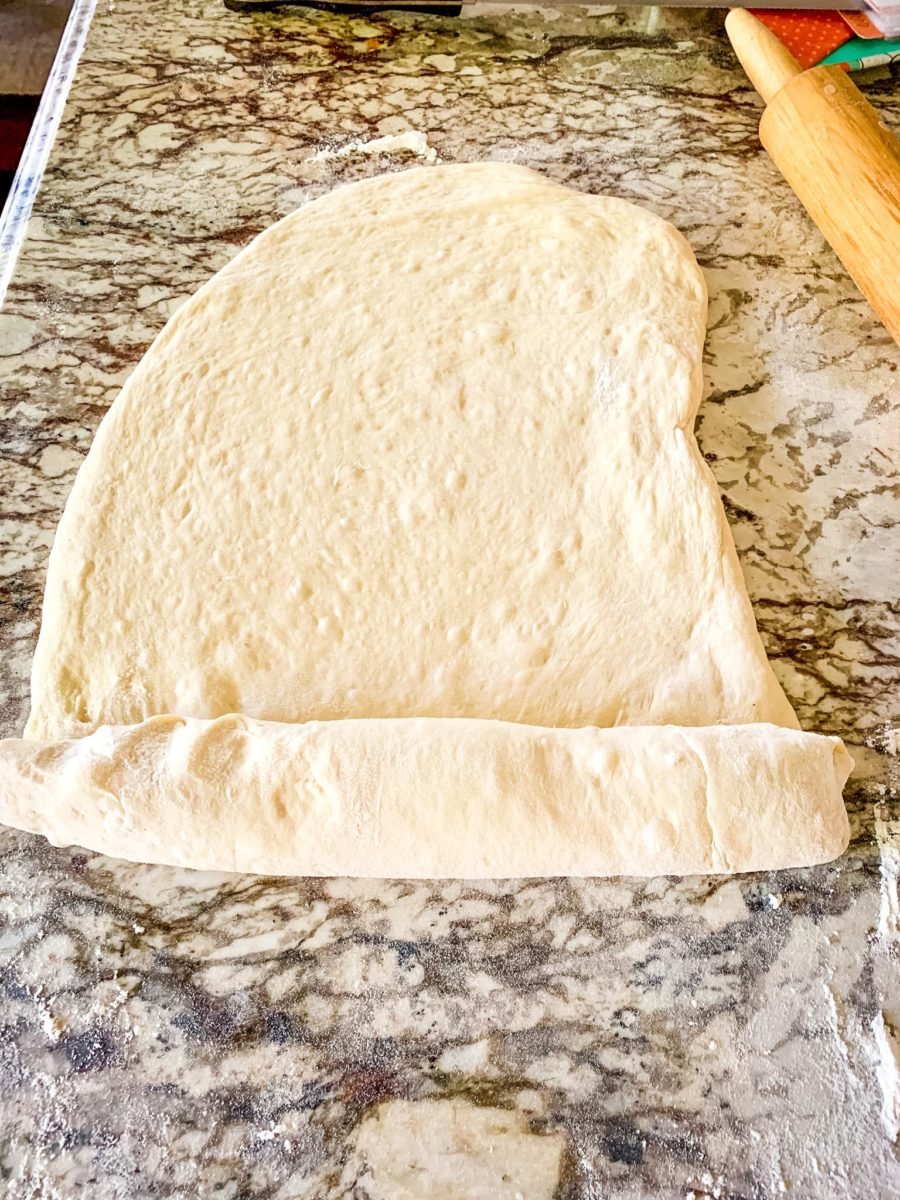
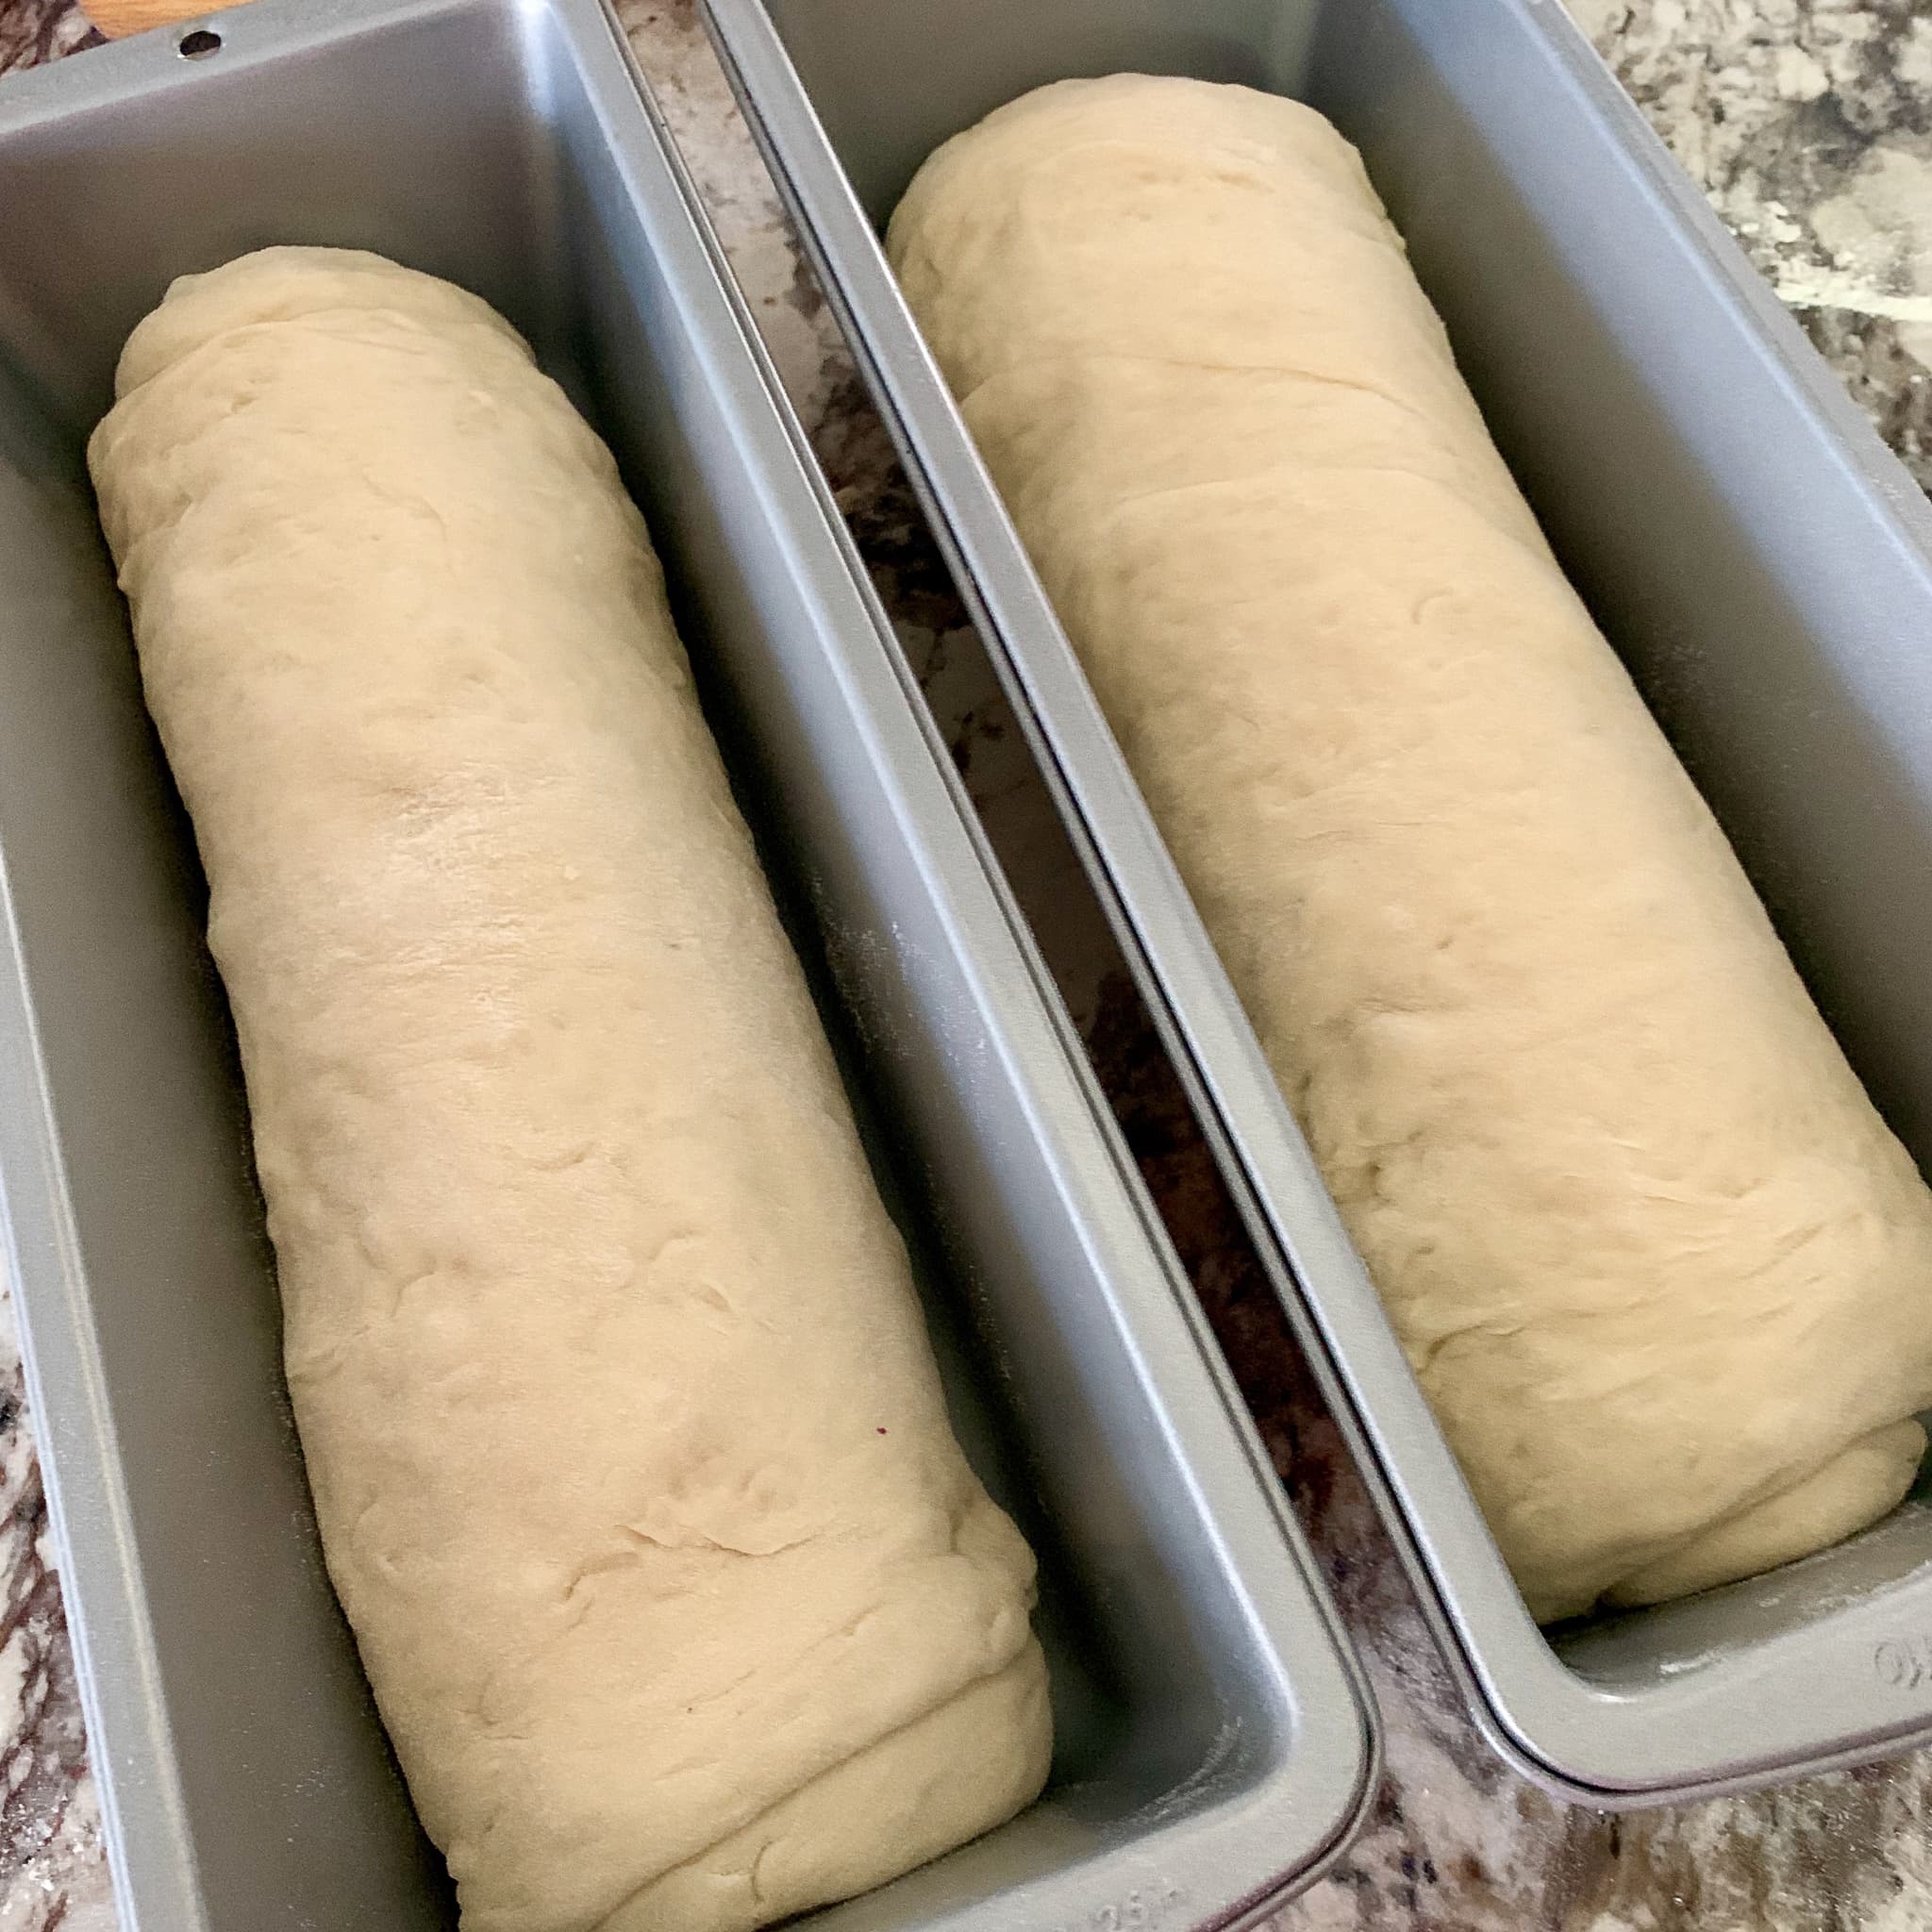
Divide the dough into two equal pieces for standard 1 1/2-pound pans, or three pieces for smaller 4 x 8-inch pans. Flatten each piece into a rectangle about 6 x 12 inches. Starting at a short end, roll the dough up snugly into a log. Then cup your hands around the middle and slide the log toward you a few inches to tighten it, and repeat once or twice.
Place each log in its pan, seam side down.
Helpful tip: That little tightening roll is worth the extra few seconds. It keeps the loaf from splitting open on the sides as it bakes, so you end up with that smooth, rounded top that looks like it came from a bakery.
Step 6: The Second Rise
Cover the pans and let the dough rise again, about 30 minutes, until it crests at least an inch above the rim of the pan. While you wait, preheat your oven to 375ºF so it is good and hot when the bread goes in.
Not sure if your dough is ready? Try the poke test. Gently press your finger about half an inch into the corner of the loaf:
- If it springs back quickly and completely, it needs more time.
- If it springs back slowly and only about halfway, it is perfectly proofed and ready to bake.
- If it does not spring back at all and leaves a dent, it is a touch overproofed, so get it into the oven right away.
Step 7: Bake
Slide your loaves into the preheated oven. Bake standard loaves for 30 to 35 minutes, checking at the 30 minute mark. Smaller loaves need 20 to 25 minutes, so check those at 20.
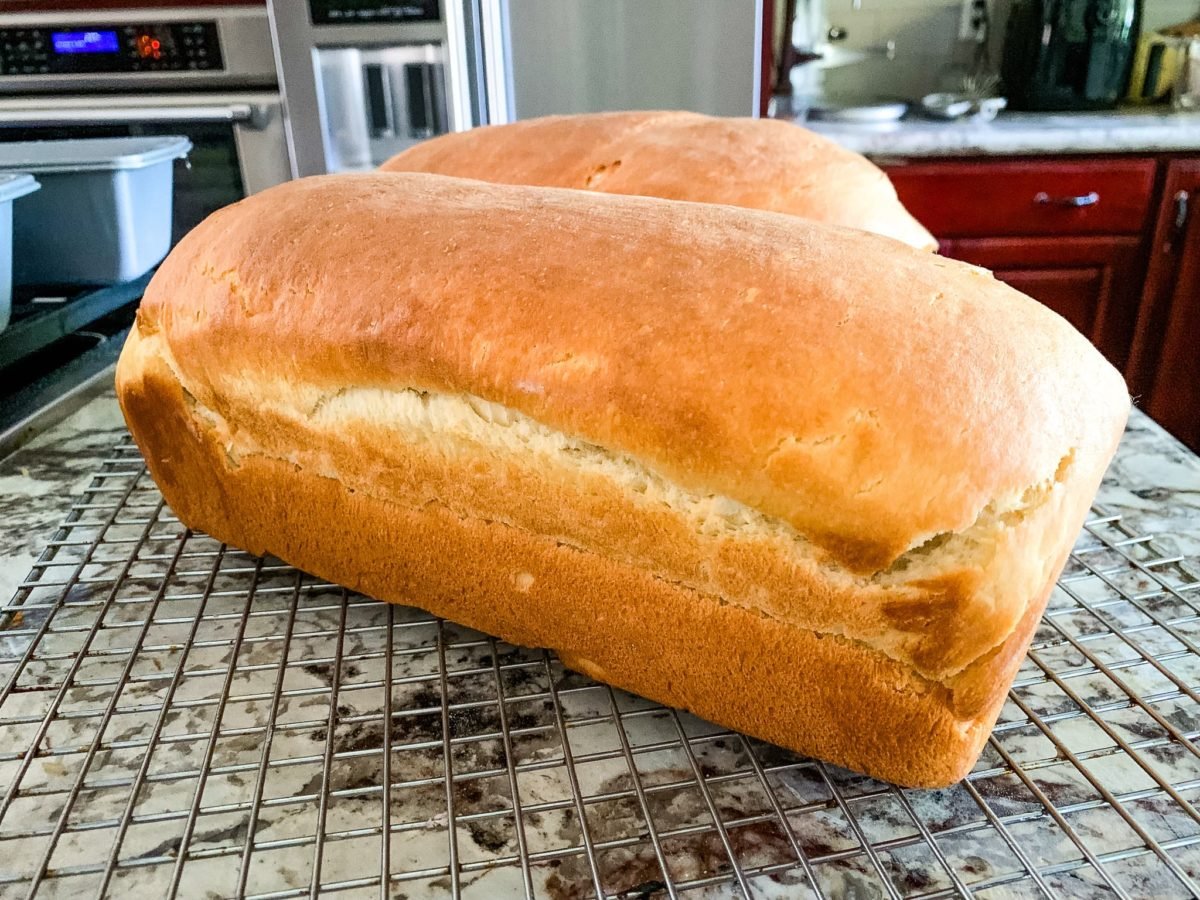
Your bread is done when the crust is firm and golden, the underside sounds hollow when you tap it, and the inside reaches 195ºF to 205ºF.
Helpful tip: An instant-read thermometer takes all the guesswork out of it. Tap-and-listen works, but checking the temperature is the surest way to know your loaf is fully baked through and not doughy in the middle.
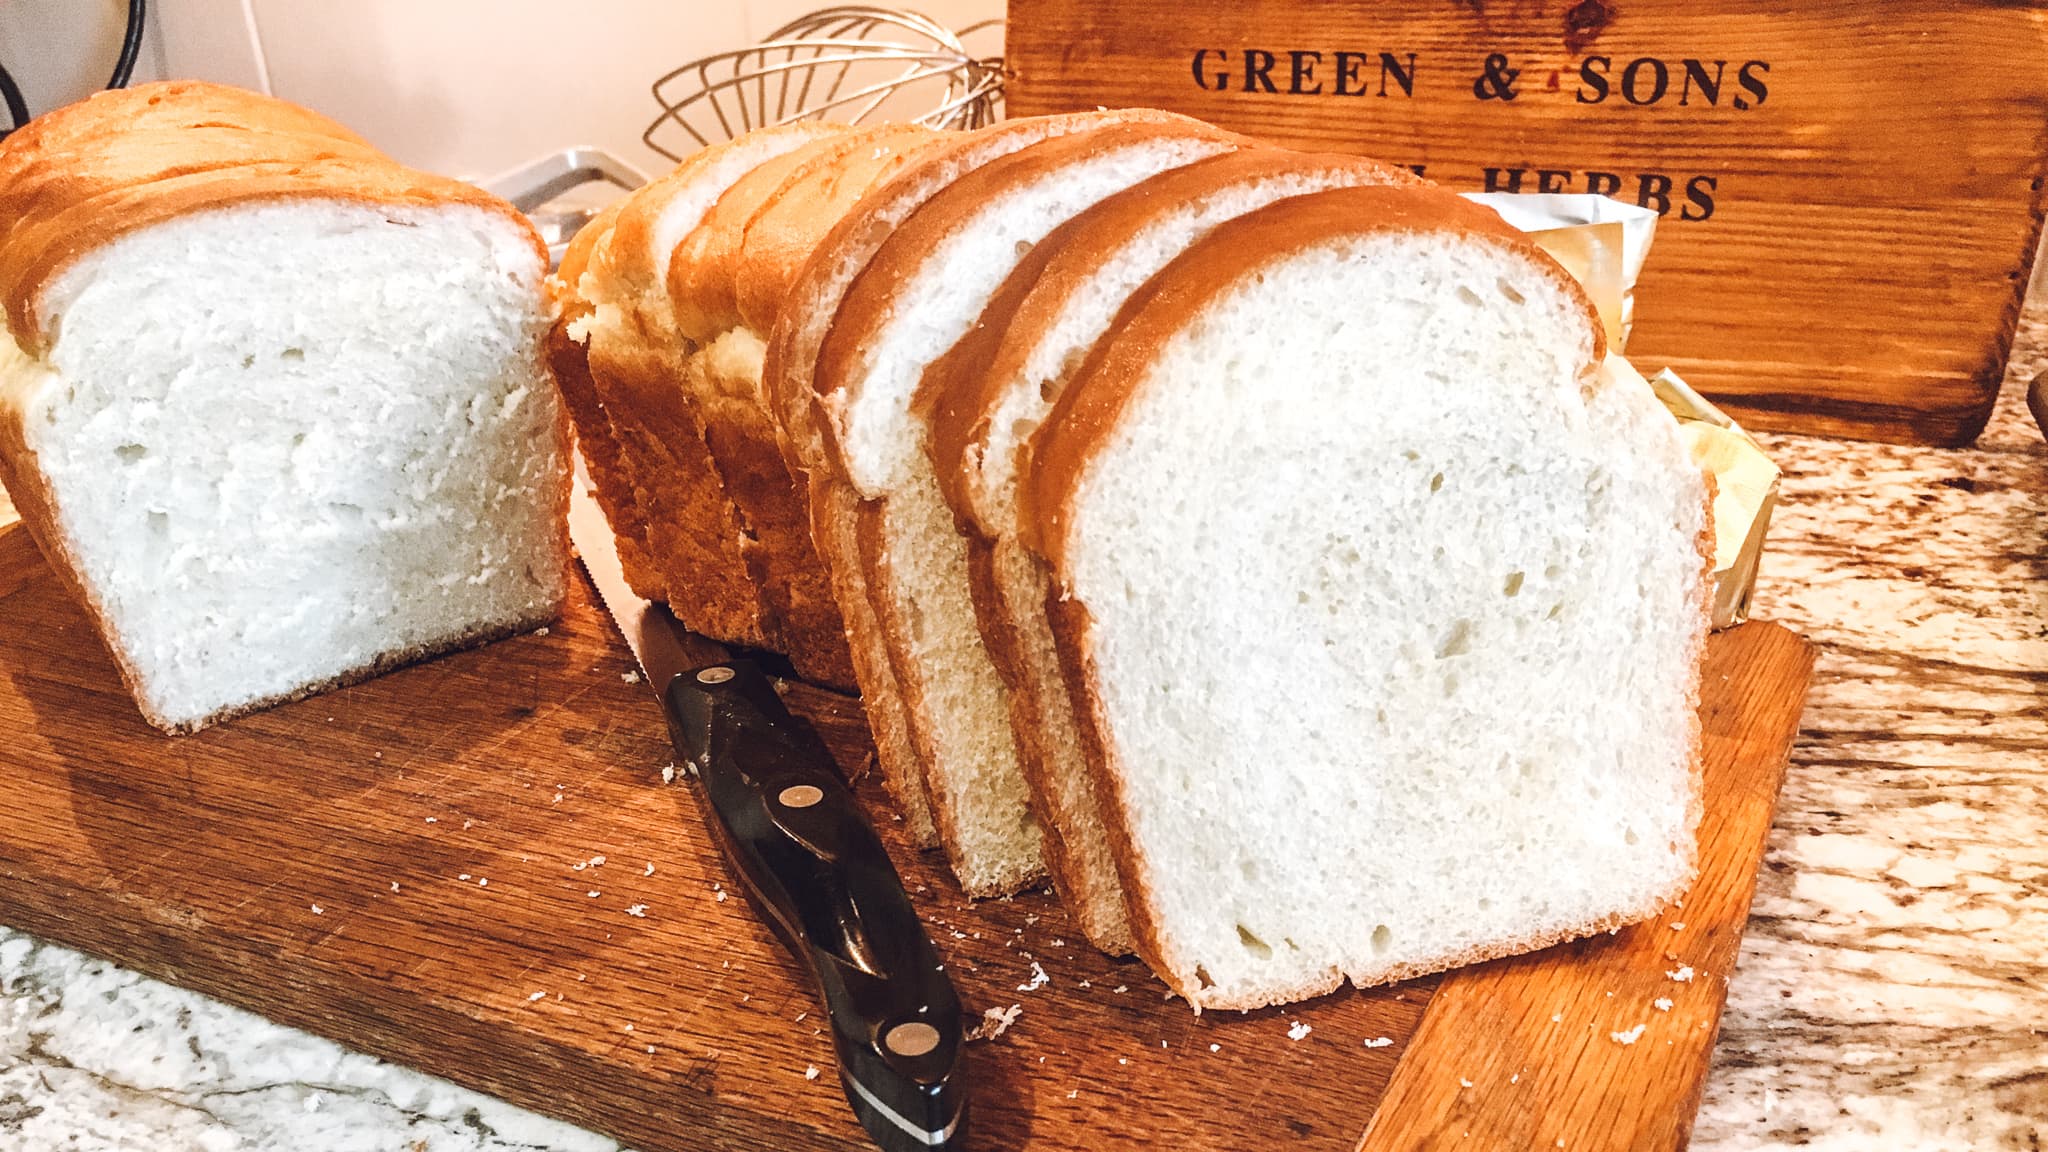
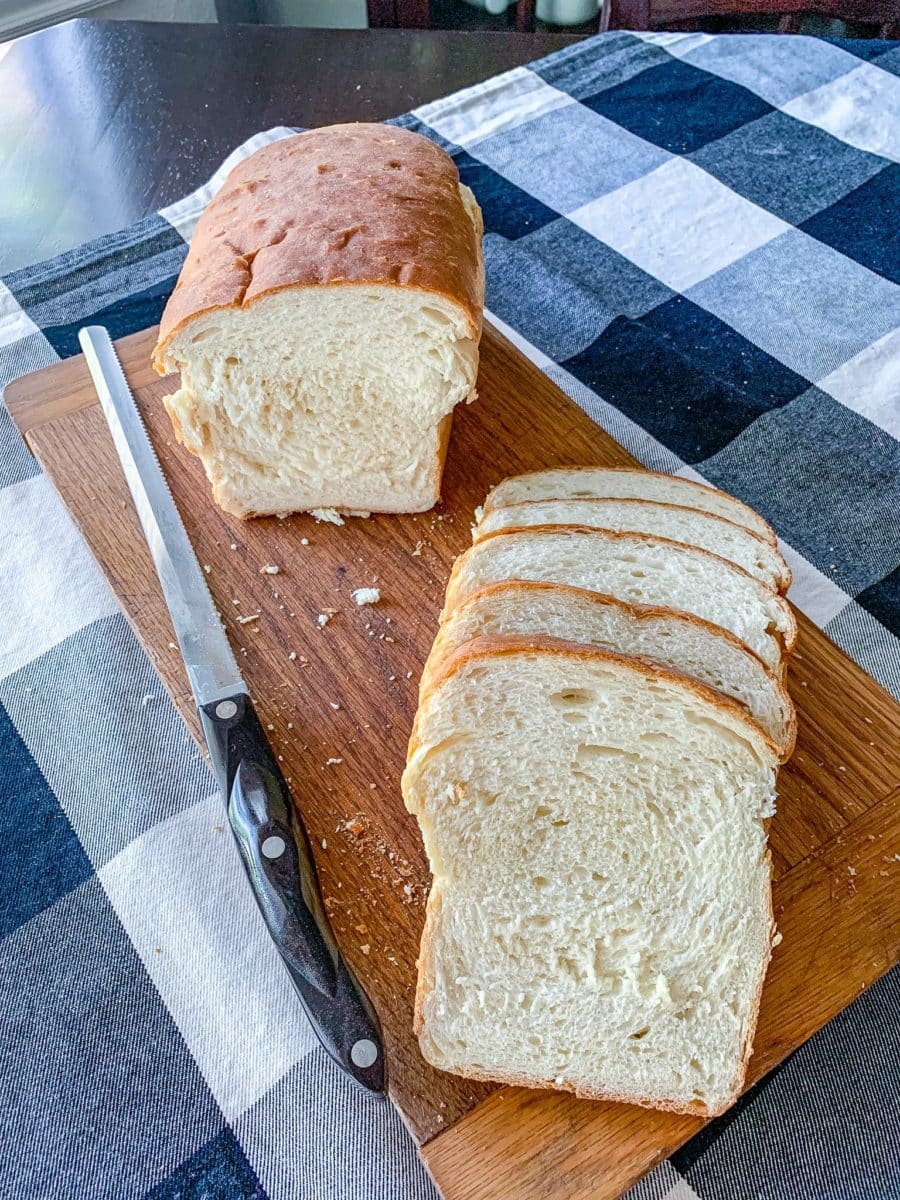
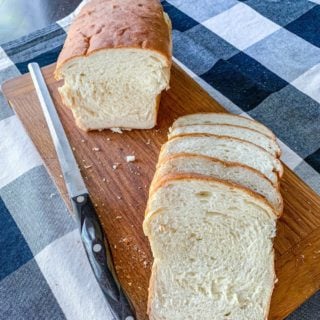
Step 8: Cool, Then Slice
As soon as the loaves come out, turn them out of their pans and set them on a wire rack to cool. I know the smell makes this nearly impossible, but try to let them cool before slicing.
Helpful tip: A hot loaf is still finishing on the inside as it cools, and cutting in too early can leave the center gummy. Letting it rest gives you cleaner slices and the best texture. If you simply cannot wait, tear off the heel and call it the baker’s reward.Place the dough on a lightly floured surface. Cut the dough in equal halves. This recipe makes two 1 1/2 pound loaves.
A Few Final Thoughts
This bread keeps beautifully at room temperature for about 3 days in a bread box or zip-top bag, and it freezes wonderfully too. Let it cool completely, wrap it in wax or parchment paper, and freeze whole or pre-sliced for up to 3 months. On a busy morning, you will be so glad to have slices ready to drop straight into the toaster.
Once you make this loaf a few times, it will start to feel like second nature, and your family will start asking for it by name. That is my favorite part of homemade bread, the way a simple recipe turns into a little tradition.
What to Serve with Homemade Sandwich Bread
Our sandwich bread is a versatile base for countless flavor combinations. Elevate your sandwich game with avocado bread spread, infused with lime juice and red pepper flakes for a zesty kick. For a savory twist, consider a classic tuna salad or a hearty chicken salad, both offering substantial protein and satisfying textures.
If you love bread, try our carrot bread recipe next. Both are simple to make and pack incredible flavor, with the sandwich bread offering a soft, fluffy texture and the carrot cake loaf delivering a moist, spiced treat that’s perfect for any occasion. Try them together for a delicious, homemade baking experience!
Recipe FAQs
Yes, and plenty of readers do. Mix the dough with a sturdy spoon until it’s shaggy, then knead by hand on a lightly floured counter for about 7 minutes. You’re looking for a smooth, slightly tacky dough that springs back when you poke it.
The most common reason is yeast that has lost its punch. If your yeast didn’t foam when you mixed it with the warm liquid, it may be old, or the liquid was too hot and killed it. Aim for warm-to-the-touch liquid, around 100ºF, and check that your yeast is fresh before you start.
Both work in this recipe. Active dry yeast likes to be dissolved in warm liquid first so it can wake up. Instant yeast can be stirred right into the flour. If you swap one for the other, the rise times may shift a little, so watch the dough rather than the clock.
Absolutely, and I always keep a loaf in the freezer for busy mornings. Let it cool completely, wrap it well, and freeze whole or pre-sliced for up to 3 months. Pull out slices as you need them and they’ll toast up beautifully.
You can, with a small trade-off. Whole wheat makes a heartier, denser loaf, so start by swapping just half the flour to keep things soft. You may also need a touch more liquid, since whole wheat drinks it up.
More Easy Bread Recipes…
If you tried this 5 ingredient sandwich bread recipe or any other recipe on my website, please leave a 🌟 star rating and let me know how it went in the 📝 comments below. Thanks for visiting!
Easy Homemade Sandwich Bread
Equipment
- 2 loaf pans - 1 1/2 pound loaf pans, or smaller loaf pans
Ingredients
- 2 ¼ cups warm water 95º-100ºF temperature
- 4 ½ teaspoons active dry yeast (2 packets)
- ¼ cup sugar
- ¼ cup melted butter or cooking oil
- 1 tablespoon salt
- 6 cups all purpose flour
Instructions
- Activate the yeast. In a large bowl, or the bowl of your stand mixer, stir together the warm water and sugar. Sprinkle the yeast over the top and let it sit for 10 minutes, until the surface looks foamy. That foam is how you know your yeast is alive and ready to work.
- Make the dough. Add the melted butter and salt to the yeast mixture and stir to combine. Add the flour one cup at a time, mixing well after each addition. After the sixth cup, watch the dough. It should pull away from the sides of the bowl and form a soft ball. If it is still sticking, add up to 1/4 cup more flour, a little at a time. Go slowly here, since too much flour makes a dry, dense loaf.
- Knead the dough. In a stand mixer fitted with the dough hook, knead on medium speed for 5 to 7 minutes. By hand on a lightly floured surface, knead for at least 7 minutes. You want dough that is tacky but not sticky, smooth like the inside of your cheek, and stretchy enough to pull 3 to 4 inches without tearing.
- First rise. Cover the bowl with a clean, damp kitchen towel and let the dough rise until doubled, about 45 to 60 minutes.
- Shape the loaves. Punch the dough down to deflate it and fold the edges into the center. Lightly grease your loaf pans, even nonstick ones. Lightly flour your work surface and divide the dough: two equal pieces for 1 1/2-pound pans, or three pieces for smaller 4 x 8-inch pans. Flatten each piece into a rectangle about 6 x 12 inches. Starting at a short end, roll the dough into a log. Cup your hands around the middle and slide the log toward you a few inches to tighten it the roll, then repeat. This keeps the loaf from splitting on the sides as it bakes. Place each log in a pan, seam side down.
- Second rise. Cover the pans and let the dough rise for about 30 minutes, until it crests at least an inch above the rim of the pan. If you are not sure it is ready, use the poke test in the notes below. While the dough finishes rising, preheat your oven to 375ºF.
- Bake. Bake standard loaves for 30 to 35 minutes, checking at 30 minutes. Bake smaller loaves for 20 to 25 minutes, checking at 20 minutes. The bread is done when the crust is firm and golden, the underside sounds hollow when tapped, and the internal temperature reads 195ºF to 205ºF.
- Cool. Remove the loaves from the pans right away and let them cool on a wire rack before slicing or storing.
Notes
- Springs back quickly and completely: it needs more time, not ready yet.
- Springs back slowly and only about halfway: perfectly proofed, ready to bake.
- Does not spring back at all and leaves a permanent dent: overproofed, get it in the oven right away.

Erica says
May I please have the original recipe that made larger loaves of bread?!
Danielle - TFN Team Member says
I wish I can be more help, but this is the same recipe it has always been!
Olivia Santiago says
Made this last week and my family loved it! Used this bread to make grilled cheese one night and it was a hit 😋.
Jennifer D says
This has been by far the best bread recipe! My family loves it!! Thank you for sharing.
Angie B. says
I have tried numerous sandwich bread recipes and this by far the best one ever!!!
Jennifer says
If I use quick rise yeast would I use same directions or would I alter them?
Gianne - TFN Team Member says
Same instructions.