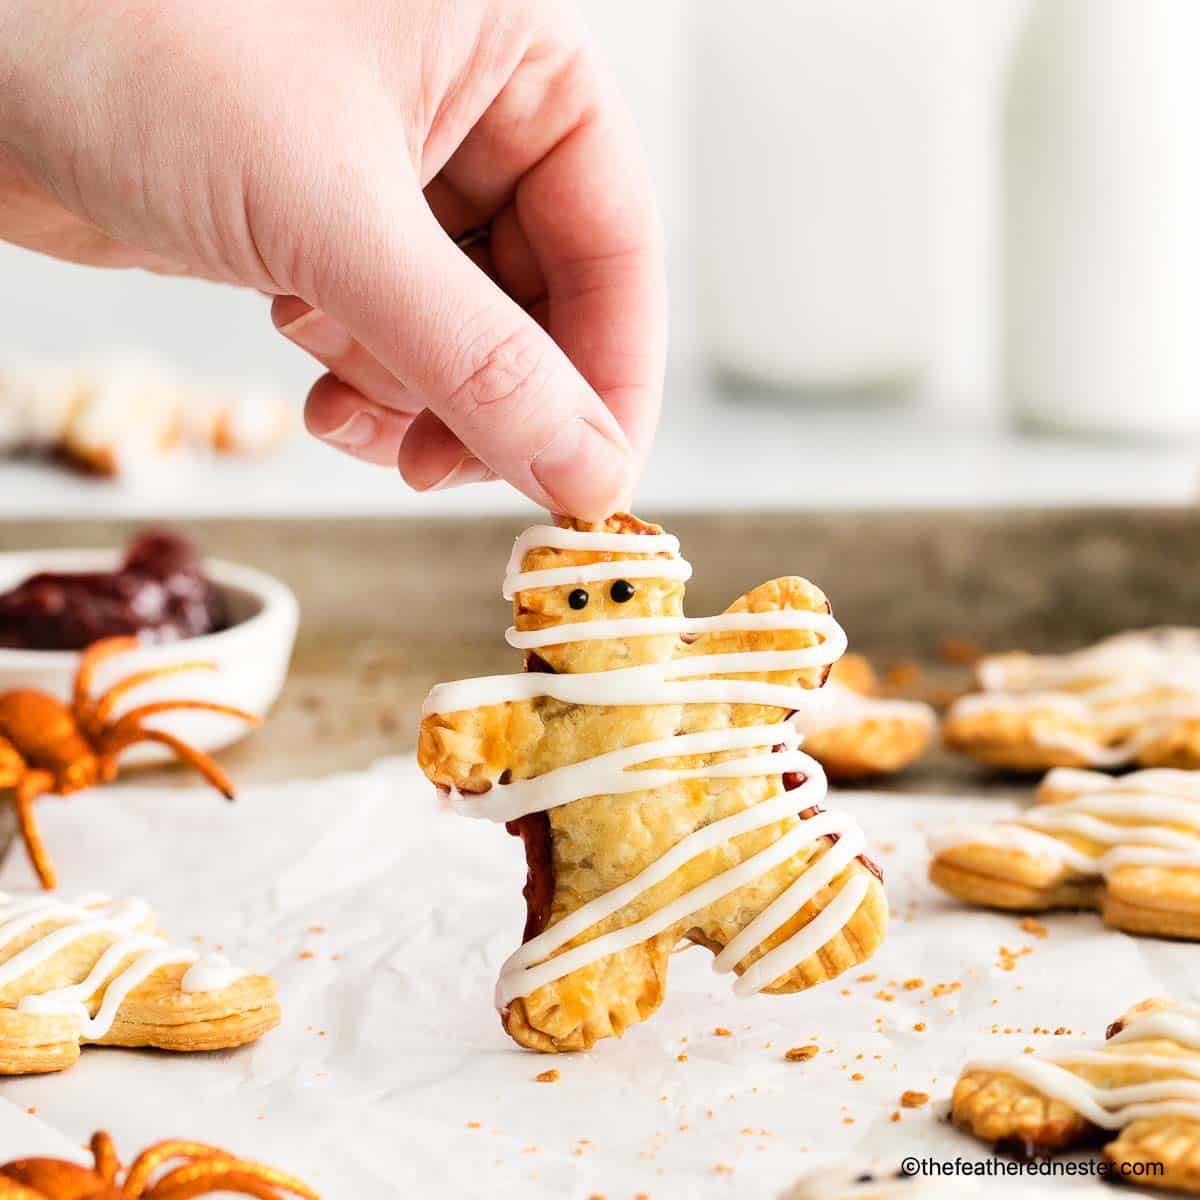

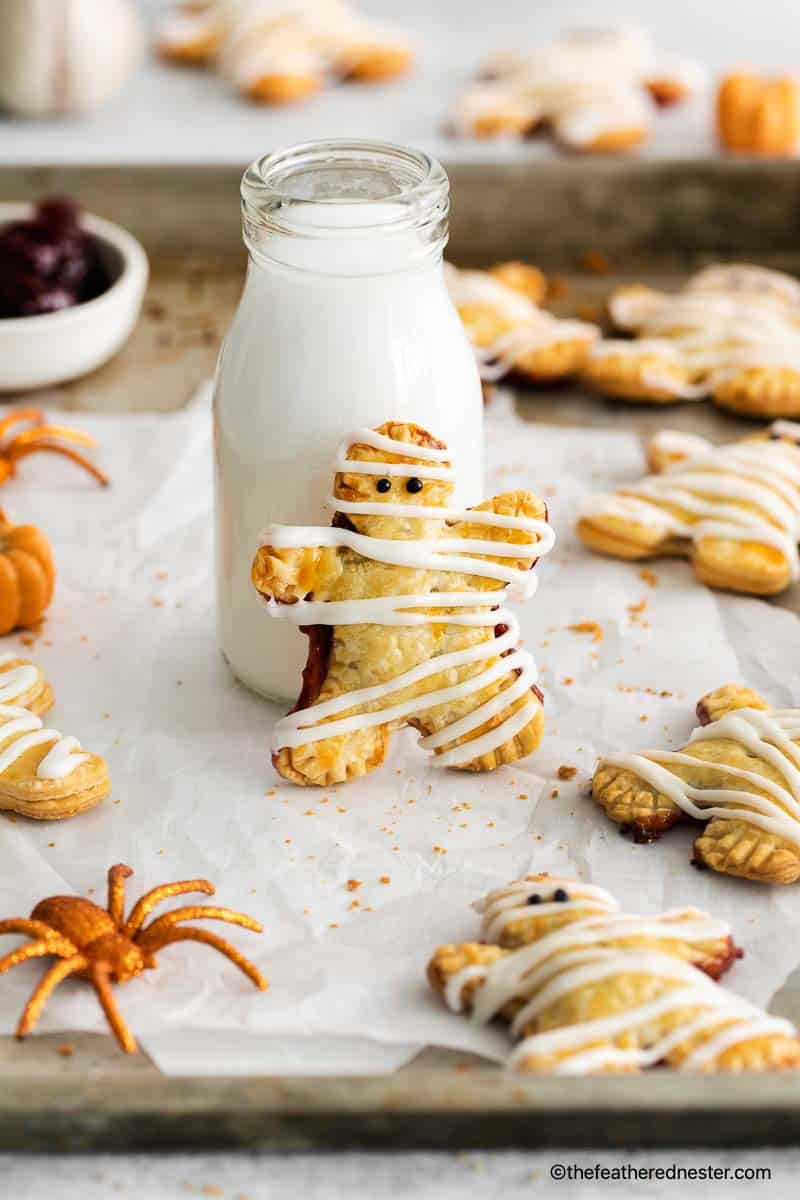
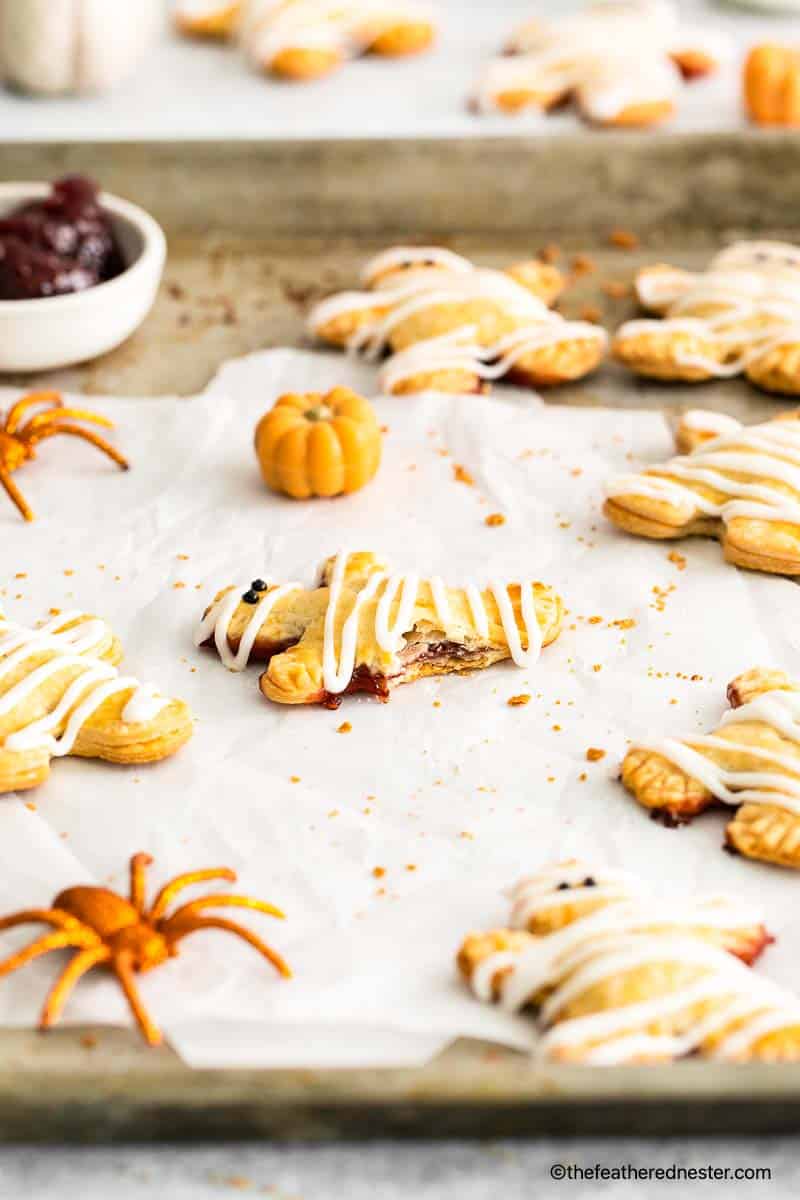
These Halloween hand pies are a must-have treat for spooky season! They’re cute, delicious, and surprisingly simple to make. Just use store-bought pie crust and your favorite jam filling, then create adorable mummy-shaped cutouts before baking. These are perfect Halloween food ideas for kids, parties, or classroom treats—and they disappear fast!
Content Covered Here
Fancy Trick or Treat Snacks Made Easy
With Halloween just around the corner, it’s time to start planning creative and festive snacks. You can bring these mini Halloween pies to your next party or serve them at home for a less scary celebration. Kids love the fun mummy shape, and grown-ups appreciate how quick and easy they are to make—no complicated decorating or chilling required!
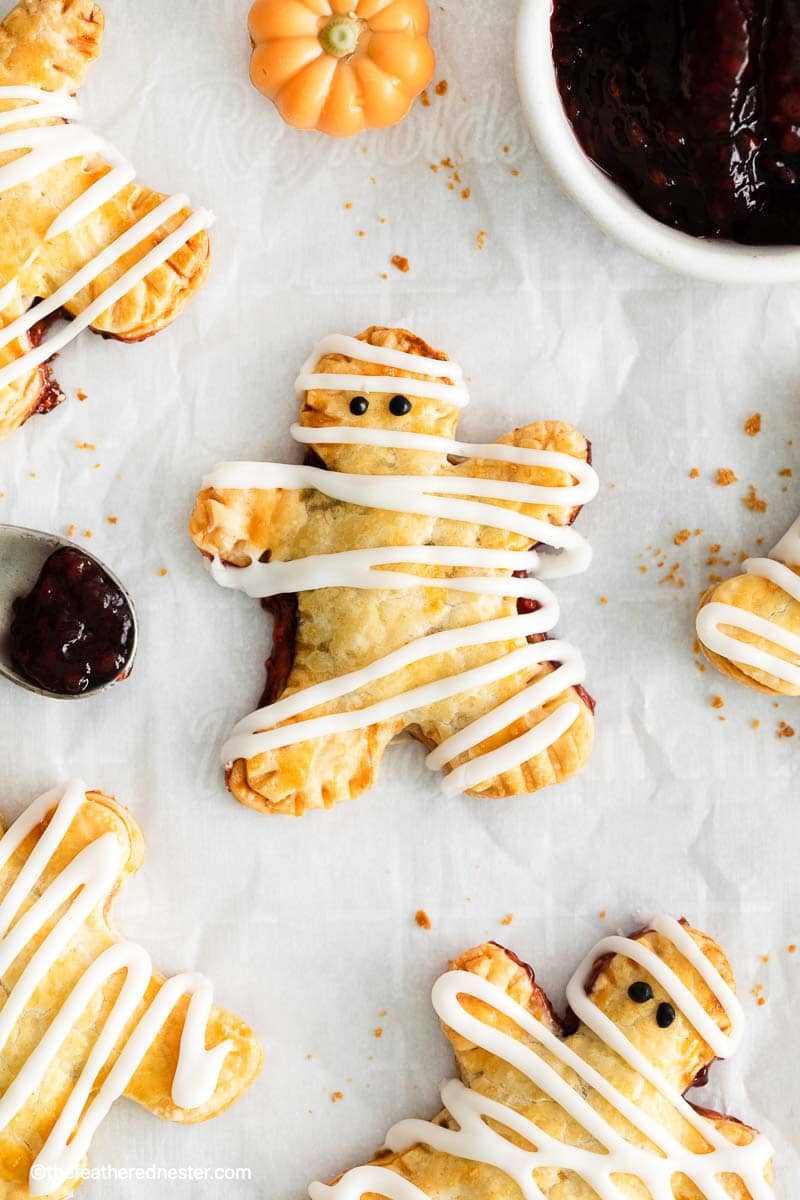
This is one of our favorite Halloween food ideas for kids because it’s both fun to make and highly customizable. Use a cookie cutter to create strips of dough for the “bandages,” then layer them over your favorite jam—like raspberry or mixed berry. Crimp the edges, brush with egg wash, and bake until golden brown. The result? The result is flaky, fruity little Halloween pies that resemble edible mummies and taste just like a classic berry pie in bite-size form!
Why We Love These Halloween Food Ideas for Kids
- Endlessly customizable fillings
While we love using raspberry jam, you can use whatever you have—strawberry, blueberry, blackberry, olallieberry, or even apple butter! These pies work with all kinds of fruit spreads. - Mini pies, maximum fun
These hand pies have all the cozy flavor of a full berry pie but come in personal sizes—perfect for handing out to guests or kids at Halloween parties. - Simple and fast to make
Thanks to store-bought pie dough and jam, the prep is quick and easy. No need for fancy tools or hours in the kitchen—just cut, fill, and bake!

Ingredient Notes and Substitutions
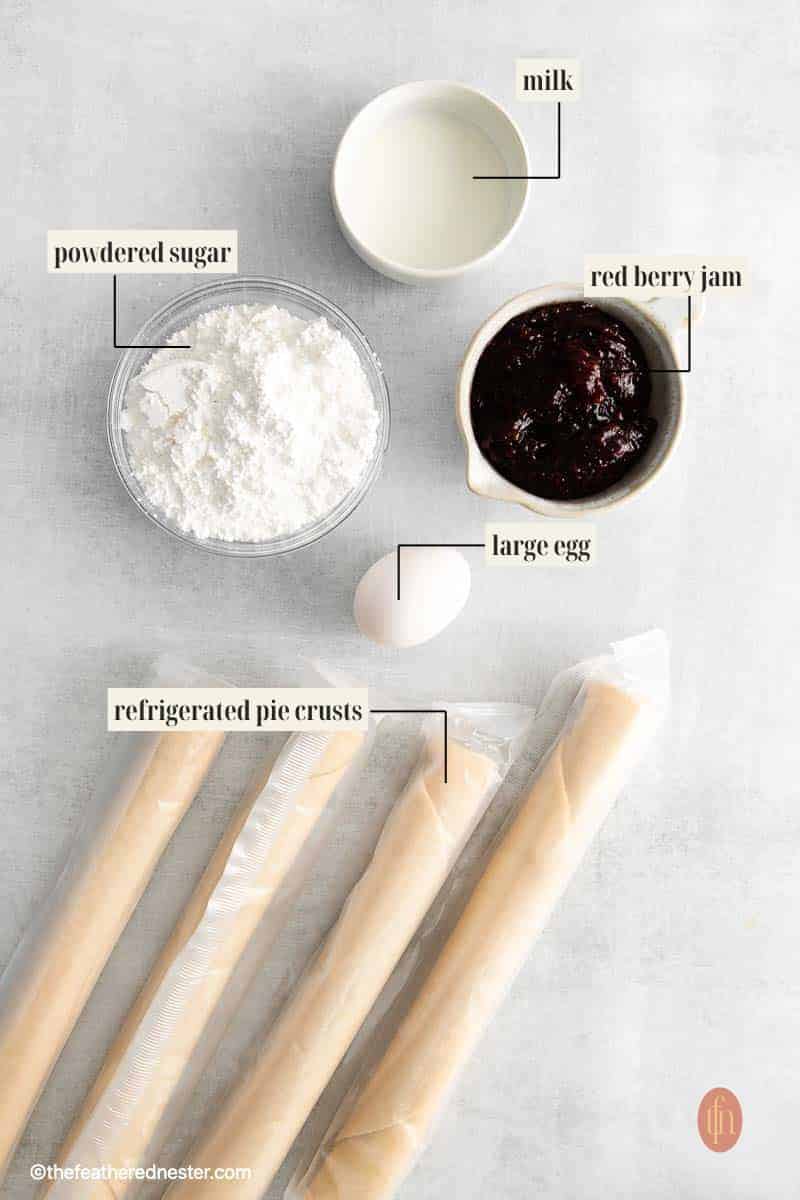
- Pie crusts: I’m using a refrigerated pie crust for this recipe, but you could use your favorite homemade crust if you prefer.
- Jam: You can use any type of red berry jam in these hand pies, such as cherry, strawberry, raspberry, blackberry, or a combination.
- Egg: Beaten with a splash of water. This helps to seal the hand pies and also helps them to brown in the oven.
- Powdered sugar: This gives sweetness and structure to our frosting. You can also use granulated sugar if preferred.
If you want to make your frosting vanilla flavored, feel free to add a small amount of vanilla extract (about 1/8th teaspoon). - Milk: This helps to thin the frosting so it is the desired consistency.
Recipe Variations
- Blackberry Hand Pies: use blackberry jam as a filling on your heart-shaped desserts. Or even use different kinds of berries in the filling, such as mixed berry, blueberry, Cookies White Chocolate and Raspberry, olallieberry, and easy strawberry cobbler for the handpies.
- Add a few drops of food coloring to the frosting to give the hand pies even more of a Halloween theme.
- Use different flavored jams in the center of the mummy pies. You could even use chocolate spread or peanut butter!
- Make a half batch of mummies and a half batch of ghosts. To make ghosts, simply cut out oval shapes from the pie crust and follow the same instructions. Alternatively, use our set of cookie cutters to create various spooky characters.
- Decorate the hand pie mummies with Halloween sprinkles instead of frosting on the top crust.
- Sprinkle your berry hand pies with coarse sugar or granulated sugar to give them a sweet and sugary taste.
- You can also add some lemon zest to the berries for a tart flavor.
Equipment Used in this Recipe
- 3″ Gingerbread man cookie cutter – I’m using the second largest size from this set of cookie cutters.
- Baking sheet
- Parchment paper (optional, but recommended)
- Ziplock or piping bag
How To Make Halloween Pies
Baking The Mummy Hand Pies
- Preheat the oven to 375°F. Then, line two large baking sheets with parchment paper.
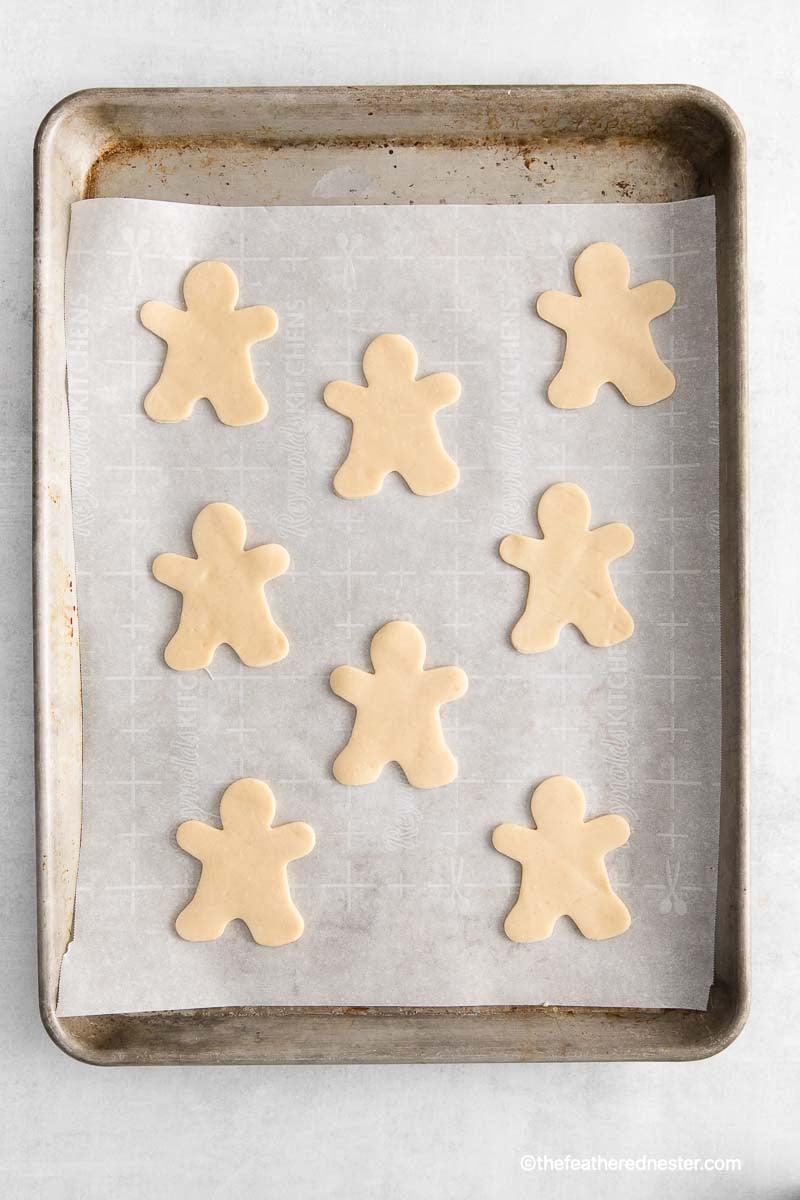
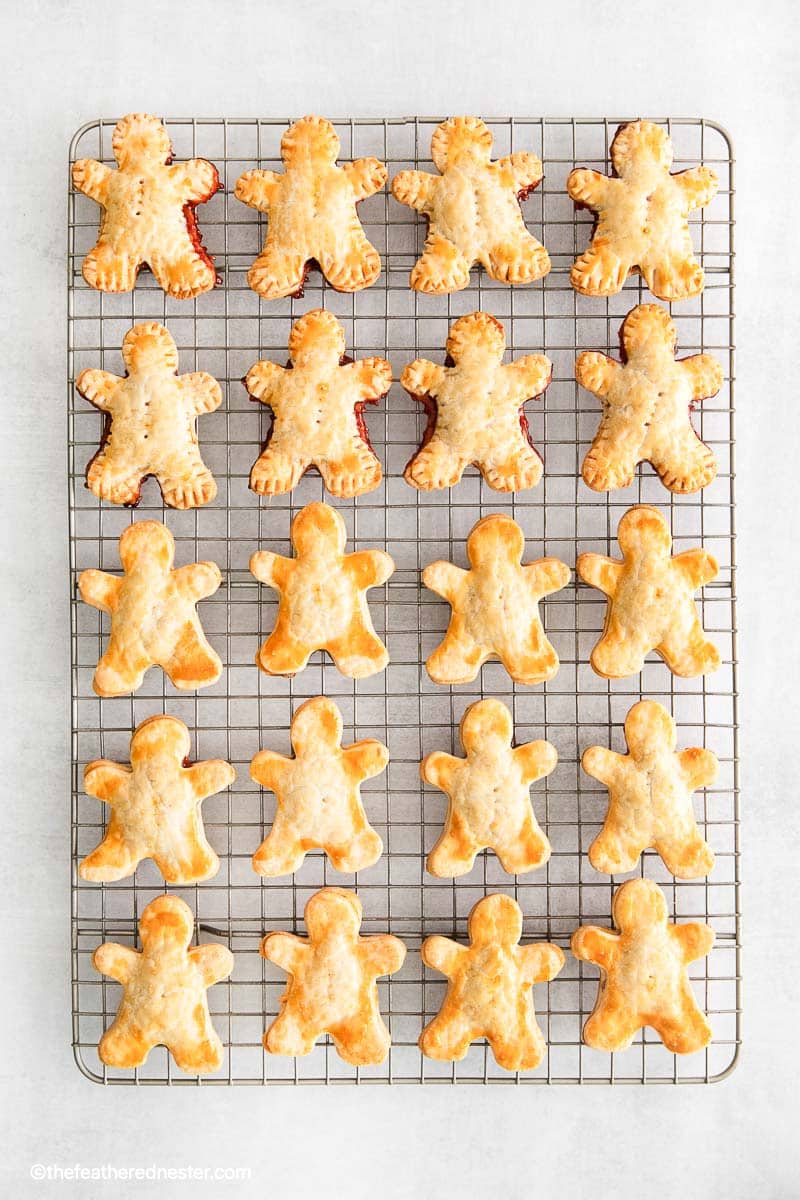
- Unroll the refrigerated pie crusts onto a very lightly floured surface. Cut out as many mummies as you can using a knife or cookie cutter (you should be able to get 10 per pie crust for a total of 40 mummies).
Optional: Then gather all of the leftover hand pie dough crust together into a ball. Roll it out until it is 1/8 inch thick. Cut out as many mummies as you can (you should be able to get another 12 mummies).
- Place as many mummies as will fit on the prepared baking sheet, making sure to leave at least an inch of space between each one.
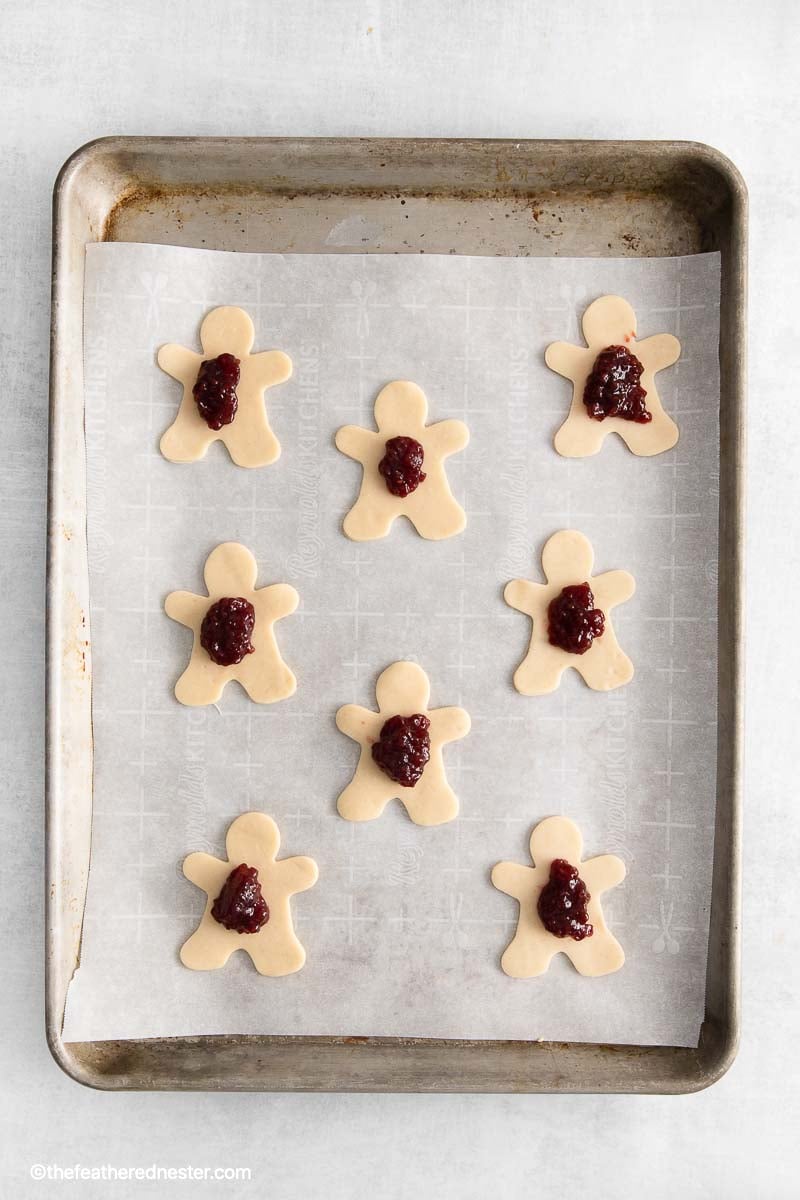
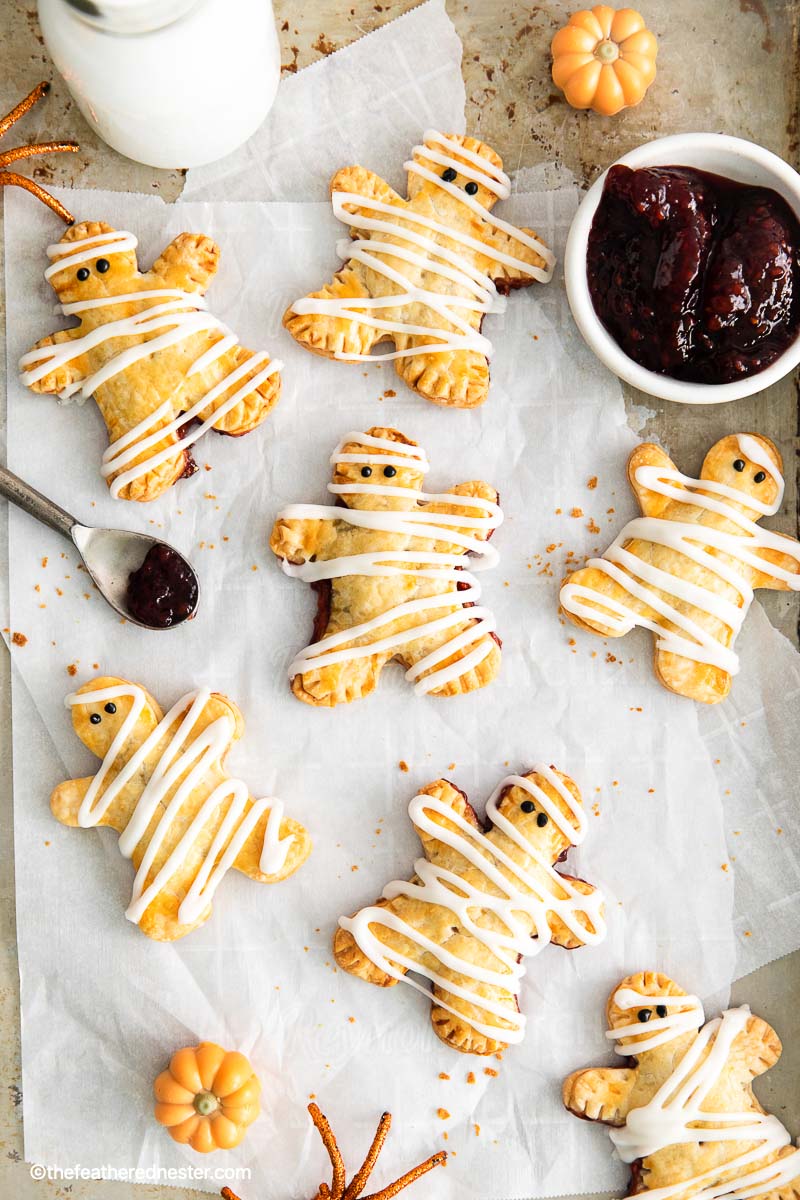
- Fill the center of each mummy with 1-2 teaspoons of red berry mixture. This will give the mummy a nice flavor and make it look delicious.
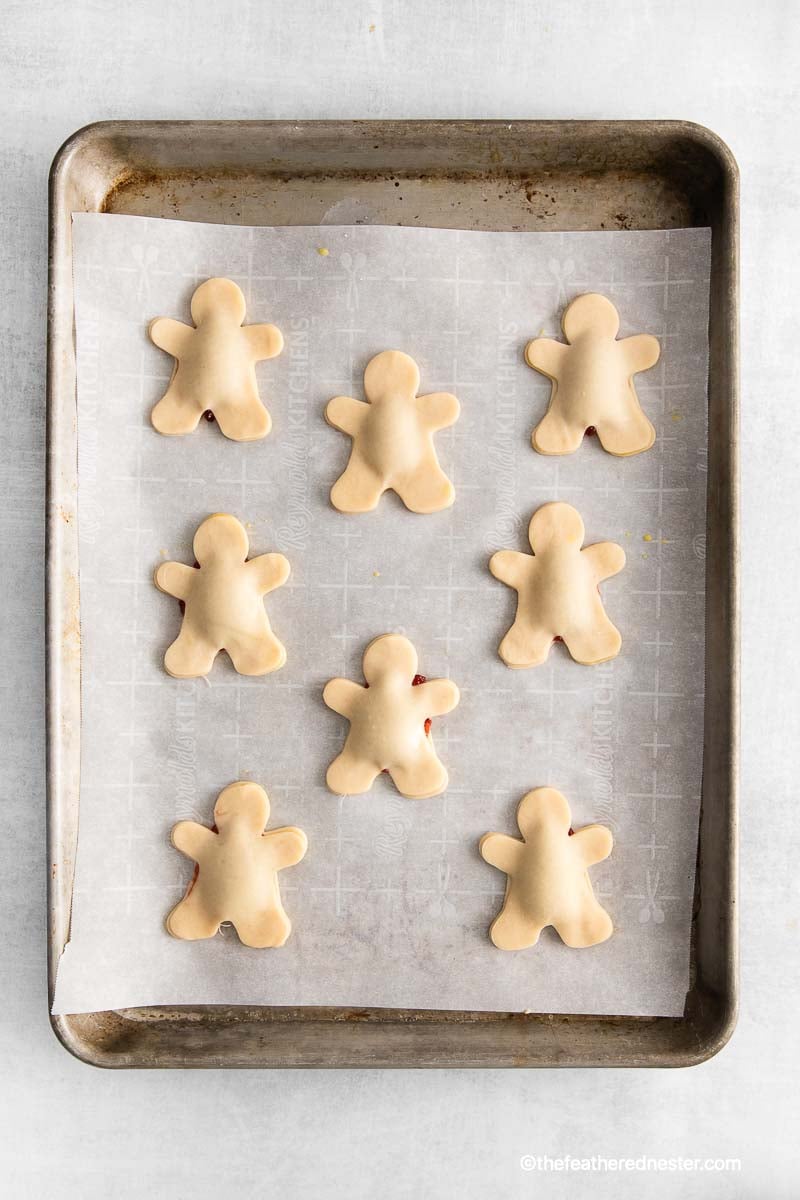
- Brush a thin layer of egg wash around the edge of the pie crust cut outs. Place another mummy on top and press the edges together to seal in the jam. If you want, you can crimp the edges of each mummy with a fork. But if you pinch the seams to seal in the filling, crimping isn’t required.
- Brush the tops of each mummy with some egg wash. This will help the sugar stick to the dough. Then use a fork to poke some holes in each mummy, so that the air can escape while it is baking and it doesn’t explode.
- Bake the mummies for 13-15 minutes or until they are golden brown.
- Let the mummies cool completely before frosting them.
🎯 TFN Pro Tip
For crispy mummy pies, ensure the berry jam filling is thick and not runny. Make sure to thoroughly drain any fresh berry jam before incorporating it into the pie crust.
Frosting The Halloween Hand Pies
- When you are ready to decorate, mix together the powdered sugar and milk in a medium bowl. The mixture should be thick but you should be able to pipe it. If it is too thin, add more powdered sugar. If it is too thick, add more milk.
- Transfer the frosting to a piping bag or a Ziploc bag with the end cut off. This will make it easier to put the frosting on the cake.
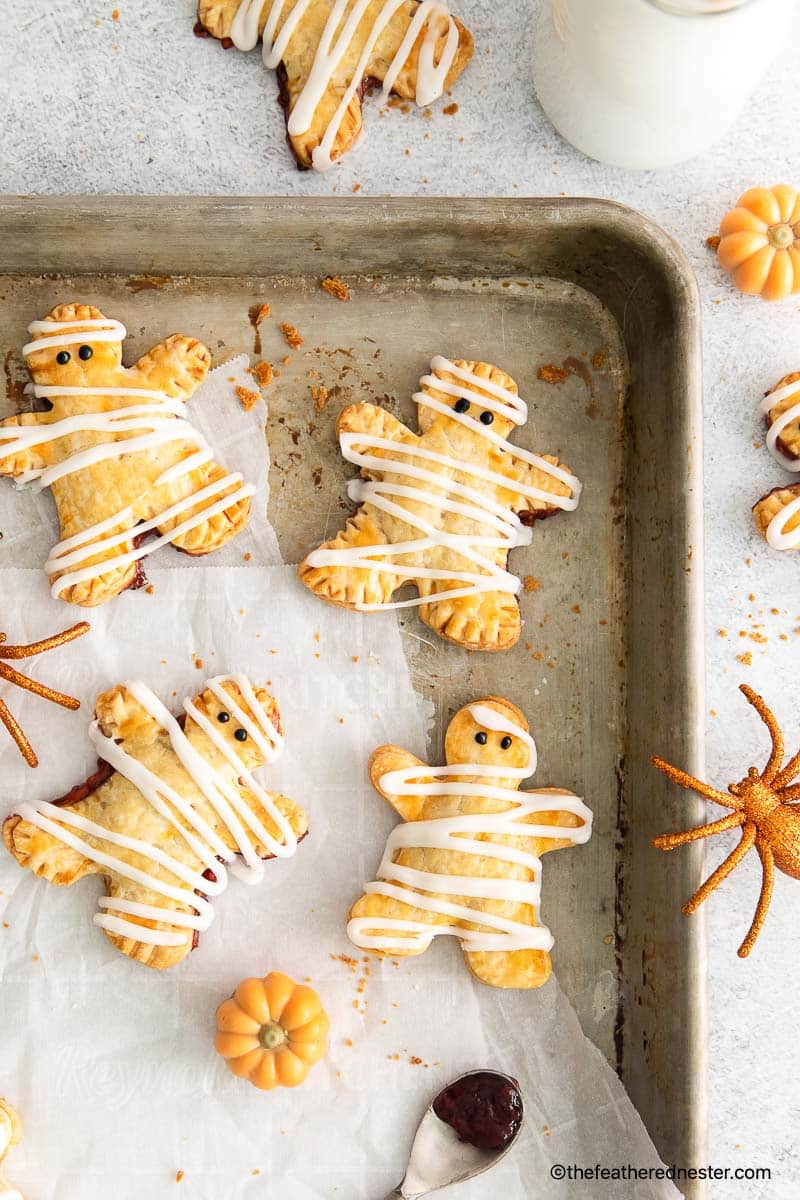
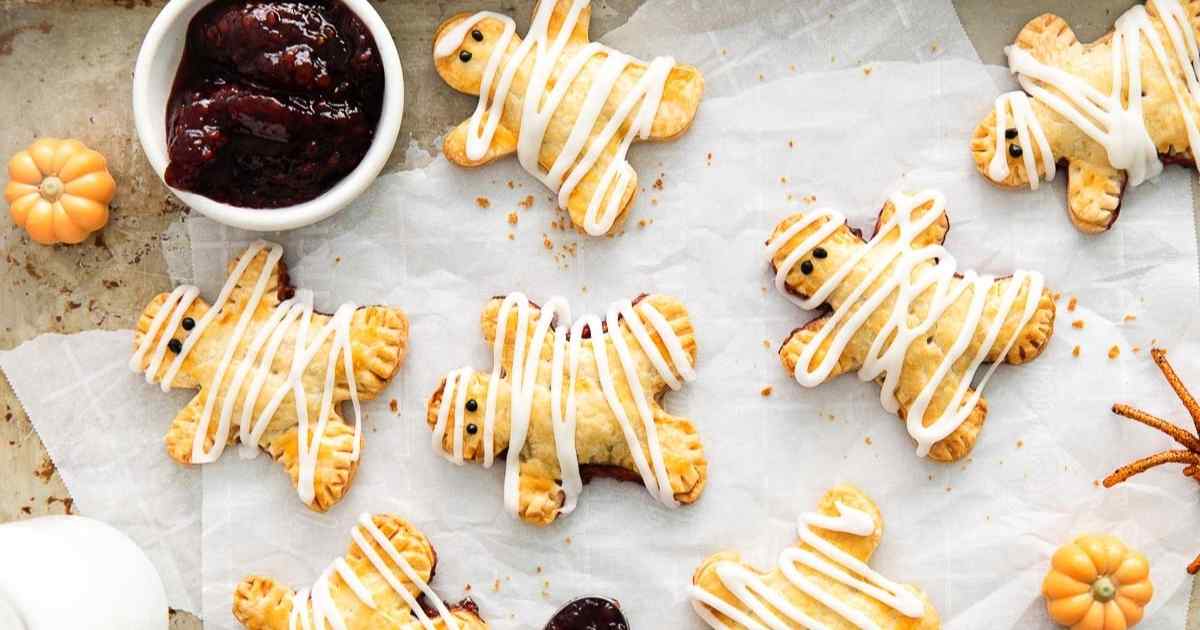
- Frost each mummy with a drizzle of icing.
- To make the eyes, mix any remaining frosting with black food coloring in a small bowl. Then transfer the frosting to a piping bag and pipe two small eyes on each mummy.
- Allow the frosting to set for about 20 minutes, and then enjoy. If you have any leftovers, store them in an airtight container in the fridge for up to two days.
We have more Halloween ideas for you! Try our Chex Mix Recipe with M&M’s, and Snack Mix for Halloween!
Serving Suggestions
Serve these mummy Halloween hand pies warm or at room temperature alongside other themed treats like monster cupcakes, caramel apples, or candy bark. Pair them with a fall punch or a kid-friendly apple cider to complete your Halloween spread. They also make a great addition to lunch boxes, party favor bags, or as a festive dessert following dinner. Add whipped cream or a small scoop of vanilla ice cream for an extra sweet touch if you’re serving them at home!
Recipe FAQs
A hand pie is a type of pastry pie that you can hold in your hands. A pasty (or pastie) has a thicker crust filled with sweet or savory fillings (like meats).
Typically, a hand pie combines a sweet fruit filling, such as mixed berries, with a pie crust. They are small enough to fit into the hand to eat. Turnovers are typically made with puff pastry, thin layered sheets of flakey dough, and filled with sweet or savory fillings. They are usually triangular shaped as if folded over.
Brush the edges of the pie crust with a beaten egg before adding the filling. This will help keep the filling and crust separate and prevent juice from seeping through. Also, crimp the edges of the pie crust cutouts to prevent the filling from running.
We do not recommend using fresh or frozen berries as filling for the hand pies. Frozen or fresh berries are too runny, unlike a thick mixed berry type jam.
Consider Making These Other Holiday Snack Recipes…
If you tried this halloween hand pies recipe or any other recipe on my website, please leave a 🌟 star rating and let me know how it went in the 📝 comments below. Thanks for visiting!

Halloween Hand Pies
Equipment
- 3" gingerbread man cookie cutter
- ziploc or piping bag
Ingredients
- 2 boxes refrigerated pie crusts 4 crusts total
- 1⁄3 cup red berry jam (any type of jam, like mixed berry, raspberry, cherry, blackberry, blueberry)
- 1 large egg beaten with a splash of water
- 1 1⁄4 cup powdered sugar
- 1-2 tablespoons milk as needed
Instructions
Baking the Hand Pies
- Preheat the oven to 375ºF and line two large baking sheets with parchment paper.
- Unroll the refrigerated pie crusts onto a very lightly floured surface and cut out as many mummies as you can (you should be able to get 10 per pie crust for a total of 40 mummies).
- (Optional) Gather all of the leftover pie crust together into a ball and roll it into a 1⁄8” thick rectangle. Cut out as many mummies as you can again (this time you should be able to get another 12 mummies).
- Place as many mummies as will fit on the baking sheet, making sure to leave at least an inch of space between each one.
- Fill the center of each mummy with 1-2 teaspoons of red berry jam.
- Lightly brush the egg wash around the edge of each mummy. Place another mummy on top and press the edges to seal in the jam. If you want to crimp the edges of each mummy with a fork, feel free to– but if you pinch the seams to seal in the filling, crimping isn’t required.
- Brush the top of each mummy with egg wash and then poke each mummy with a fork to create a vent.
- Bake for 13-15 minutes or until the mummies are golden brown.
- Allow the mummies to cool completely before frosting.
Frosting the Hand Pies
- When you’re ready to decorate, whisk together the powdered sugar and milk. The mixture should be thick but pipeable. If it is too thin, add a little more powdered sugar. If it is too thick, add a little more milk. Transfer the frosting to a piping bag or a Ziploc bag with the end cut off.
- Drizzle the frosting over each mummy.
- To make the eyes, place any remaining frosting in a small bowl and add one drop of black food coloring. Mix to combine and then transfer to a piping bag and pipe two small eyes on each mummy.
- Allow the frosting to set completely (about 20 minutes) and then enjoy. Store any leftovers in an airtight container in the fridge for up to two days.
Video

Notes
- For crispy mummy pies, ensure the berry jam filling is thick and not runny. Make sure to thoroughly drain any fresh berry jam before incorporating it into the pie crust.
- We’ve used second largest size from this set of cookie cutters: https://amzn.to/3vifu83
- We used refrigerated pie crust in this recipe, but you could use your favorite homemade crust.
- You could use any red berry jam in these hand pies– or mixed berry, cherry, strawberry, raspberry, or a combination.
- Egg helps seal the hand pies and helps them brown in the oven.
- Powdered sugar gives sweetness and structure to our frosting.
- Milk helps thin the frosting to our desired consistency.
- If you want to make it a vanilla frosting, feel free to add a small splash (about 1/8th teaspoon) of vanilla extract.
- Blackberry Hand Pies: use blackberry jam as a filling on your heart-shaped desserts. Or even use different kinds of berries in the filling, such as mixed berry, blueberry, Cookies White Chocolate and Raspberry, olallieberry, and easy strawberry cobbler for the handpies.
- Add a few drops of food coloring to the frosting to give the hand pies even more of a Halloween theme.
- Use different flavored jams in the center of the mummy pies. You could even use chocolate spread or peanut butter!
- Make a half batch of mummies and a half batch of ghosts. To make ghosts, simply cut out oval shapes from the pie crust and follow the same instructions. Alternatively, use our set of cookie cutters to create various spooky characters.
- Store any leftovers in an airtight container in the fridge for up to two days.

Janessa says
OMG, these are so cute! Such a great idea for Halloween.