
Just unwrapped an Instant Pot for Christmas? Or maybe yours has been sitting in the box for months because you’re not quite sure where to start (no judgment here!)? You’re not alone! I hear this from my Instagram followers all the time, and I totally get it. When I first got my Instant Pot, I felt intimidated too.
But here’s the thing: once you get past that first hurdle and actually use it, you’ll wonder how you ever cooked without it. It has honestly become my most-used kitchen appliance, and I want to help you feel confident using yours too.
Why I love my Instant Pot:
I can make the fluffiest mashed potatoes without hauling a heavy pot of boiling water to the sink. My rice turns out perfectly every single time with no sticky bottom or messy stovetop boil-overs. And on busy weeknights? I throw meat and potatoes together for an easy one-pot dinner that my whole family loves.
Here’s what you’ll learn in this guide:
- How to do the water test (your very first step)
- Understanding the key parts you actually need to know
- Natural release vs. quick release explained simply
- My 5 easiest beginner recipes to build your confidence
- Troubleshooting common issues like the dreaded “burn” notice
By the end of this guide, you’ll go from nervous beginner to confidently making your first delicious meal. Let’s get started!

Content Covered Here
The Instant Pot Water Test (Your First Step)
Before you cook anything in your pressure cooker, you need to do the water test. I know it might seem like an extra step that you want to skip, but trust me on this one. The water test serves two important purposes: it makes sure your pot is working properly, and it gives you a chance to learn how it works without the stress of potentially ruining dinner.
Think of it like a practice run. You’ll see how the pot comes to pressure, how long it takes, what the buttons do, and how to release the pressure safely. It’s way better to figure all this out with just water than with a pot full of food!
What You’ll Need:
- Your pressure cooker
- 3 cups of water
- About 20-30 minutes of time
Step-by-Step Instructions:
- Make sure the inner pot is inside the base. This sounds obvious, but you’d be surprised how easy it is to forget!
- Pour 3 cups of water into the inner pot. Just regular tap water is fine.
- Check that the sealing ring is properly in place under the lid. It should fit snugly in the groove. This is super important because if it’s not seated correctly, your pot won’t come to pressure.
- Place the lid on top and turn it to lock it in place. You’ll hear a little chime or feel it click. Line up the arrows on the lid and base.
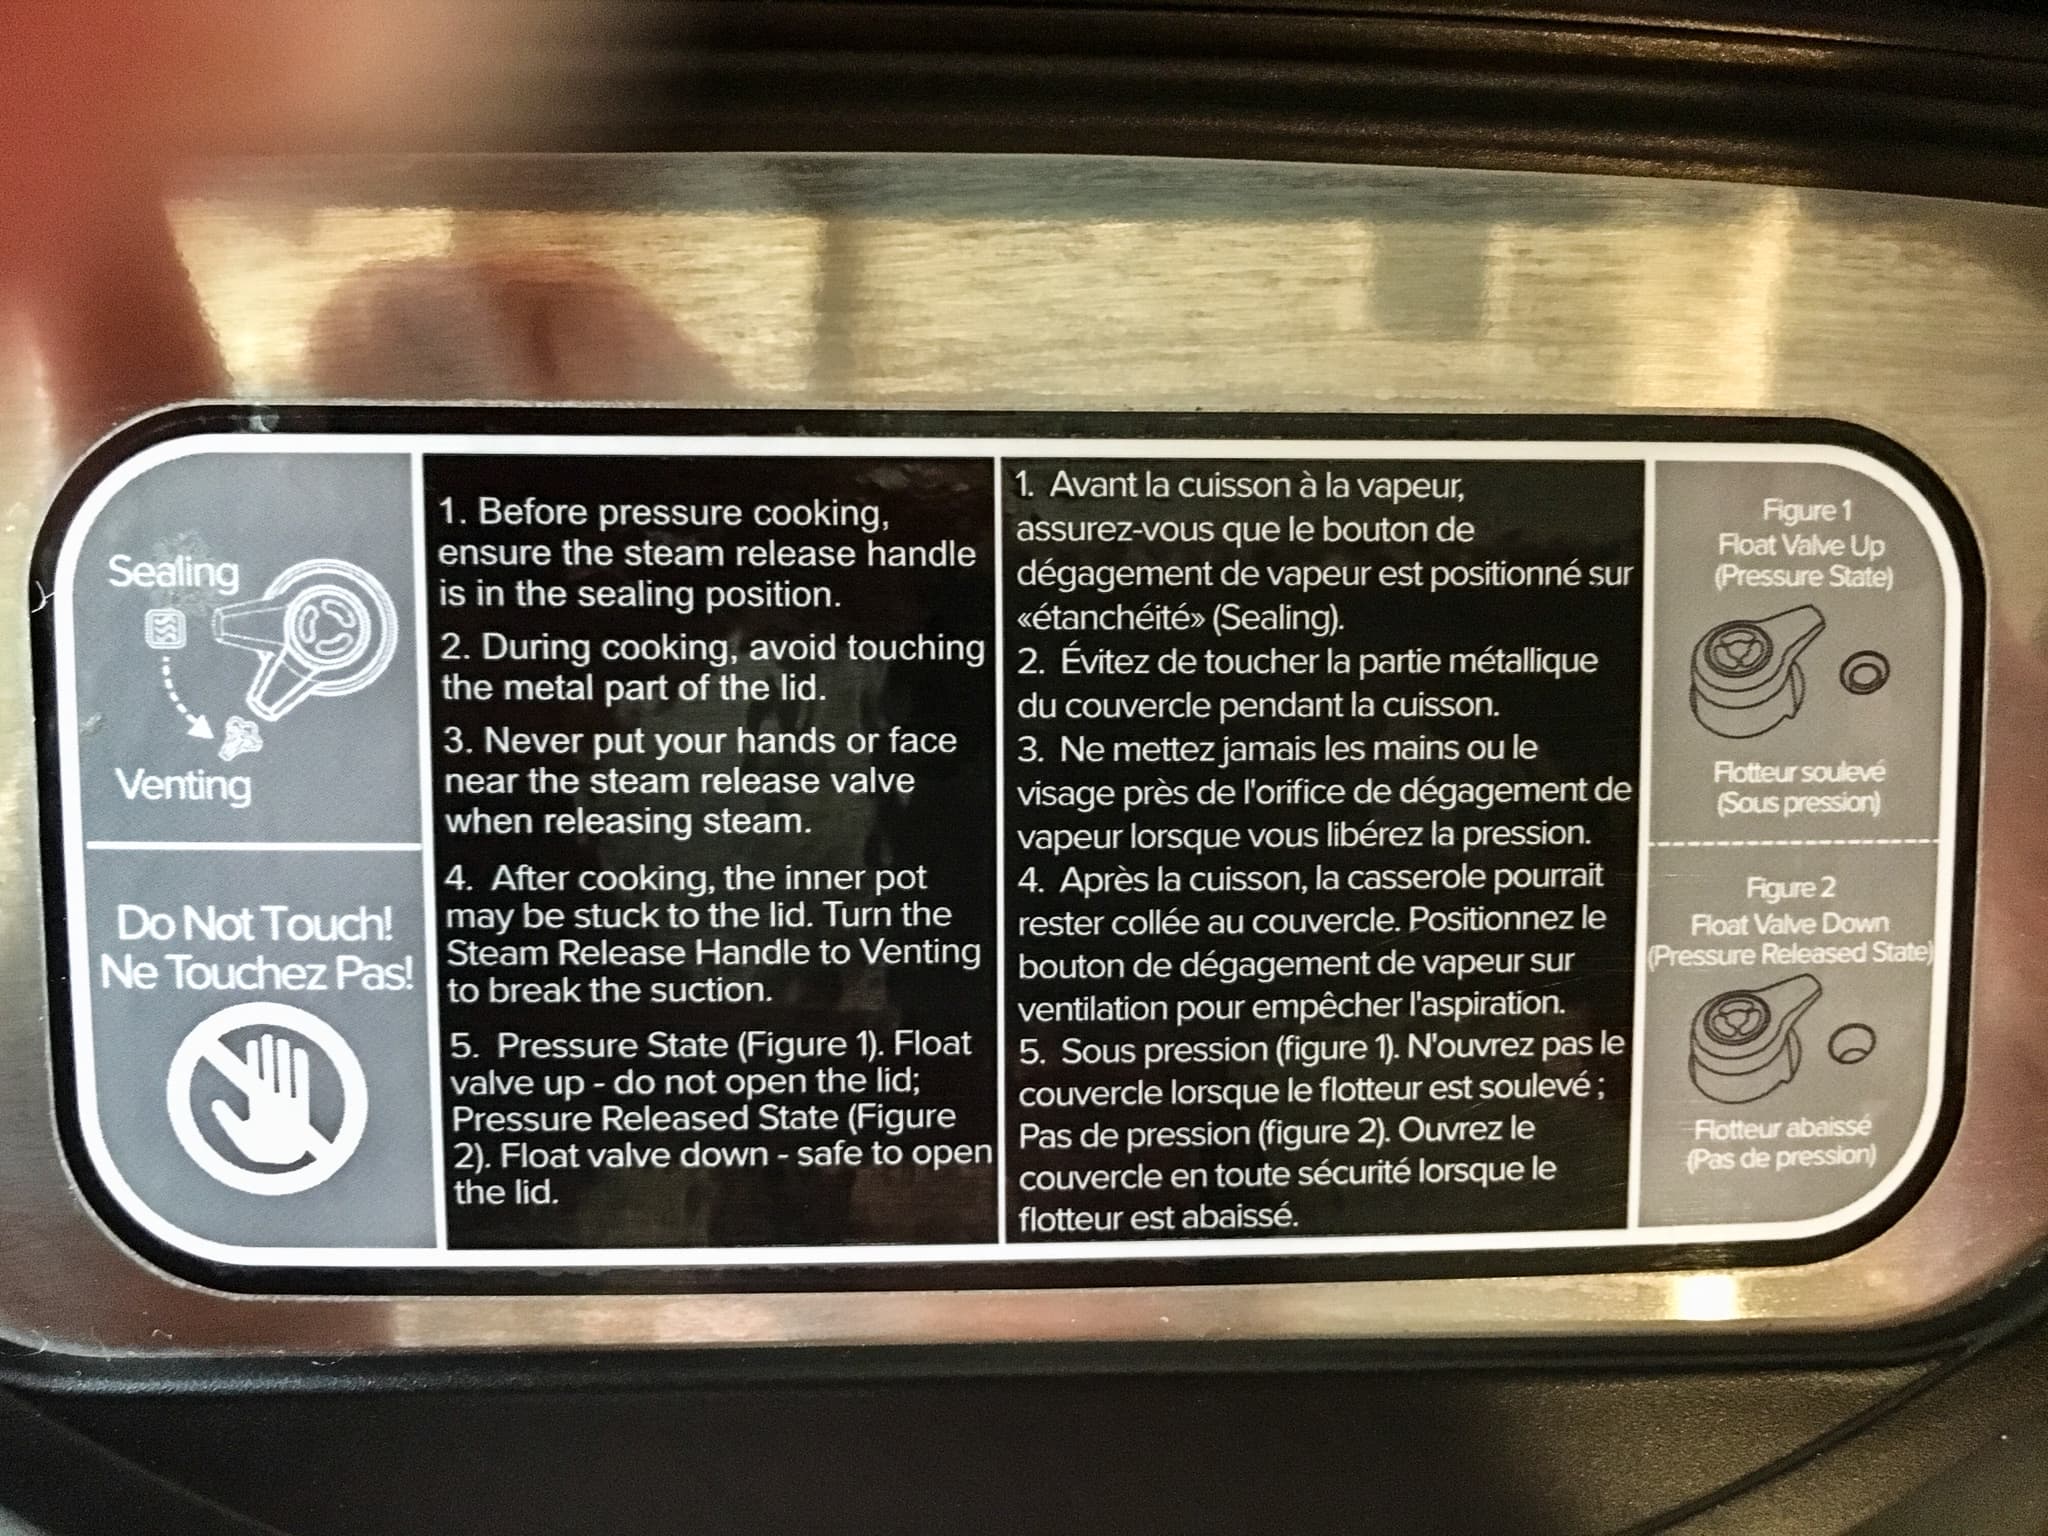
- Make sure the steam release valve on top is turned to “Sealing.” This is the little knob on top of the lid. If it’s set to “Venting,” your pot won’t pressurize.
- Press the “Pressure Cook” or “Manual” button. (Different models use different names for this button, but they do the same thing.)
- Set the time to 5 minutes using the plus or minus buttons.
- Now wait and watch what happens. The pot will take about 10-15 minutes to come to pressure. You’ll see “On” on the display, and eventually the float valve (that little metal pin) will pop up. Once the float valve is up, the pot is pressurized and the 5-minute countdown will begin.
- When the timer beeps, let it sit for 5 minutes. This is called a natural pressure release, and we’ll talk more about that in the next section.
- After 5 minutes, carefully turn the steam release valve to “Venting” using a long spoon or while wearing an oven mitt. Hot steam will shoot out, so keep your face and hands away from the valve! This is the quick release.
- Once the float valve drops down completely, it’s safe to open the lid. Turn the lid away from you when you open it so the steam doesn’t hit your face.
Congratulations! You just successfully used your Instant Pot for the first time. The scariest part is over. Now you know exactly what to expect when you’re actually cooking food.
What if something went wrong?
- Pot won’t come to pressure: Check that the sealing ring is in place and the valve is set to “Sealing”
- Steam leaking from the sides: The lid might not be locked properly, or the sealing ring needs to be reseated
- Taking forever to pressurize: This is normal! It can take 10-20 minutes depending on your model and how cold the water is
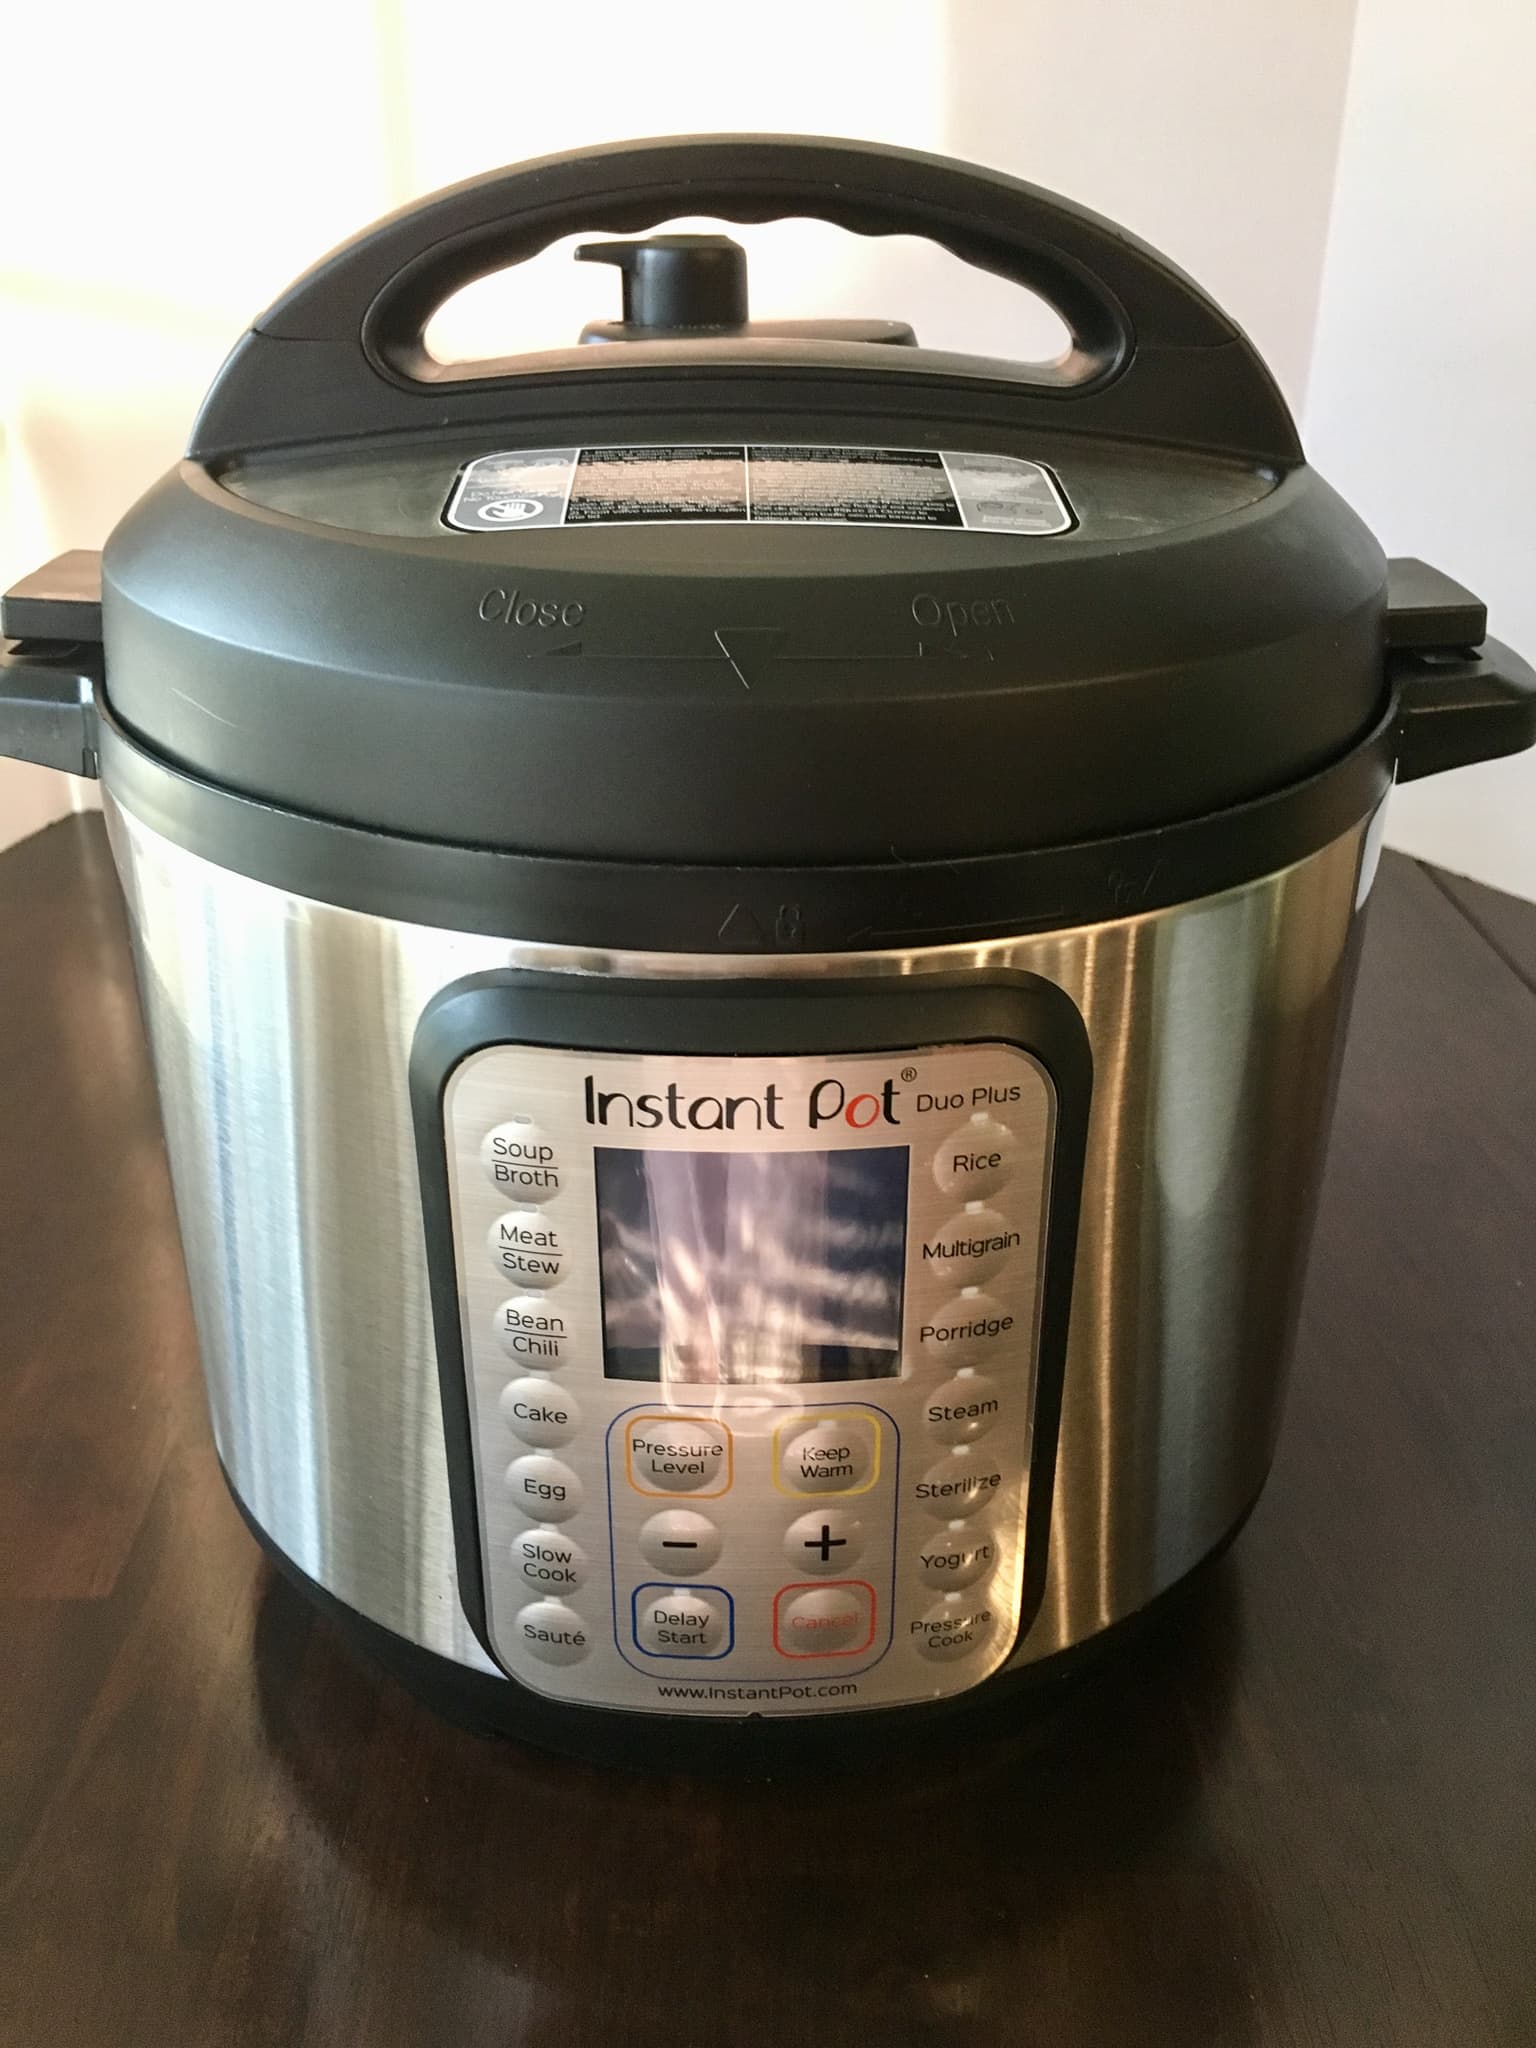
Key Parts of a Pressure Cooker
Before you start cooking, let’s get familiar with the key parts of your Instant Pot. Don’t worry, you don’t need to memorize everything! Just knowing these basics will make you feel much more confident.
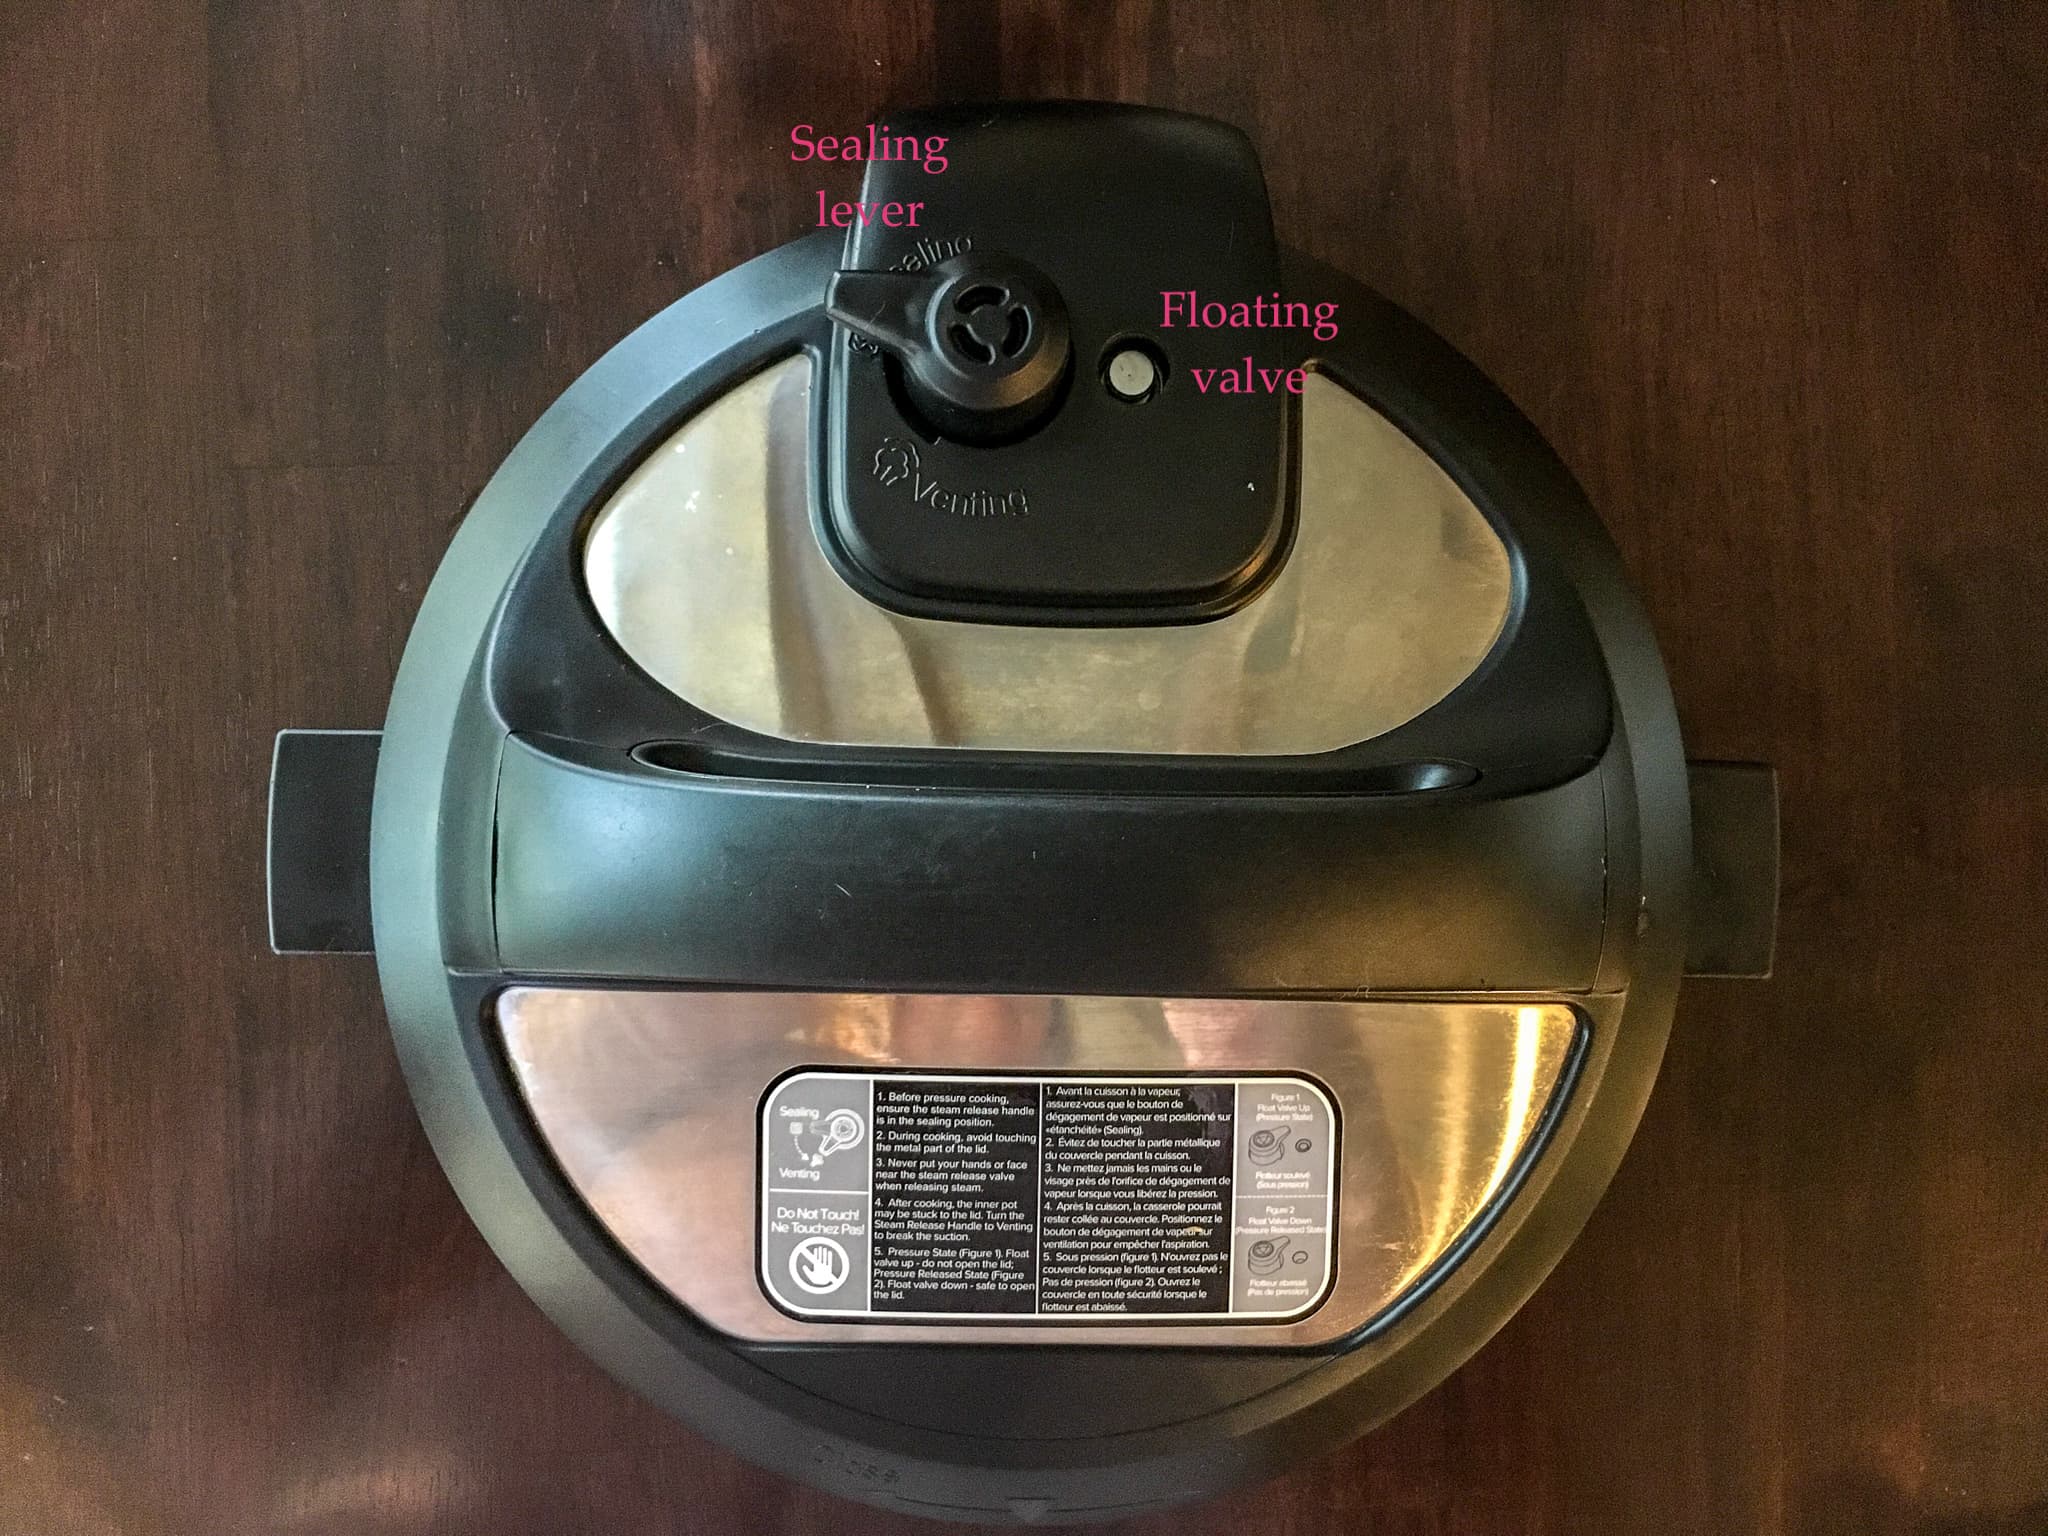
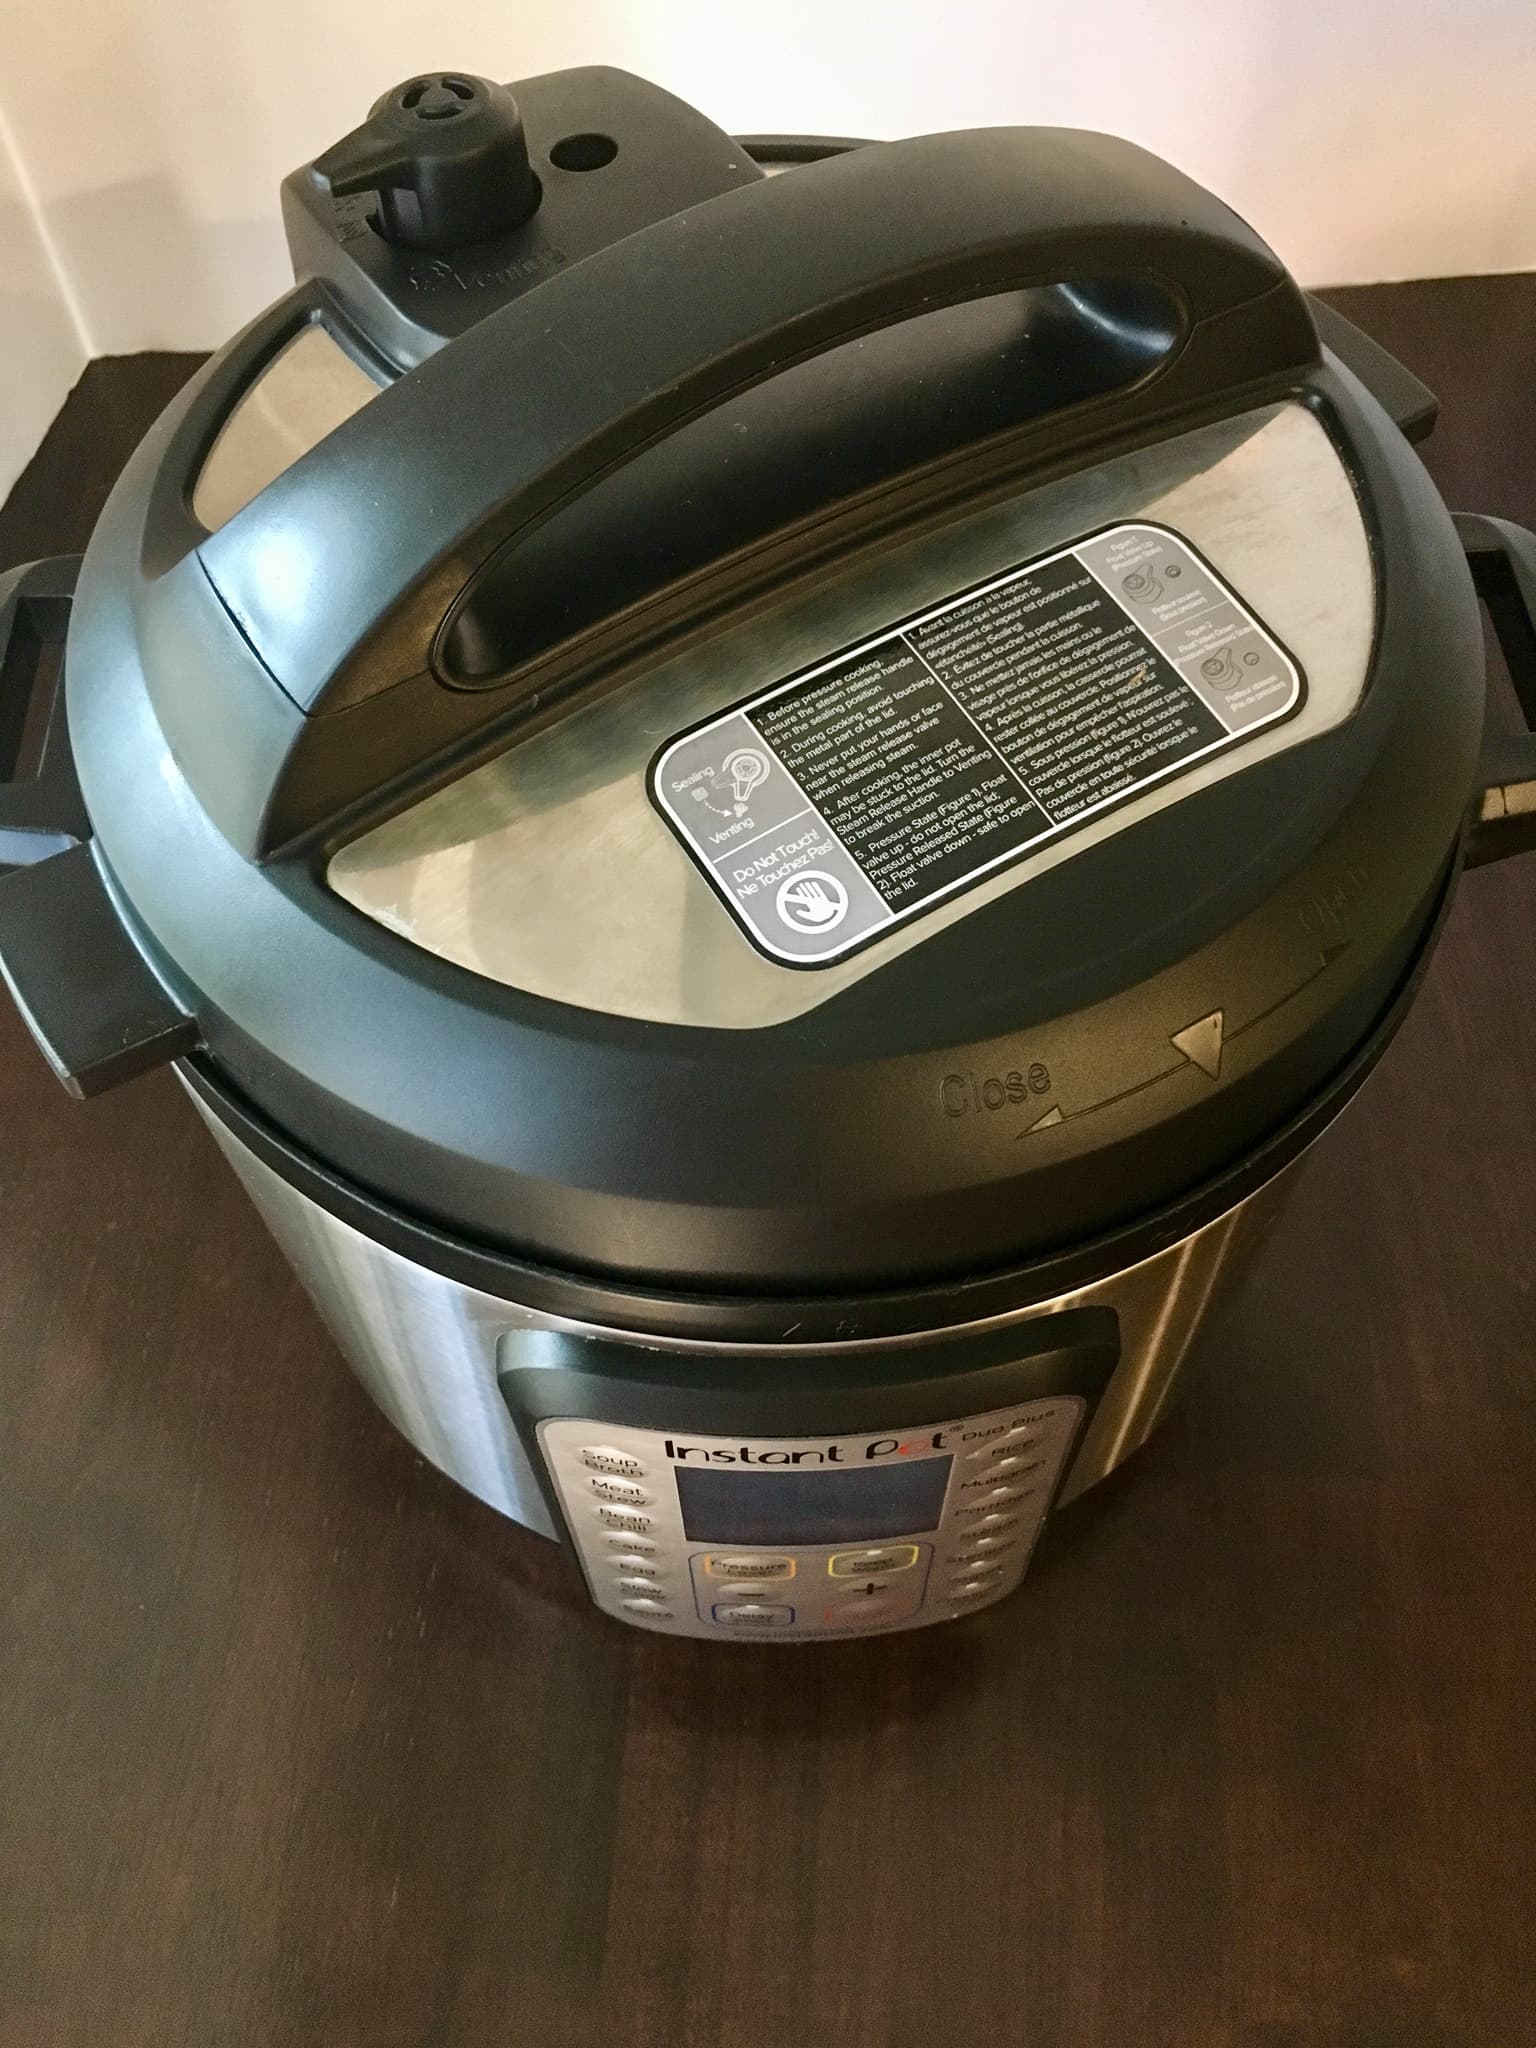
The Lid
Steam Release Valve: This is the lever on top of the lid marked “Sealing” and “Venting.” During pressure cooking, keep it set to “Sealing.” To do a quick release, move it to “Venting.”
Float Valve: This little metal pin on the lid pops up when the pot is pressurized and drops down when all the pressure is released. Never try to open the pressure cooker unless the float valve has completely dropped.
Important safety tip: Protect yourself when venting the pot. Use a long-handled spoon to turn the valve, and make sure the steam shoots away from you and anyone else nearby. The steam can be hot!
Interior Parts
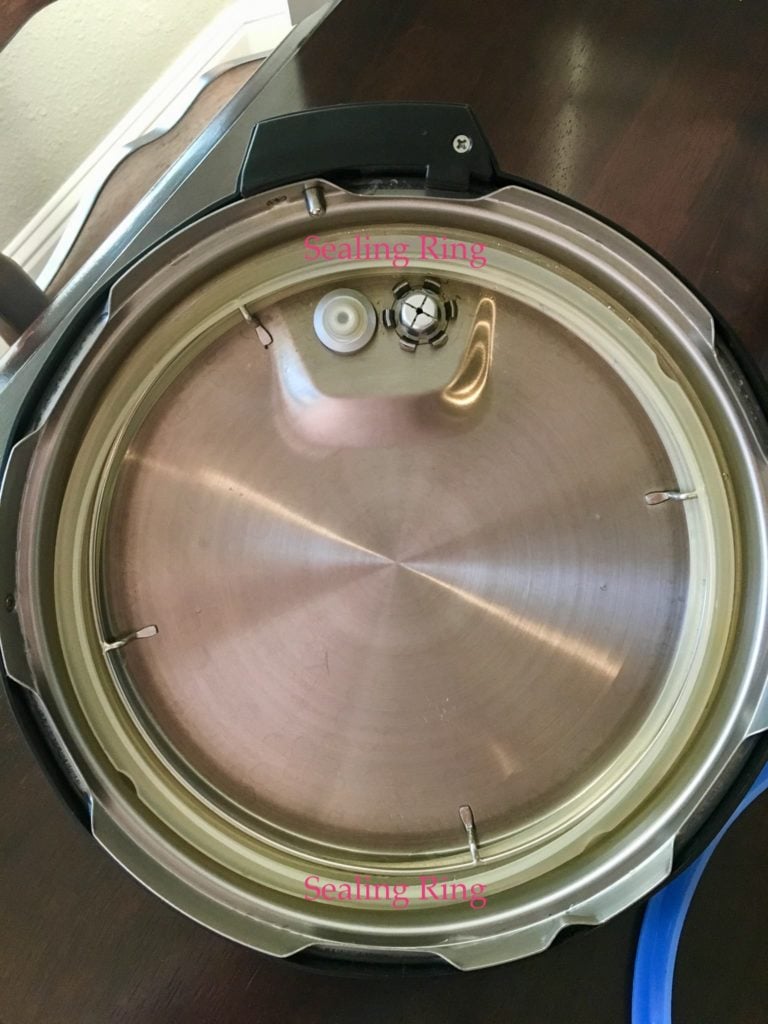
Sealing Ring: This silicone ring sits underneath the lid and creates an airtight seal. Check that it’s properly positioned in its groove every single time before you use your pressure cooker. If it’s not seated correctly, your pot won’t come to pressure.
Inner Pot: This is the removable stainless steel pot that sits inside the base. All your food goes in here. If you use your Instant Pot frequently, consider buying an extra inner pot so you always have a clean one ready!
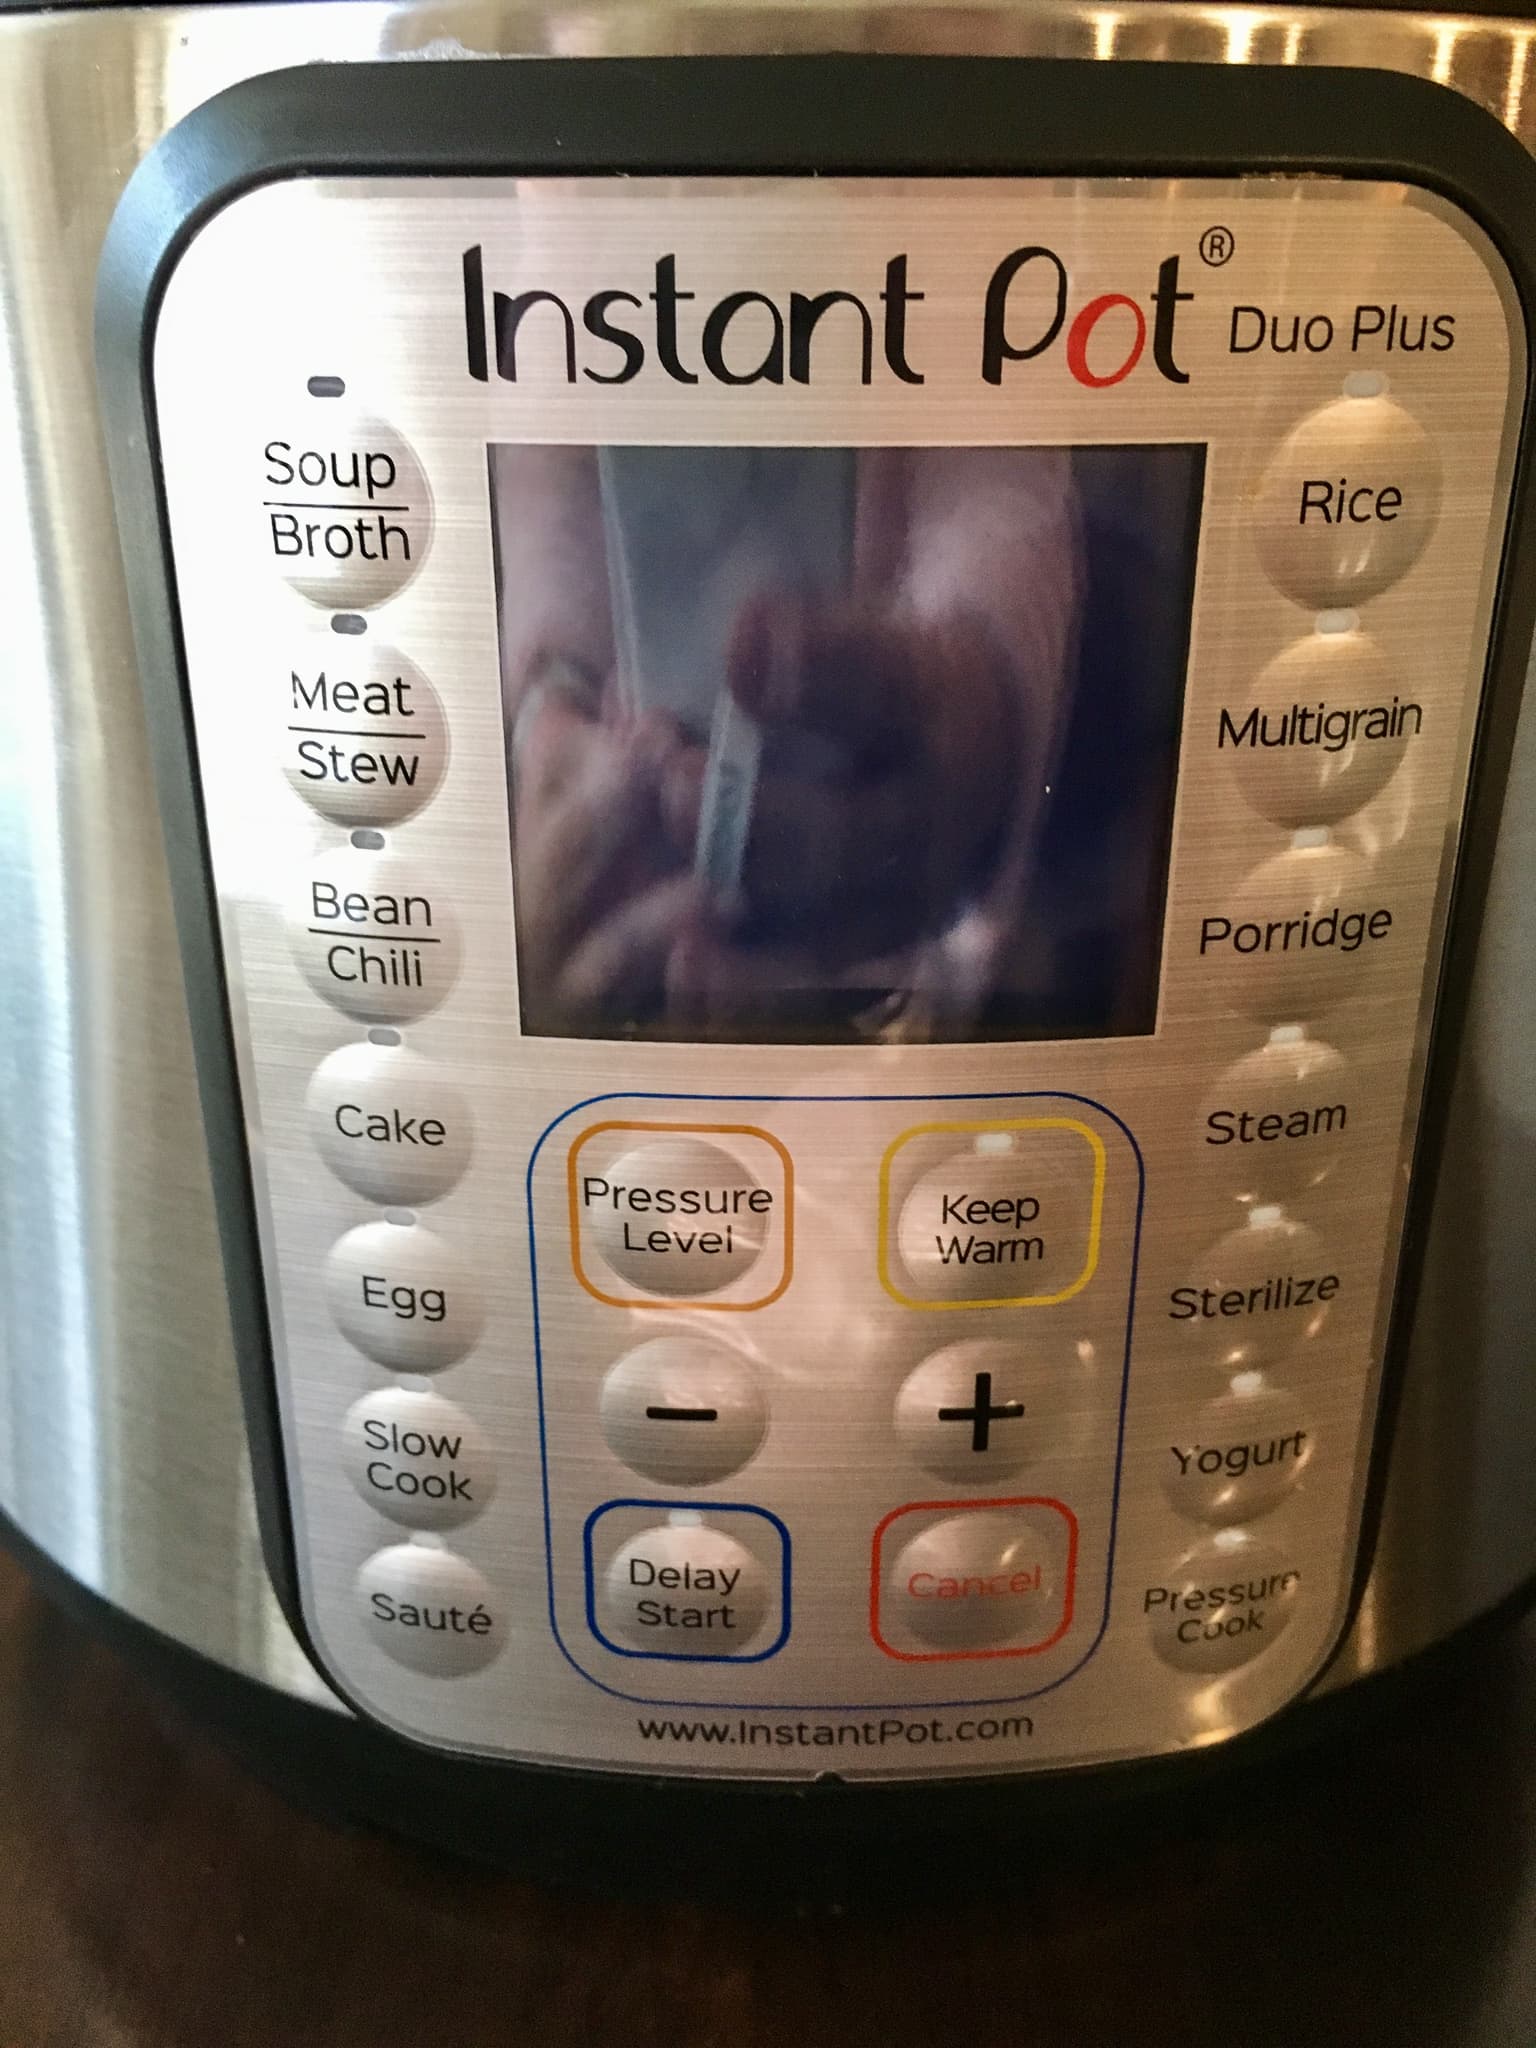
The Control Panel
Function Buttons: Your pressure cooker has various preset buttons (like Soup, Meat/Stew, Rice, etc.) and a Manual or Pressure Cook button.
🎯 TFN Pro Tip
Here’s my beginner tip: you can make almost any recipe using just the Manual/Pressure Cook button and adjusting the time. Don’t stress about all the preset buttons!
Cancel Button: Press this to stop any function and return to standby mode. You’ll need to hit Cancel before switching between functions (like going from Sauté to Pressure Cook).
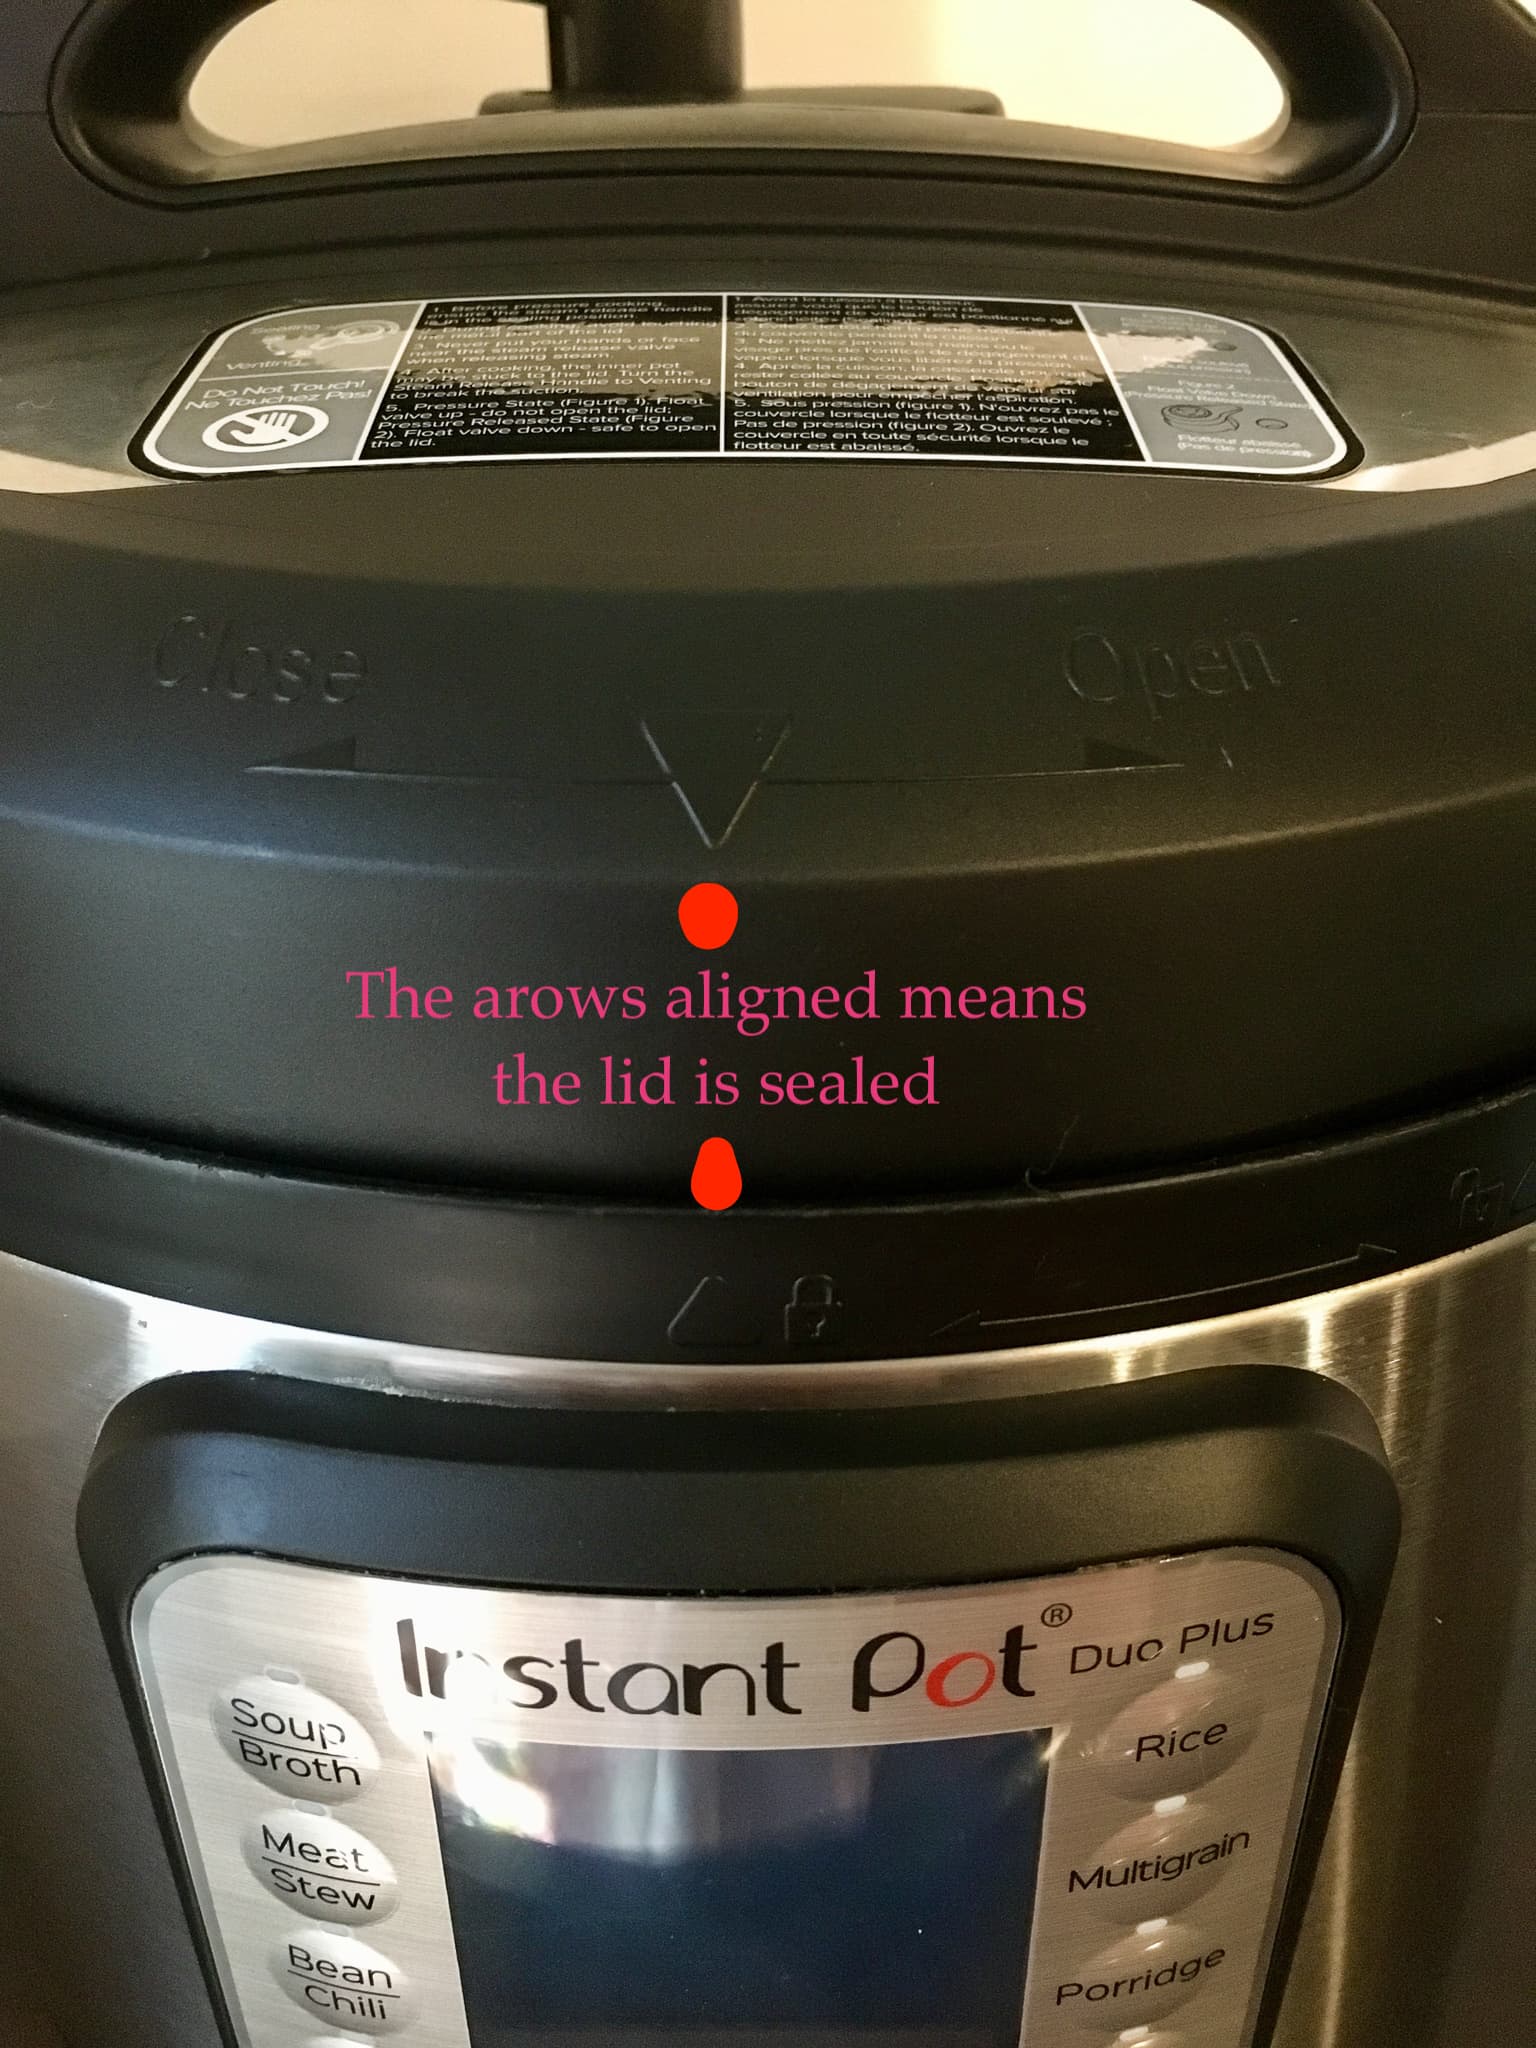
How to Lock the Lid
The lid placement can be a little tricky at first. Align it at an angle to the left, then it locks into place.
Place the lid on, then twist until you hear a chime or feel it click into place. The arrows should line up to show it’s locked.
Understanding Natural Pressure Release
One of the most confusing things for Instant Pot beginners is understanding natural pressure release. But once you get it, it’s actually really simple!
What is Natural Pressure Release?
Natural pressure release (often abbreviated as NPR) simply means you let the pot sit and release pressure on its own after the cooking cycle ends. You don’t touch anything. You don’t turn any valves. You just let it do its thing.
Here’s what happens: when the timer beeps and your food is done cooking, the Instant Pot automatically switches to “Keep Warm” mode. The pressure inside slowly decreases as the pot cools down. You’ll see the float valve (that little metal pin on the lid) gradually drop as the pressure releases. Once the float valve is completely down, it’s safe to open the lid.
How Long Does Natural Release Take?
It varies, but typically takes anywhere from 10 to 25 minutes depending on how much food is in your pot. A pot full of soup will take longer than a pot with just a few chicken breasts. The more liquid and food you have, the longer it takes.
Here’s my personal tip: I usually start the natural release while I’m setting the table, making a salad, or getting side dishes ready. By the time everything else is prepped, it’s ready to open.
When Should You Use Natural Release?
Use natural pressure release for:
- Soups and stews (prevents hot liquid from sputtering out)
- Large cuts of meat (helps them stay tender and juicy)
- Beans and grains (prevents them from splitting or getting mushy)
- Anything with a lot of liquid (safer than quick release)
- Foamy foods like pasta or oatmeal
Why Does This Matter?
Natural release serves two purposes. First, it’s safer for foods with lots of liquid because the pressure drops gradually instead of all at once. Second, it actually continues to gently cook your food, which is perfect for tough cuts of meat that benefit from that extra time.
You’ll see recipes that say things like “natural release for 10 minutes, then quick release” or “full natural release.” This just tells you how long to let it sit before manually releasing any remaining pressure. We’ll talk about quick release in the next section!

Natural Release vs Quick Release Comparison
Now that you understand natural release, let’s talk about the other method: quick release. Knowing when to use each one is key to Instant Pot success!
What is Quick Release?
Quick release (QR) is when you manually turn the steam release valve from “Sealing” to “Venting” as soon as the cooking time ends. This forces the pressure out quickly, and you’ll see a big jet of steam shooting straight up from the valve. It usually takes just 1-2 minutes for all the pressure to release.
Important safety note: Always use a long spoon or wear an oven mitt when turning the valve to venting. Keep your face, hands, and body away from the steam. It’s HOT and can burn you!
When to Use Each Method:
Use Natural Release for:
- Soups, stews, and chili
- Large cuts of meat (roasts, whole chickens, pork shoulder)
- Dried beans and lentils
- Rice and grains
- Anything with a lot of liquid
- Foods that foam (pasta, oatmeal, split peas)
Use Quick Release for:
- Vegetables (so they don’t overcook)
- Delicate proteins like fish or shrimp
- Eggs
- When you need to add ingredients partway through cooking
- When you’re in a hurry and the recipe allows it
The Combo Method:
Many recipes use both! You’ll often see instructions like “natural release for 10 minutes, then quick release remaining pressure.” This gives you the benefits of natural release (safety, continued cooking) while still speeding things up.
Quick Visual Guide:
| Method | Time | Best For | Safety |
|---|---|---|---|
| Natural Release | 10-25 min | Meats, soups, beans | Very safe, no steam exposure |
| Quick Release | 1-2 min | Vegetables, eggs, fish | Use caution, hot steam shoots out |
| Combo (10 min + QR) | ~12 min | Many recipes | Balances safety and speed |
Common Instant Pot Terms
Most pressure cooking recipes use specific terminology. Here are the terms you’ll see most often and what they actually mean:
We already covered Natural Pressure Release (NPR) and Quick Pressure Release (QR) above.
Sauté: This function lets you brown meat, sauté vegetables, or simmer sauces directly in the pot before or after pressure cooking. It works just like cooking on your stovetop.
High Pressure: Most recipes use this setting. It cooks at 10.2-11.6 psi (pounds per square inch).
Low Pressure: Used for more delicate foods. It cooks at 5.8-7.2 psi. You’ll use this less often as a beginner.
Pot-in-Pot (PIP): This method lets you cook multiple dishes at once by placing food in an oven-safe container on a trivet or rack inside the Instant Pot, keeping it separate from the liquid below. Great for making rice and a main dish together!
Manual/Pressure Cook: These buttons do the same thing on different pressure cooker models. This is your go-to button for most recipes.
Keep Warm: After cooking, the pressure cooker automatically switches to this mode to keep your food warm until you’re ready to eat.
Now you’re fluent in Instant Pot language!
Beginner Tips
Here are my top tips to set you up for success in your pressure cooking journey:
Start with simple recipes. Don’t try to tackle a complicated dish right away! Stick to straightforward recipes like the ones I shared earlier: rice, mashed potatoes, shredded chicken, or simple soups. Build your confidence first.
Always add enough liquid. Your pressure cooker needs at least 1 cup of thin liquid (water, broth, wine) to come to pressure. The 3 quart needs 3/4 cup, and the 8 quart needs 1 1/4 cups. Thick liquids like tomato sauce or cream don’t count toward this minimum because they don’t create steam.
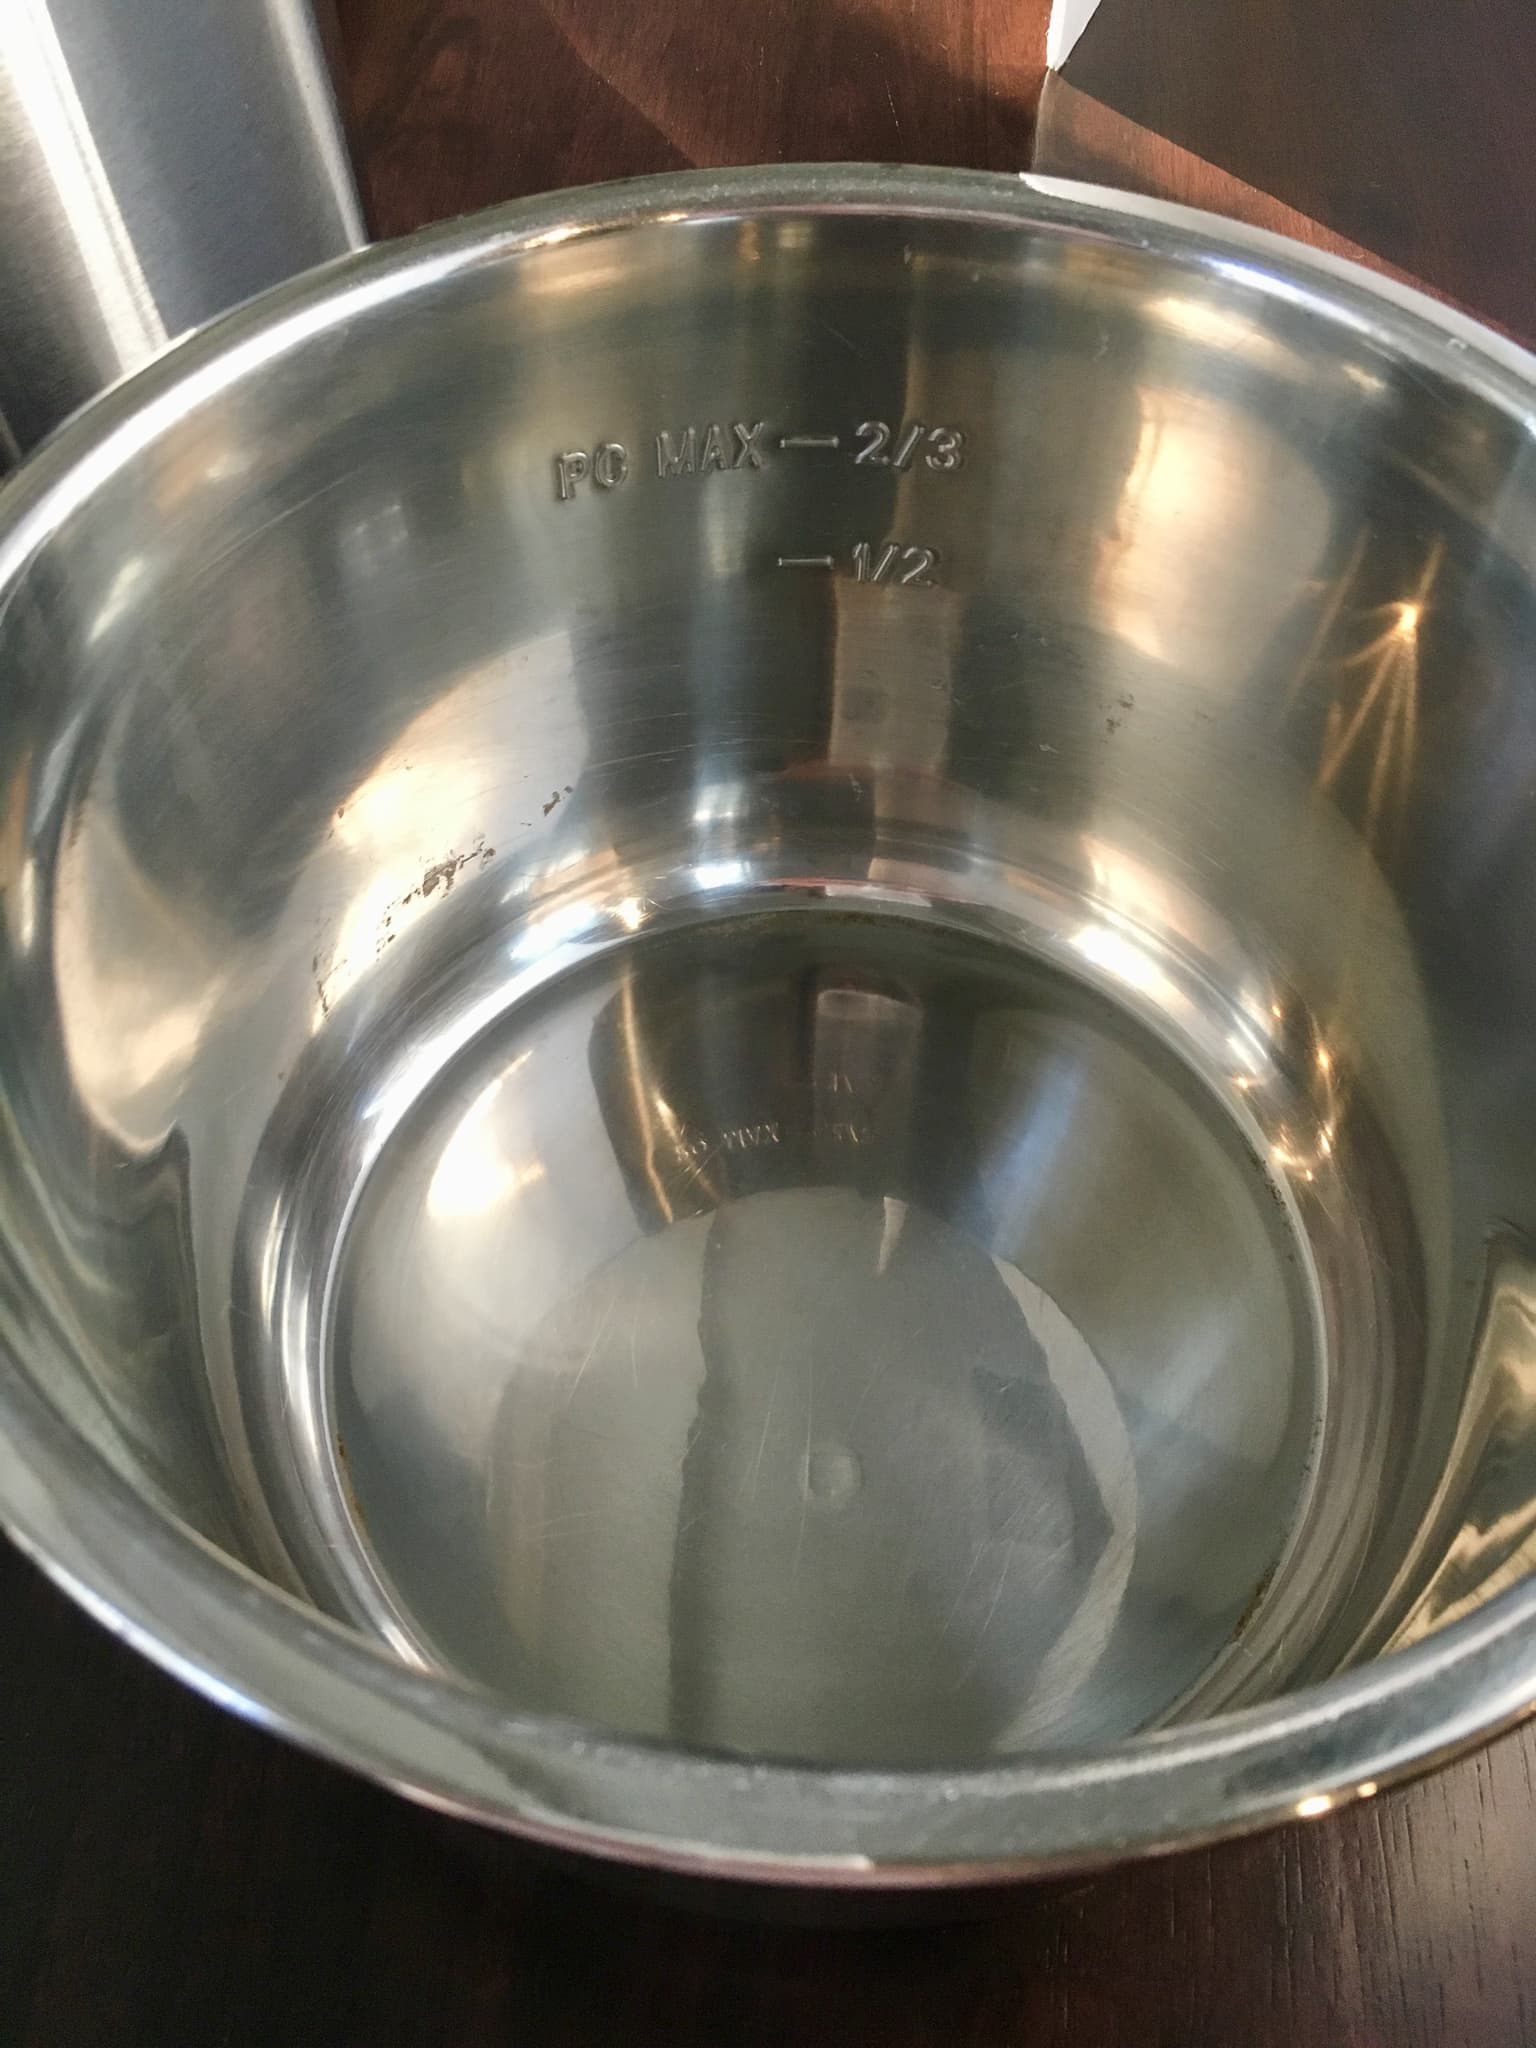
Don’t overfill the pot. Never fill your pot more than 2/3 full. For foods that expand or foam (like rice, beans, or pasta), only fill it halfway. Overfilling can clog the valve and prevent proper pressurization.
Be patient with the timing. Remember that the cooking time in a recipe is just the pressure cooking time. You need to add 10-20 minutes for the pot to come to pressure before cooking starts, plus time for pressure release afterward. Your “20-minute” recipe might actually take 40-45 minutes total.
Use the right insert size. Make sure you’re using the inner pot that came with your specific Instant Pot model. A 6-quart pot for a 6-quart base, an 8-quart pot for an 8-quart base, and so on.
Don’t peek! Resist the temptation to open the lid to check on your food before the cooking time is done. Trust the process and let the Instant Pot do its job.
What is a Pressure Cooker?
Now that you’ve used your pressure cooker a bit, you might be wondering: how does this thing actually work? Understanding the science makes you a better cook!
First, a quick clarification: Instant Pot is actually a brand name, just like Crock Pot is a brand of slow cooker. Your Instant Pot is an electric pressure cooker with lots of extra functions built in.
Here’s how pressure cooking works:
A pressure cooker is a sealed pot with a valve that controls steam pressure inside. When you lock the lid and turn the valve to “Sealing,” the pot becomes airtight. As it heats up, the liquid inside turns to steam, which raises the pressure.
This high-pressure steam does two amazing things:
1. Raises the boiling point of water. Normally, water boils at 212°F. But under pressure, the boiling point can reach as high as 250°F. This higher temperature cooks food much faster than traditional methods.
2. Forces liquid into the food. The pressure pushes moisture deep into ingredients, which is why tough cuts of meat become fall-apart tender in a fraction of the usual time. This is also why your mashed potatoes turn out so incredibly fluffy!
The flavor bonus: The extra-high heat of pressure cooking promotes caramelization and browning, creating deep, complex flavors that you don’t get from regular steaming or boiling. This is why Instant Pot meals taste like they’ve been simmering for hours when they’ve only cooked for minutes.
Pretty cool, right?
My 5 Easiest Instant Pot Recipes for Beginners
After years of pressure cooking (and teaching hundreds of people how to use theirs), these are the recipes I recommend every beginner start with. They’re foolproof, delicious, and will help you build confidence with your new appliance. Plus, once you master these basics, you’ll have go-to recipes you’ll make over and over again!
1. Perfect Instant Pot Rice
This is hands-down my favorite way to make rice, and it’s the perfect beginner recipe because it’s nearly impossible to mess up. The secret? We sauté the rice for a few minutes first, which prevents sticking and creates incredibly fluffy grains every single time.
No more rice stuck to the bottom of the pot. No more messy stovetop boil-overs. No more guessing if you added the right amount of water. Just perfect, fluffy rice that turns out great whether you’re making white rice, brown rice, or jasmine rice.

2. Ultra-Fluffy Mashed Potatoes
This recipe changed how I make mashed potatoes forever, and it’s become one of my most popular Instant Pot recipes for a reason. There’s no heavy pot of boiling water to carry to the sink, no risk of burns from splashing water, and the pressure cooking creates the fluffiest texture you’ve ever tasted.
Here’s what makes this recipe special: my no-drain method uses way less butter and cream than traditional recipes without sacrificing any flavor. The potatoes come out so creamy and delicious, and you’ll save yourself from all that heavy lifting. Trust me, once you make mashed potatoes this way, you’ll never go back to the stovetop!

3. Instant Pot Shredded Chicken
If you only learn one Instant Pot recipe, make it this one. This simple shredded chicken is incredibly versatile and saves you so much time during busy weeks. You can use it in tacos, sliders, enchiladas, salads, soups, or casseroles. It’s basically a blank canvas for weeknight dinners!
The chicken comes out perfectly tender and juicy every time, and the best part? You can make a big batch, freeze portions, and have ready-to-go protein for multiple meals. It’s the ultimate meal prep recipe for beginners.
We have recipes for chicken tacos, BBQ chicken sliders, and creamy chicken enchiladas that all use this shredded chicken as the base!

4. Instant Pot Pork Tenderloin and Potatoes
Ready for your first complete one-pot dinner? This recipe is perfect because everything cooks together with minimal prep. You’ll have tender, flavorful pork tenderloin with perfectly cooked potatoes all in one pot, which means less cleanup and more time enjoying dinner with your family.
This is the kind of recipe that makes you fall in love with your Instant Pot. It feels like a fancy meal, but it’s actually incredibly simple. The pork stays juicy, the potatoes soak up all the delicious flavors, and you’ll look like a cooking genius!

5. Instant Pot Pozole (Chicken Posole)
Once you’ve mastered the basics, try this recipe! Traditional pozole takes hours of simmering on the stove, but the Instant Pot makes it quick and easy without sacrificing any of that deep, rich flavor. This Mexican soup is absolutely delicious, loaded with hominy, tender chicken, and flavorful broth.
This recipe will show you how the Instant Pot can transform traditionally time-consuming dishes into weeknight-friendly meals. Plus, it’s a crowd-pleaser that’s perfect for feeding a group or meal prepping for the week. So good!

Why Start With These Recipes?
Each of these recipes teaches you something different:
- Rice teaches you basic pressure cooking and timing
- Mashed potatoes shows you how pressure cooking creates amazing texture
- Shredded chicken builds your confidence with meat
- Pork tenderloin and potatoes introduces you to one-pot meals
- Pozole demonstrates how to tackle more complex flavors
Once you’ve tried a few of these, you’ll be ready to explore the dozens of other Instant Pot recipes on my site!
One-Pot Instant Pot Dinners
One of my favorite things about pressure cooking is how easy it is to make complete one-pot dinners. You can throw proteins and vegetables together, set it, and come back to a full meal with minimal cleanup. No juggling multiple pots and pans on the stove, no timing different components perfectly. Just dump everything in, press start, and let the it do the work.
This is especially great on busy weeknights when you’re short on time and energy. The pork tenderloin and potatoes I mentioned above is a perfect example, but we have so many more options! From hearty beef stews to chicken and potato dishes to comforting soups, there’s a one-pot dinner for every taste.
The best part? These meals taste like you’ve been cooking all day. The pressure cooking intensifies flavors and makes everything tender and delicious. Your family will think you spent hours in the kitchen when really, most of your time was hands-off.
Ready to try more one-pot meals? Browse our collection of easy Instant Pot dinners that come together in one pot, but let me share a few of my favorite here:


Troubleshooting Common Beginner Problems
Let me address the two biggest concerns I hear from Instant Pot beginners, plus a few other common issues you might run into.
“I’m Scared to Use It!”
This is the number one thing I hear from my Instagram followers, and I totally understand. The Instant Pot can feel intimidating, especially if you’ve heard stories about old-fashioned pressure cookers from decades ago. But here’s the truth: modern pressure cookers have multiple safety features built in that make them incredibly safe to use.
The lid won’t even let you open it if there’s pressure inside. The pot won’t come to pressure if the lid isn’t locked correctly. There are backup valves and sensors everywhere. You’d have to actively try to mess it up, and even then, the safety mechanisms would stop you.
My advice? Just do the water test. That’s it. Once you see how it works with just water, that fear melts away. You’ll realize it’s not scary at all, it’s actually easier and safer than a pot of boiling water on your stovetop!
The Dreaded “Burn” Notice
This is the most common error message beginners see, and it’s usually an easy fix. The “Burn” notice appears when the Instant Pot’s sensor detects that food is sticking or starting to burn on the bottom of the pot.
Why it happens:
- Not enough liquid in the pot (you need at least 1 cup for a 6 quart)
- Ingredients like tomato sauce or thick sauces are sitting directly on the bottom
- The bottom of the inner pot wasn’t scraped well after sautéing
How to prevent it:
- Always add your liquid first, directly to the bottom of the pot
- If using thick sauces (like tomato sauce or BBQ sauce), layer them on top of your other ingredients, don’t stir them in
- After using the sauté function, deglaze the bottom by scraping up any browned bits with a wooden spoon before pressure cooking
- Make sure you’re using enough thin liquid (broth, water, etc.)
- Keep the bottom of your pot shiny and clean. Here’s a video showing how to clean your pot – it just takes a minute!
If you get the burn notice:
- Hit “Cancel” immediately
- Do a quick release (carefully!)
- Open the pot and check the bottom
- Scrape off any stuck bits of food so the bottom of the pot is smooth, and add more liquid if needed
- Restart the cooking process
Pot Won’t Come to Pressure
This usually means steam is escaping somewhere it shouldn’t be.
Check these things:
- Is the steam release valve set to “Sealing”? (Most common culprit!)
- Is the sealing ring properly seated in the lid?
- Is the float valve able to move freely?
- Is the lid completely locked in place?
Steam Leaking from the Sides
If you see steam coming from around the edges of the lid, the sealing ring probably isn’t seated properly. Take off the lid, remove the sealing ring, and snap it back into place, making sure it’s tucked into the groove all the way around.
Food Isn’t Cooked All the Way
Remember that the time on the display is just the pressure cooking time. The pot needs 10-20 minutes to come to pressure first, and that’s when a lot of the cooking actually happens. If your food isn’t done, just add a few more minutes of pressure cooking time and try again. You’ll get a feel for timing as you cook more recipes!
The good news? Most of these issues are one-time learning experiences. Once you figure them out, they rarely happen again!
Frequently Asked Questions
Yes! I know it seems like an unnecessary extra step, but the water test is the best way to learn how your Instant Pot works without the stress of potentially ruining dinner. It only takes about 20 minutes, and it will make you so much more confident when you cook your first real meal. Think of it as a practice run that teaches you what to expect.
It usually takes 10-20 minutes for the pressure cooker to pressurize, depending on how much food and liquid is in the pot. The more food and the colder the ingredients, the longer it takes. This is normal! The display will show “On” while it’s coming to pressure, then the actual cook time countdown will begin once it’s pressurized.
The most common reasons are: (1) the steam release valve is set to “Venting” instead of “Sealing,” (2) the sealing ring isn’t properly seated in the lid, or (3) the lid isn’t fully locked in place. Check all three of these things first, and 99% of the time, that will solve the problem!
No, you cannot open the lid while the pot is pressurized and would be dangerous to do so. The good news is the Instant Pot won’t even let you try! The lid physically cannot be opened until all the pressure is released and the float valve drops down completely. This is one of those safety features that makes modern pressure cookers so safe to use.
This is a popular method for making perfect hard boiled eggs: cook at High Pressure for 5 minutes, let naturally release for 5 minutes, then place eggs in an ice bath for 5 minutes. It’s just an easy way to remember the timing!
You need at least 1 cup of thin liquid (water, broth, etc.) for the Instant Pot to come to pressure. Thicker liquids like tomato sauce or cream don’t count toward this requirement because they don’t create enough steam. When in doubt, add a cup of broth or water to be safe. If you’re using an 8 quart pot, you need a little more ( 1 1/4 cups) and for a 3 quart a little less (3/4 cup).
Yes! This is one of the best features of the Instant Pot. You can cook frozen chicken breasts, frozen ground beef, and other frozen meats without thawing first. Just add a few extra minutes to the cooking time. It’s a lifesaver for those nights when you forgot to take something out of the freezer!
If your Instant Pot is brand new, it might have a slight plastic or chemical smell from the manufacturing process. Run the water test a couple of times to help eliminate this. The sealing ring also absorbs odors from whatever you cook, which is why many people buy extra sealing rings to keep separate for sweet and savory dishes. Instead, I just store the lid of my pressure cooker turned upside down and that lets all odors dissipate from the sealing ring.
There’s no difference! Different Instant Pot models just use different names for the same button. Older models say “Manual” and newer models say “Pressure Cook,” but they both do the exact same thing. Don’t worry if your model has one or the other.
You can increase recipes, but remember never to fill the Instant Pot more than 2/3 full (or 1/2 full for foods that expand or foam, like rice or beans). Doubling a recipe doesn’t double the cooking time, though! The pressure cooking time usually stays the same, but it will take longer for the pot to come to pressure with more food in it.
Ready to Explore More Instant Pot Recipes?
Now that you know the basics, you’re ready to explore! I’ve shared about 50 Instant Pot recipes that range from quick weeknight dinners to impressive Sunday suppers. Browse our complete collection of Instant Pot recipes.
You’ll find everything from soups and stews to pasta dishes, breakfast recipes, and my favorite budget friendly meals – dried bean recipes. Each recipe includes step-by-step instructions, tips for beginners, and tells you whether to use natural or quick release.
Happy cooking, and don’t forget to tag me on Instagram @thefeatherednester when you make your first Instant Pot meal—I love seeing what you create!
Mike Jones says
Love the IP!!