
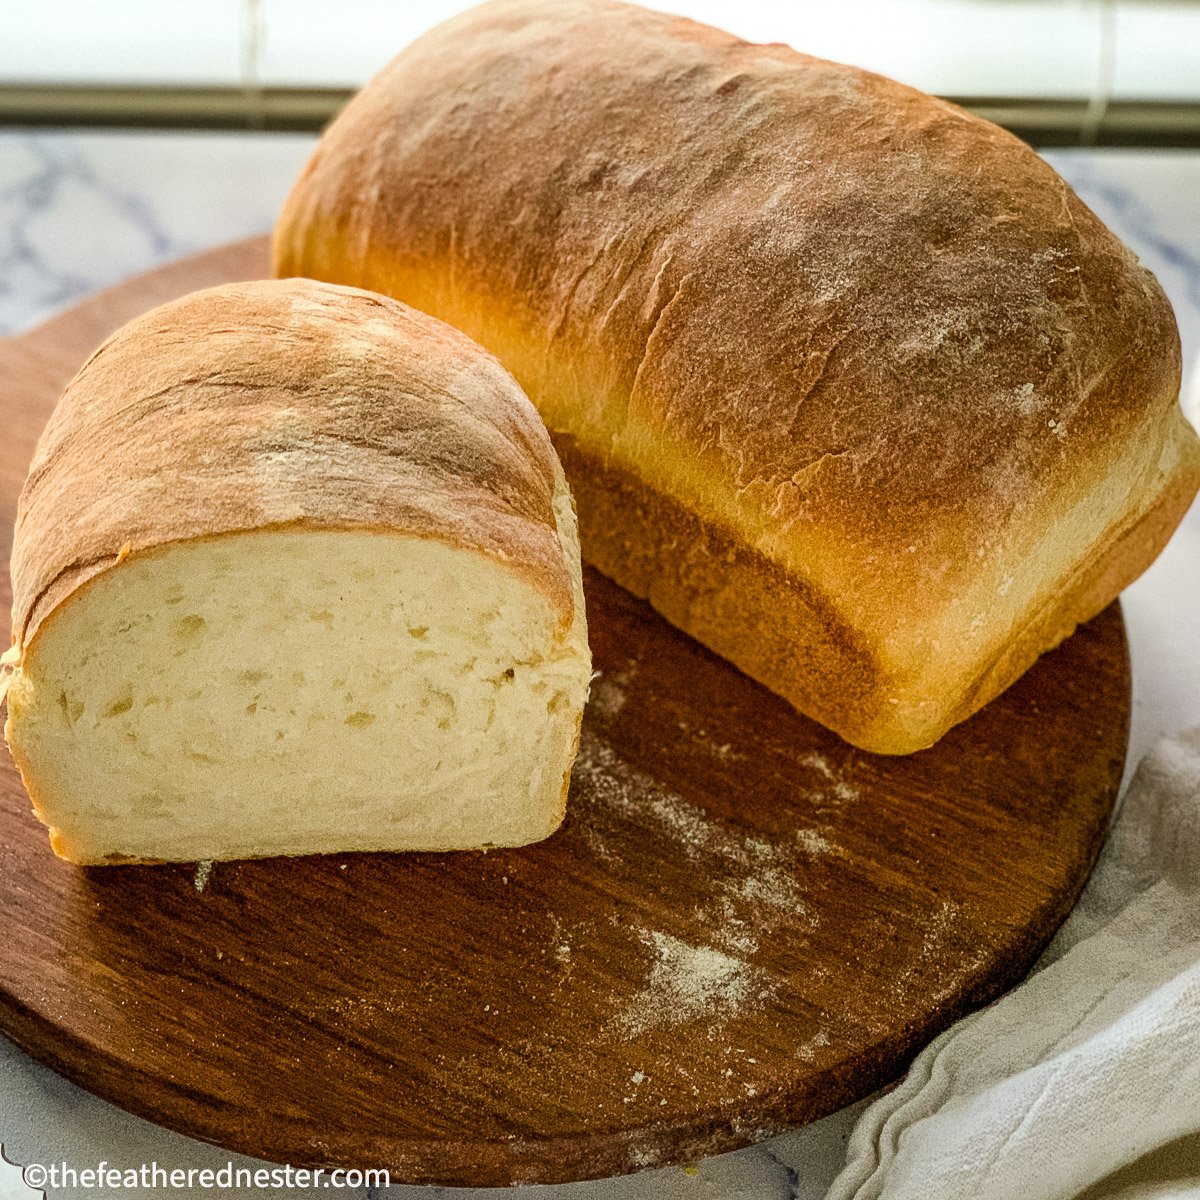
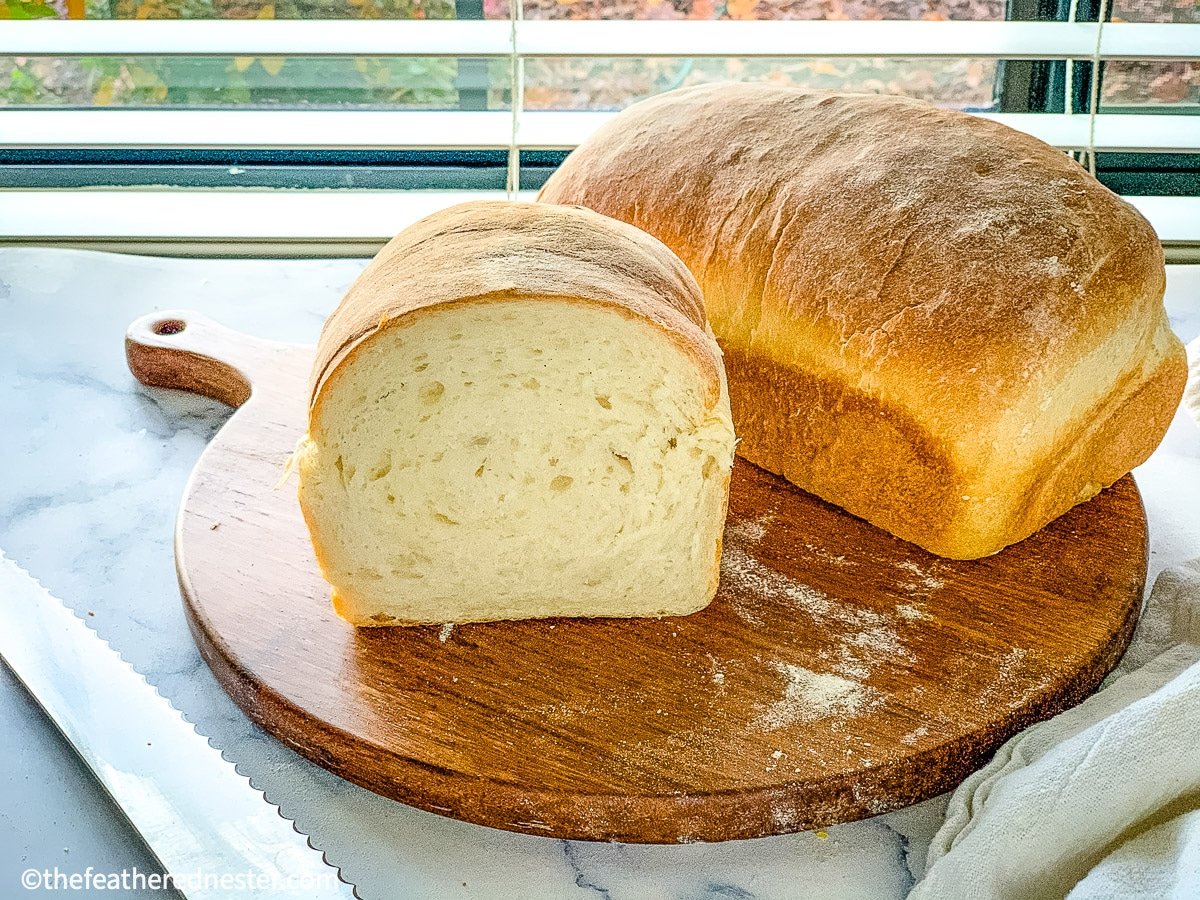
This sourdough sandwich bread recipe makes an amazingly super-soft bread with a flavor and texture that kids absolutely love. Once you make this easy no-knead sourdough bread, buying it from the store will be a thing of the past!
Content Covered Here
Sourdough Sandwich Bread Video Tutorial
Why We Love This Sourdough Sandwich Bread Recipe
- It’s super soft inside and out – so everyone loves it!
Sourdough loaves typically have a sour taste and crunchy, chewy exterior that some people (and kids) dislike. However, this recipe is baked in a loaf pan for a wonderfully light crust and soft interior. - There is no kneading required!
Since this is a no-knead bread recipe, there’s no worry about “Have I kneaded the dough enough?” The recipe is literally fail-proof. - It tastes like “regular” sandwich bread – without the “sour” taste.
Even if your kids aren’t sourdough fans, they’ll love it! They probably won’t even notice the difference between it and store-bought. The kids might also like our grilled cheese on sourdough bread recipe or our sourdough breakfast sandwich.
Learn more about how sourdough is fermented in my overnight sourdough bread post.
Ingredient Notes & Substitutions
Make this yummy soft loaf with just a handful of simple ingredients. There’s no yeast, eggs, or milk required!
- “Active” Sourdough starter – fed 12-24 hours before starting the recipe.
When we say “active,” we mean a mature starter that is at least a week old and always doubles in size within 4-6 hours of feeding. It doesn’t mean you need to use it at the peak activity after a feeding. This recipe uses an unfed starter or one that was fed 12-24 hours prior. - Bread flour – I prefer using unbleached King Arthur bread flour. Although you can use all-purpose flour, the higher protein content in bread flour creates a higher more airy loaf that’s perfect for sandwiches.
- Sugar – Granulated sugar or you can substitute the sugar with 2 rounded tablespoons of honey.
Do you lack a sourdough starter? My quick and easy sourdough starter recipe can make a fast starter in just five days. You can also make a loaf of our classic sandwich bread or whole wheat sandwich bread recipe, which uses yeast instead.
How to Make No Knead Sourdough Bread
This sourdough bread recipe requires just a few basic steps. Spoiler alert: the overnight rise makes a soft sandwich loaf that’s far better than anything you’ll find at the grocery store.
Start the recipe on a relaxing Saturday or Sunday evening, and then bake the next day. It will be ready to slice and stack with your favorite sandwich ingredients during the week.
🎯 TFN Pro Tip
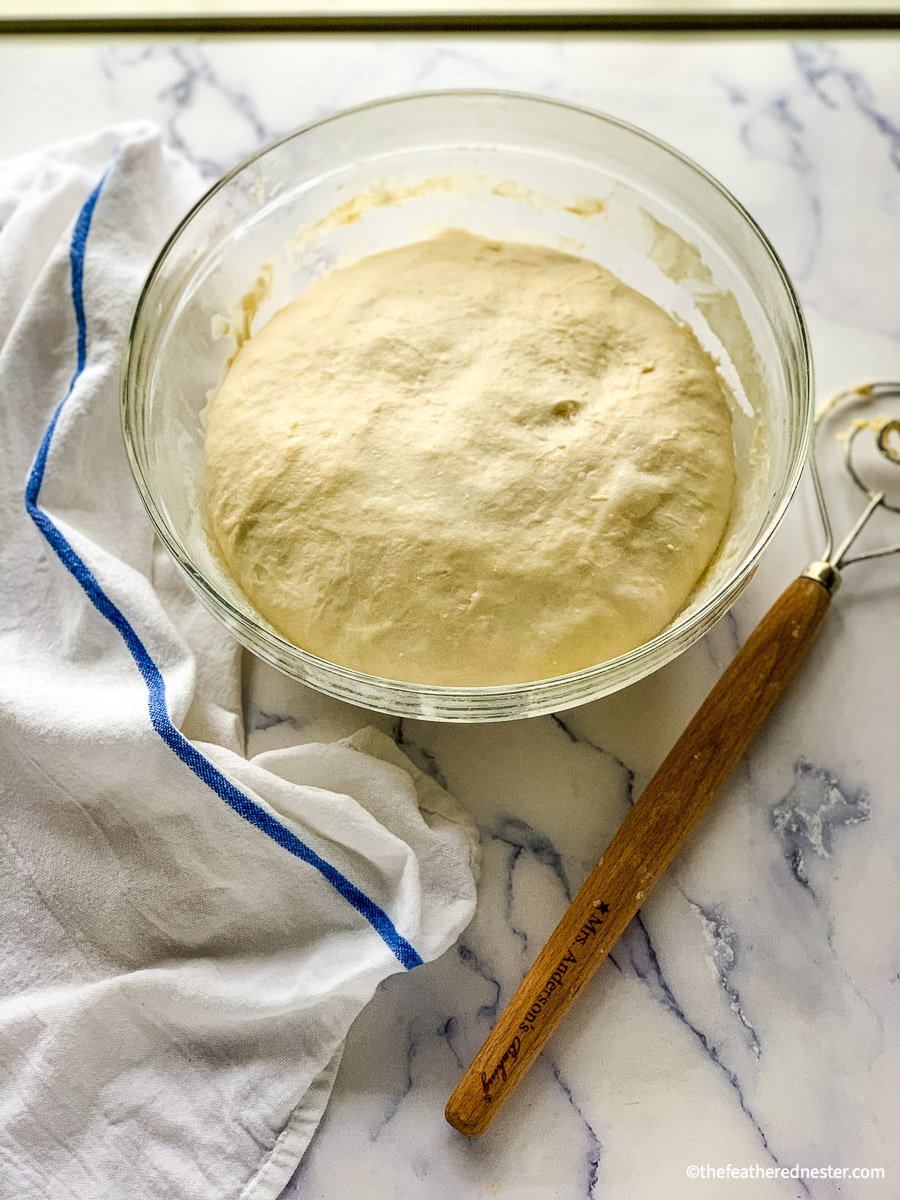
I recommend using a clear glass mixing bowl. This allows you to see the activity on the dough’s top and bottom. Often, the bottom of the dough will show a lot of activity, reassuring you that it’s properly fermented.
Mix the dough
- First, feed your starter 12-24 hours before starting the recipe.
- In a medium bowl, combine the starter with warm water, and then add flour, sugar, oil, and salt. I like using a dough whisk for mixing. Mix well to form a shaggy, sticky dough.

- Flour or wet your clean hands and use them to finishing mixing the dough. Then, cover the bowl with a damp towel and allow it to rise for 30-45 minutes.
- Coax the dough from the bowl, place it on a clean and lightly floured surface, then do a set of stretch and folds several times (see video below).
Overnight Sourdough Fermentation Process
The dough needs a long fermentation bulk rise, usually done overnight. This process is what rises the dough with wild yeast instead of commercial yeast. See our Fermentation Rising Guidelines in the recipe card for estimated rising times.
Looking for a shorter fermentation rise recipe to use up your sourdough discard? You’ll love our sourdough flatbread recipe! Use it for wraps, naan, or even pizza. Best of all, it only has a one hour rise so they’re ready fast!
🎯 TFN Pro Tip
Tips for keeping dough warm during colder months:
Place the bowl in the oven with the light on and the door slightly open to create a warmer climate without actually turning the oven on. Before doing this, make sure to take the temperature of your oven with the light on to ensure this method doesn’t get too hot! Or, do a bulk ferment during the day when you can monitor progress until you know how your dough responds to your specific environment.
Use a heated mat (like those used for germinating seeds) for rising. See my Sourdough Tools list to shop what I use.
Use the “proof” setting of your oven (I set mine to 85ºF) and set a timer. This will speed up the rising process, so check it at 4 and 6 hours.
If there is a sunny room in the house that stays warm, keep the dough covered in that area.
- Cover the bowl with a damp towel and leave the sourdough to rise at room temperature overnight, approximately 8-10 hours (see recipe for a sourdough rise chart). If you live in a drier climate then I recommend covering the bowl with plastic wrap instead of a damp towel. The plastic wrap keeps the dough from drying out overnight.
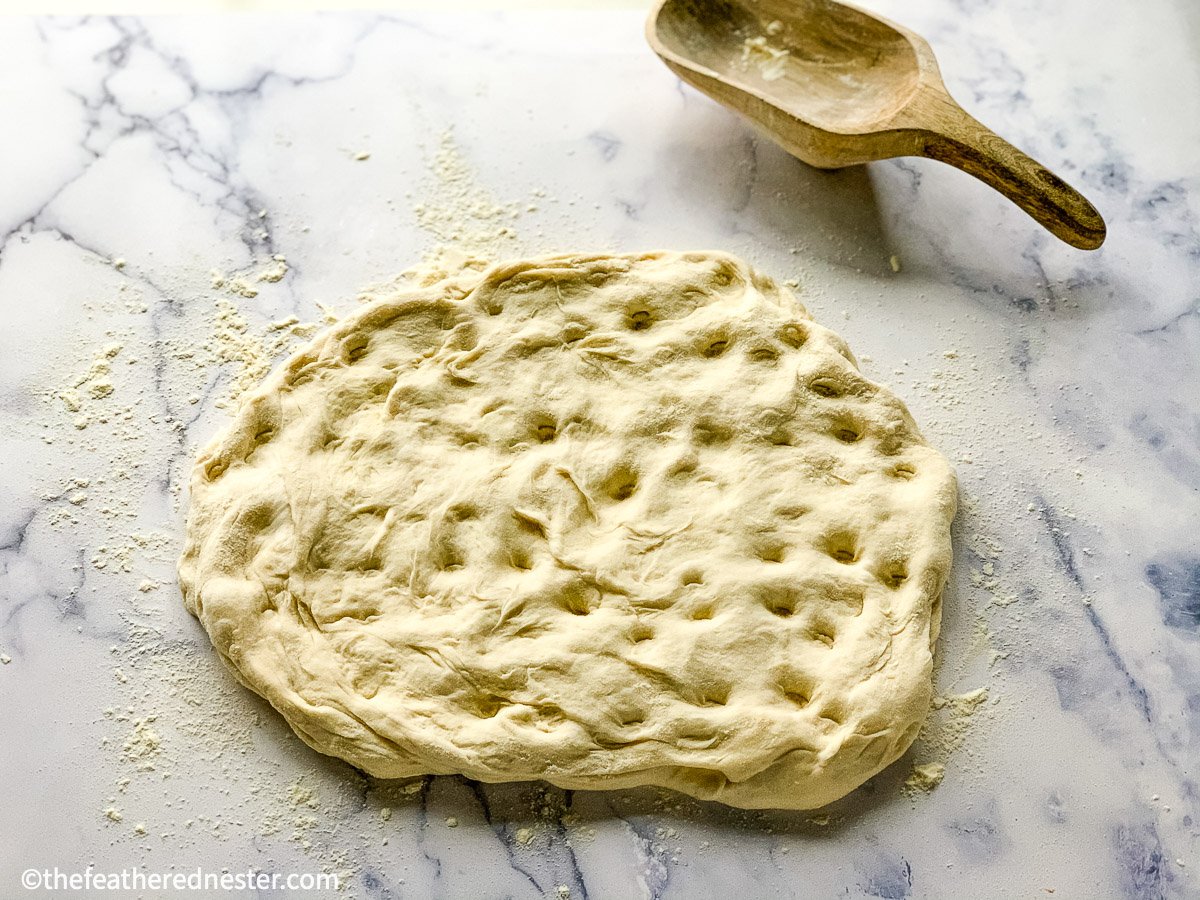
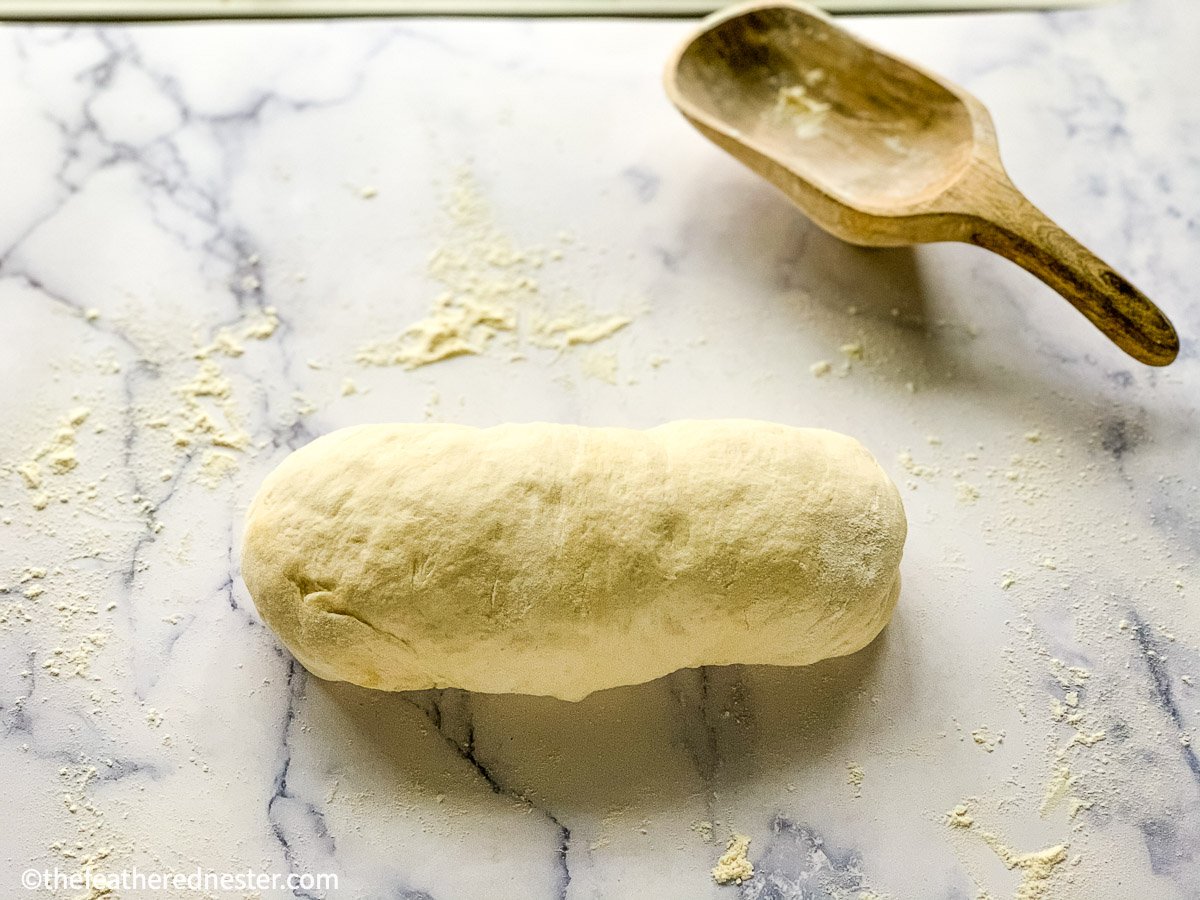
- In the morning, lightly flour your countertop. Remove the dough from the bowl and roll up the dough into a log shape (as shown below). Cover with a damp towel and let the dough rest for about 10 minutes.
Baking Instructions
- Lightly spray a 9” x 5” loaf pan with nonstick spray. Then tighten the loaf by gently rolling and pulling the dough, and transfer it to the prepared loaf pan seam side down.
Cover with a towel and let the loaf rise for another hour or two.

- When you’re ready to bake your loaf, preheat the oven to 375ºF. Then bake for 40 minutes, until the crust is a lovely golden brown color.
Remove the pan from the oven and allow it to rest for 10 minutes before carefully tipping it out of the pan onto a wire rack to cool.
Let the sourdough cool for at least one hour before storing it whole or sliced and enjoyed.
Serving Suggestion
This sandwich bread is incredibly versatile. Elevate your breakfast with an avocado sandwich spread on toasted slices. For a more substantial meal, consider a classic BLT with crispy bacon, ripe tomatoes, and a drizzle of mayonnaise.
If you want to add flavor to your sandwich bread, you might want to try our sourdough cinnamon raisin bread!
Recipe FAQs
Yes, you can use all-purpose flour instead of bread flour, using the same amount of flour. Since all-purpose flour has a slightly lower protein content than bread flour, your loaf might be slightly smaller.
You can, but for the best texture (density) and softness, I recommend only replacing 1/2 of the all purpose flour with whole wheat flour.
The dough needs a warm area for the bulk (overnight) fermented rise. Find a warm place (75º – 85º F) like an oven with the light on, a warm window, or above the dryer to extend the bulk fermentation rise for 2 more hours.
When the baking time is up, I check to see if the top of the loaf is golden and it sounds hollow when tapped on. If you are unsure, check the internal temperature which should be around 195º – 200ºF.
Let the bread cool completely. Store it in a plastic bag at room temperature. I use a plastic bread bag with a twist tie to seal it and it stays fresh for about 5 days. For the softest crust, we recommend storing it out of the fridge at room temperature.
To keep it fresher longer, put it in an air tight, freezer safe container and keep it in the freezer for up to 3 months. Let it defrost at room temperature before slicing and using.
For more storage tips, see our post on how to store sourdough bread.
More Easy Sourdough Recipes…
- Double Chocolate Sourdough Bread
- Jalapeno Cheddar Sourdough Bread
- Sourdough Bread Bowls Recipe
- Sourdough Garlic Toast
If you tried this soft sourdough sandwich bread recipe or any other recipe on my website, please leave a 🌟 star rating and let me know how it went in the 📝 comments below. Thanks for visiting!

Sourdough Sandwich Bread
Equipment
- loaf pan - See notes for a 12' x 4.5" pan
- large bowl
- dough whisk
Ingredients
- ⅓ cup (65 grams) sourdough starter discard or fed 12-24 hours prior *see notes below
- 1⅓ cups (300 grams) warm water, filtered 95º to 100º F
- ¼ cup (56 grams) granulated sugar can substitute with 2 rounded tablespoons of honey
- 3½ -4 cups (500 grams) bread flour or all-purpose flour. I recommend weighing your flour, see notes for using measuring cups
- 1½ tablespoons (20 grams) extra-virgin olive oil
- 2 teaspoons (9 grams) salt
Instructions
- Add the starter to a large bowl. Mix in warm water and sugar, stirring until dissolved. Add flour, oil, and salt. Stir with a dough whisk or wooden spoon until a thick, shaggy dough forms.
- Flour your hands or wet your hands, and finish mixing dough by hand until most of the flour has been absorbed. Don't worry if there is flour on the sides or bottom of the bowl. Cover with a clean, damp kitchen towel and let the dough rest for 30 to 45 minutes.
- Coax the dough from the bowl and stretch and fold the dough by stretching 4 inches then pushing it down the middle and turning 1/4 until you make a circle (see video below for how to do this).Return the dough to the bowl, cover with a damp towel, and let rise at room temperature overnight (at least 8-10 hours) until double in size. Do not refrigerate dough.
- In the morning, lightly flour your counter top. Remove the dough from the bowl, gently stretching it into a rectangle, then your fingers to dimple the rough to release the air from the dough (as shown in photo). Roll up dough into a log shape. Cover and let the dough rest 10 minutes.
- Spray loaf pan with cooking spray. To bake smaller loaves, see Recipe Notes below for directions.Tighten the dough log by gently pulling it towards you along the countertop for 5-8". Place it in your loaf pan, seam side down. Cover and let rise for 1-2 hours, until the dough is about double in size.To see if it's ready to bake, press the corner edge of the dough in 1/2" and if the indentation remains, it's ready to bake.
- Preheat your oven to 375ºF. If desired, brush the top of the loaf with an egg wash.
- Bake in the center of the oven for 40 minutes. See Recipe Notes below for smaller loaves. The top of the loaf should be golden in color. Remove from oven.After 10 minutes, tilt the pan to remove the bread to cool on a cooling rack.
- Wait at least 1 hour before cutting (to prevent the loaf from deflating).
Video

Notes
- I recommend using a clear glass mixing bowl for fermentation. This allows you to see the activity on the dough’s top and bottom. Often, the bottom of the dough will show a lot of activity, reassuring you that it’s properly fermented.
- The recipe ingredients call for 3 1/2 to 4 cups of flour because cup measuring is less reliable than using a food scale to weigh the flour.
- Be sure to stir the flour, then use a spoon to add it into the measuring cup, and level it with a knife. Start with the lower amount of flour and add up to 4 cups, but only if needed.
- 80ºF about 4-5 hours
- 75ºF about 6-7 hours
- 70ºF about 8-9 hours
- For temperatures under 70ºF it can take up to 12 hours or more
- Place the bowl in the oven with the door closed and light on to create a slightly warmer climate without actually turning the oven on.
- Use a heated mat (like those used for germinating seeds) for rising.
- Use the “proof” setting of your oven (I set mine to 85ºF) and set a timer. This will speed up the rising process, so check it at 4 and 6 hours.
- If there is a sunny room in the house that stays warm, keep the dough covered in that area.
- Let the bread cool completely. Store it in a plastic bag at room temperature. I use a plastic bread bag with a twist tie to seal it and it stays fresh for about 5 days. For the softest crust, we recommend sorting it out of the fridge at room temperature.
- To keep it fresher longer, put it in an air tight, freezer safe container and keep it in the freezer for up to 3 months. Let it defrost at room temperature before slicing and using.
- For more storage tips, see our post on how to store sourdough bread.

Hannah White says
Hi,
I’ve made this recipe many times now and it always turns out great tasting and great texture. The only problem I have is it splits on the side every time. I have checked and double checked that my edges are sealed and on the bottom of the pan. I’ve tried slashing the top with a knife and a lame and it still splits right at the top edge of the bread pan. I let it proof/rise for the alotted time and it always doubles and rises nicely, but if I poke the corner a little the indent doesn’t stay. Any ideas?
Renae says
EDITED reply: I thought you were referring to one of my other sandwich bread recipes (that makes 2+ loaves). I’m sorry for the confusion. I haven’t had an issue with this sourdough sandwich bread recipe splitting. That can happen when the dough hasn’t risen enough before baking. The oven heat causes the bread loaf to rise too quickly, causing a split in the loaf. The 1/2″ indent should stay if it is ready. Have you tried using a little less starter?
—the original comment below was when I thought this comment was about my non-sourdough sandwich bread recipe —
As I continue baking this bread (since publishing the recipe, I’ve probably made it 20 times), this has happened to me when I have used loaf pans that are too small. If you are splitting it between two regular-sized loaf pans, I recommend dividing the dough into three and using three loaf pans. If you do not have 3 loaf pans, or cannot bake three loaves at once, then freeze the third loaf and bake it later. Let me know if this “fix” works for you.
JO says
I’m confused. Is this recipe for more than one loaf? I was going to make it tonight and I thought the recipe as written was for one loaf, until I read this comment. I never saw in the recipe where you divide it for 2 pans.
Renae says
Sorry for the confusion in the comments. This sourdough sandwich recipe is for ONE loaf. I have about 7 bread recipes and 3 of them are for sandwich bread, 2 of which make more than one loaf. I must have been confused when I replied to a comment. I’ll see if I can find it and correct that reply.
abigail says
my dough was super dry and dense, and it didn’t rise. i think it was too cold in my kitchen. the color is also different and it is just SO dense and dry — i used a *whole grain* bread flour, is that different?? if so do you think i can just use less flour so adjust the consistency? thank you so much. i don’t have much experience with sourdough or bread in general so not sure if the flour i got is different than it should be!
Renae says
I don’t know which flour you used, if you used white bread flour the color of the bread should be the same as mine. The flour that I usually use – King Arthur Bread Flour – is white bread flour. Substituting whole wheat flour would change the recipe – from the rising time to the density of the bread. I’ll be coming out with a whole wheat sourdough sandwich bread soon. It’s still in the testing phase.
Brenda says
I’ve made it a few times now but my dough is also so sticky after the overnight rise. I can’t figure out why?? it still tastes good and looks good after baking.
Renae says
I have no idea why your dough is so sticky. I live in a dry climate, and climate and environment play a role in breaking, especially with sourdough since it’s wild yeast. I’m glad to hear that your bread turns out well, though.
Sarah says
Mine also turned out so sticky! I’m onto the final rise so we’ll see how it turns out, I’m happy to hear yours still turns out well though! Have you worked out how to fix the stickiness?
Renae says
I haven’t had this dough turn out sticky (and between my daughter and I, we’ve made it probably 50 or more times), but we live in a dry climate. If you aren’t weight measuring with a scale then I’d recommend that to be sure you’re not under measuring your flour. If you are, then add 1/2 cup of flour and see how that works. Sourdough is not like “normal” baking, and sourdough starters have different levels of hydration (mine is 100%), we use different brands of flour (with different strains of wheat and varying levels of protein), and we live in different environments – including elevations. All of those factors affect sourdough.
Cari says
This turned out great! I’ve been looking for an EASY sourdough recipe that doesn’t require a stand mixer or a bread machine or for me to knead it. This is exactly what I’ve been looking for! I also like that it rises overnight and no yeast required! The comments section is very informative too. I appreciate the time you’ve taken to answer the questions. I just discovered your website and look forward to trying more of your recipes. Thank you so much! You’ve made me very happy! 🙂
Amy Leal says
I just made this yesterday. My bread turned out dense. I followed everything as instructed. Any ideas?
Renae says
It has been my experience that most sourdough bread troubles are related to the sourdough starter or the fermentation or bulk rise. Here are my tips: Feed the starter about 12 hours before making the sourdough bread. Ensure that your sourdough starter doubles in size by the 6-hour mark. Let your dough rise in an area that is around 75ºF. Check to see that your dough has bubbles on the top and the bottom after the bulk or fermented rise and has risen significantly. Do not rush the final rise – the dough should have doubled in size.