

There is something about cobblers that I just gravitate toward… I don’t know if it’s the warm-from-the-oven fruit or if it’s the sweet bread topping, but they truly are my favorite desserts. Our bisquick peach cobbler recipe just feels like a warm summer evening. It reminds me of eating peach cobblers outside while the breeze cools off the heat of the day.
We’ve made this recipe as easy as it can get, the peaches can be fresh, frozen or canned and we use Bisquick so you don’t have to worry about properly measuring all those dry ingredients together. No Bisquick? No problem- we have a DIY recipe for that too!
Content Covered Here
Bisquick Peach Cobbler Video Tutorial
Why We Love This Recipe
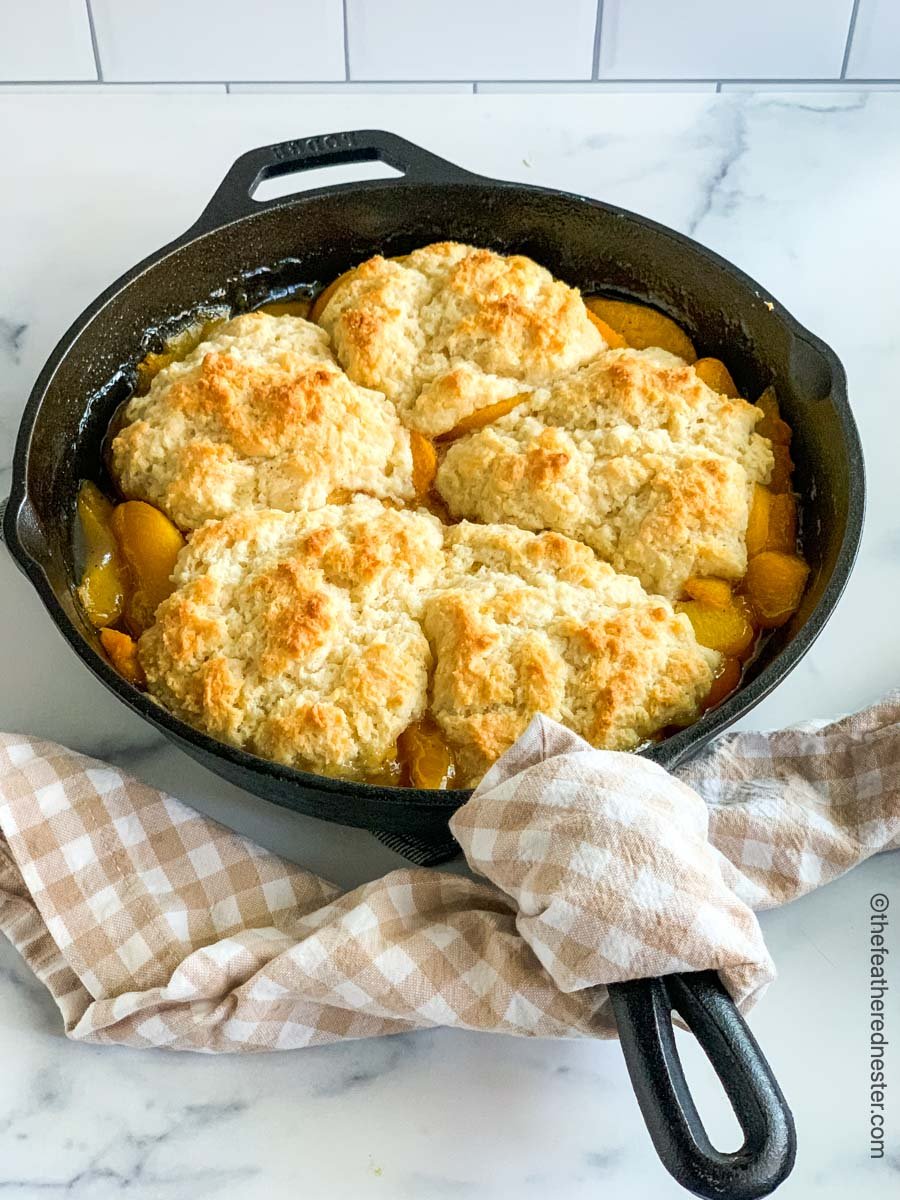
- You can use your cast iron– give this easy dessert a fun, old-fashioned feeling by making our Bisquick peach cobbler in cast iron.
- Few ingredients– fruit cobblers are simple to prepare with just a few key ingredients.
- Use whatever peaches you have- our recipe works with fresh, frozen, or canned peaches. You can even make this gluten-free by using Gluten Free Bisquick. Check out our FAQ section below for more information
Why this Peach Cobbler with Bisquick works
One of my go-to easy recipes is peach cobbler made with Bisquick baking mix. Since Bisquick already has the perfect ratios of baking ingredients, there is no complicated measuring.
No Bisquick on hand? No worries, check out what’s in Bisquick biscuit mix to make your own Bisquick mix.
Combine the Bisquick (or your homemade baking mix) with sugar, milk, and butter for a foolproof cobbler topping!
It’s great to bake ahead of time, and leftovers are great for several days – warm or cold.
Ingredient Notes and Substitutions
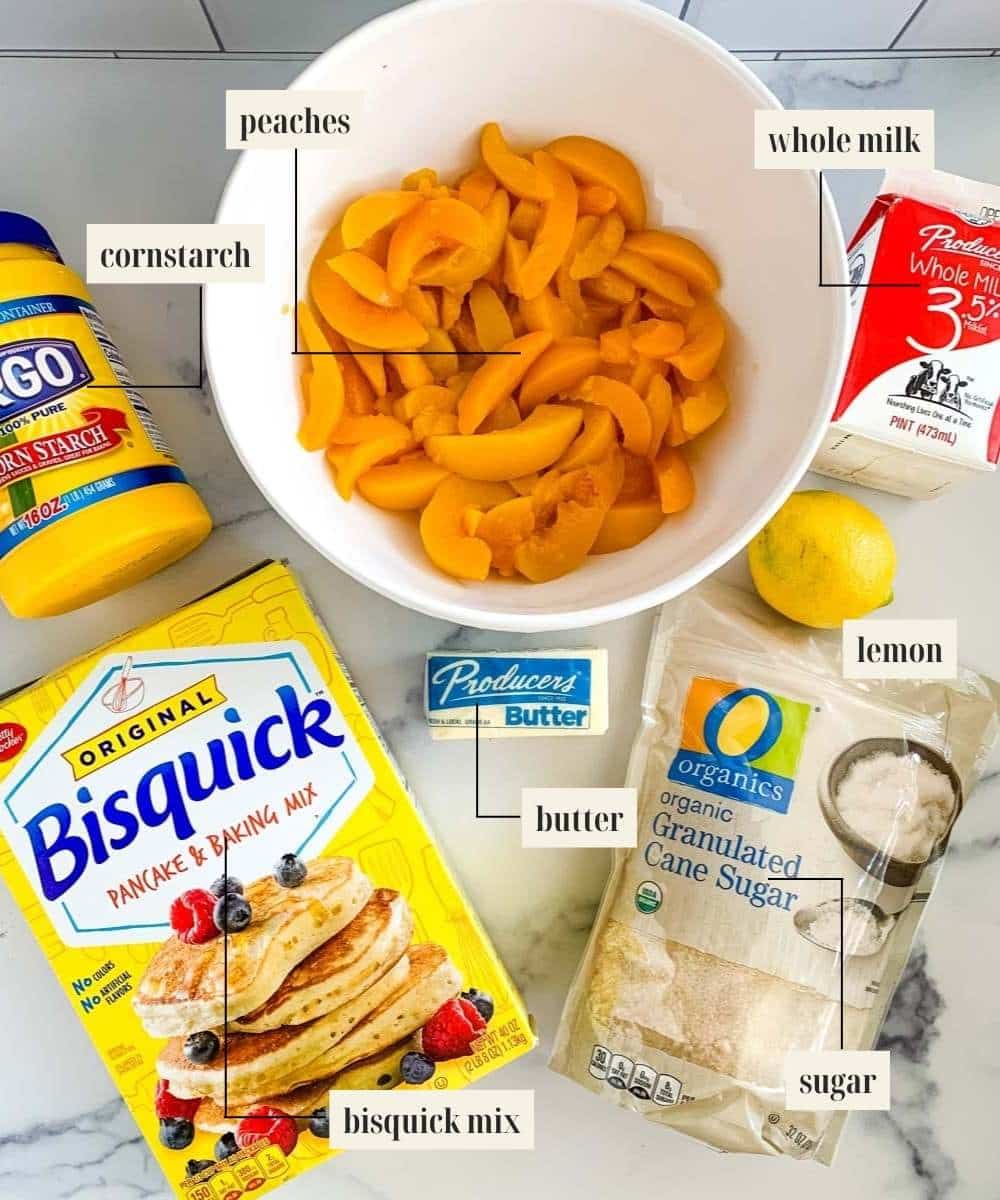
- Peaches – fresh, frozen, or canned. For canned peaches use two 15-ounce cans of drained peaches, and increase cornstarch to 2 tablespoons. For frozen make sure they thaw completely beforehand (so you don’t end up with a soggy dessert) and increase cornstarch to 2 tablespoons.
- Cornstarch- acceptable substitutes are tapioca starch (or flour), arrowroot powder, and all-purpose flour
- Lemon juice- fresh or bottled.
- Sugar- granulated sugar or brown sugar.
- Original Bisquick mix- or use Gluten Free Bisquick. Learn our how to make homemade biscuits easy or biscuits self rising flour instead of Bisquick biscuits for the topping. Or, make your own Bisquick mix to use in all of our Bisquick recipes.
- Milk- whole or 2% milk.
- Butter- slightly frozen, or very cold butter grates much easier!
Try These Cobbler Recipes Next
You can use our cobbler recipe with bisquick mix with any fruit. Once you make it with peaches, you’ll want to try it all year long with whatever is in season. Here are a few of my favorites:
- Bisquick Apple Cobbler– warm cinnamon apples under a golden Bisquick topping make this a perfect fall dessert.
- Strawberry Blueberry Cobbler– can’t choose just one fruit? This mixed berry cobbler is the answer.
- Bisquick Blueberry Cobbler– sweet, juicy blueberries and a buttery biscuit topping that couldn’t be easier to make.
- Bisquick Blackberry Cobbler– slightly tart blackberries with a sweet Bisquick topping is a combination worth making every summer.
- Bisquick Strawberry Cobbler– fresh strawberries shine in this simple spring dessert the whole family will love.
- Easy Bisquick Cherry Cobbler– a classic cherry cobbler that works with fresh or canned cherries any time of year.

Kitchen Tools Needed
- Cast iron skillet or casserole dish
Why Make it in a Cast Iron Skillet
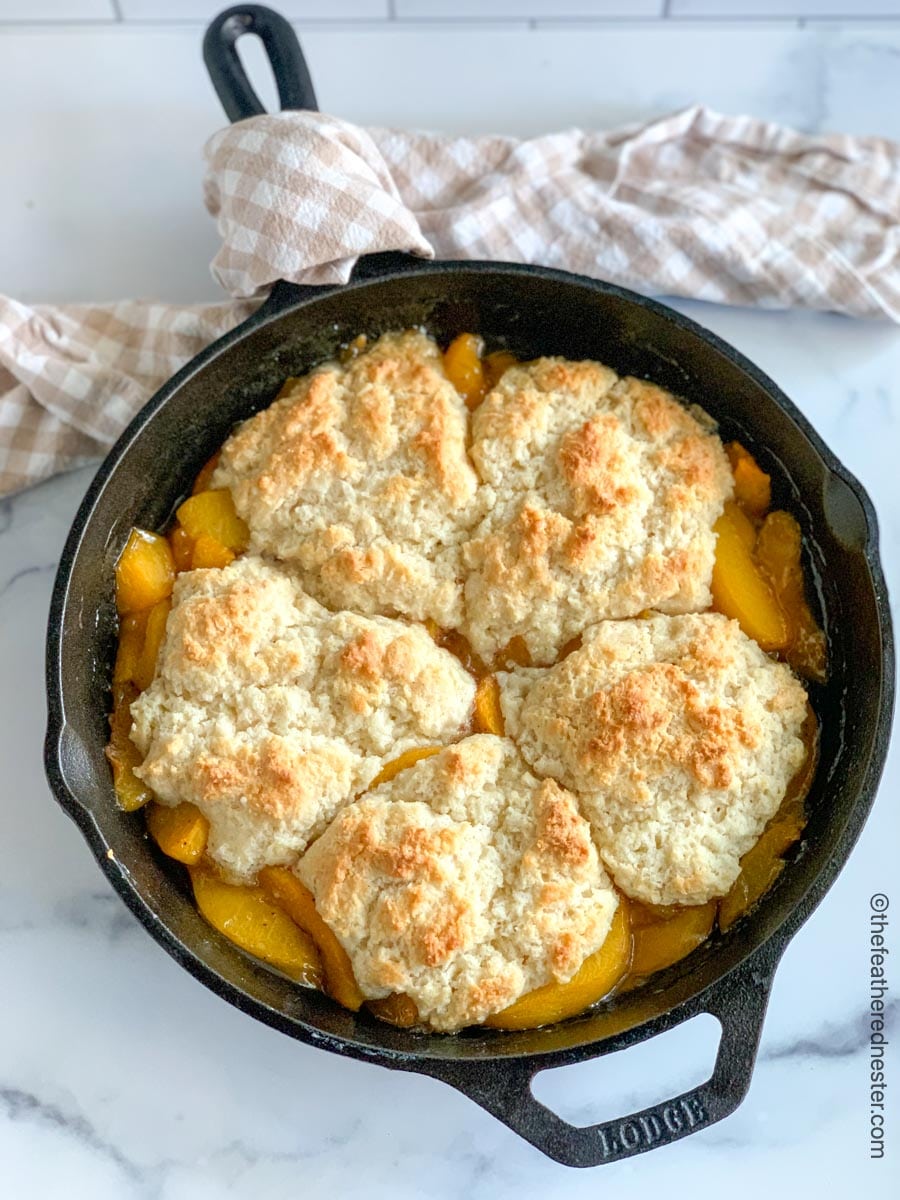
I love the old-fashioned presentation that this Bisquick peach cobbler in cast iron skillet makes! From prep, to the oven to the table, the cobbler can stay in the cast iron skillet. But, it’s not only about how it looks.
Cast iron is ideal for baking as it bakes evenly in the oven. Plus, a seasoned cast-iron pan is naturally non-stick – you can even scramble eggs in them! A good cast iron pan does double duty in the oven and stove. And, I love anything that saves me space in the kitchen.
A cast iron skillet is not needed, however, our recipe works well in a regular 9×13 baking dish.
How to make Bisquick Peach Cobbler
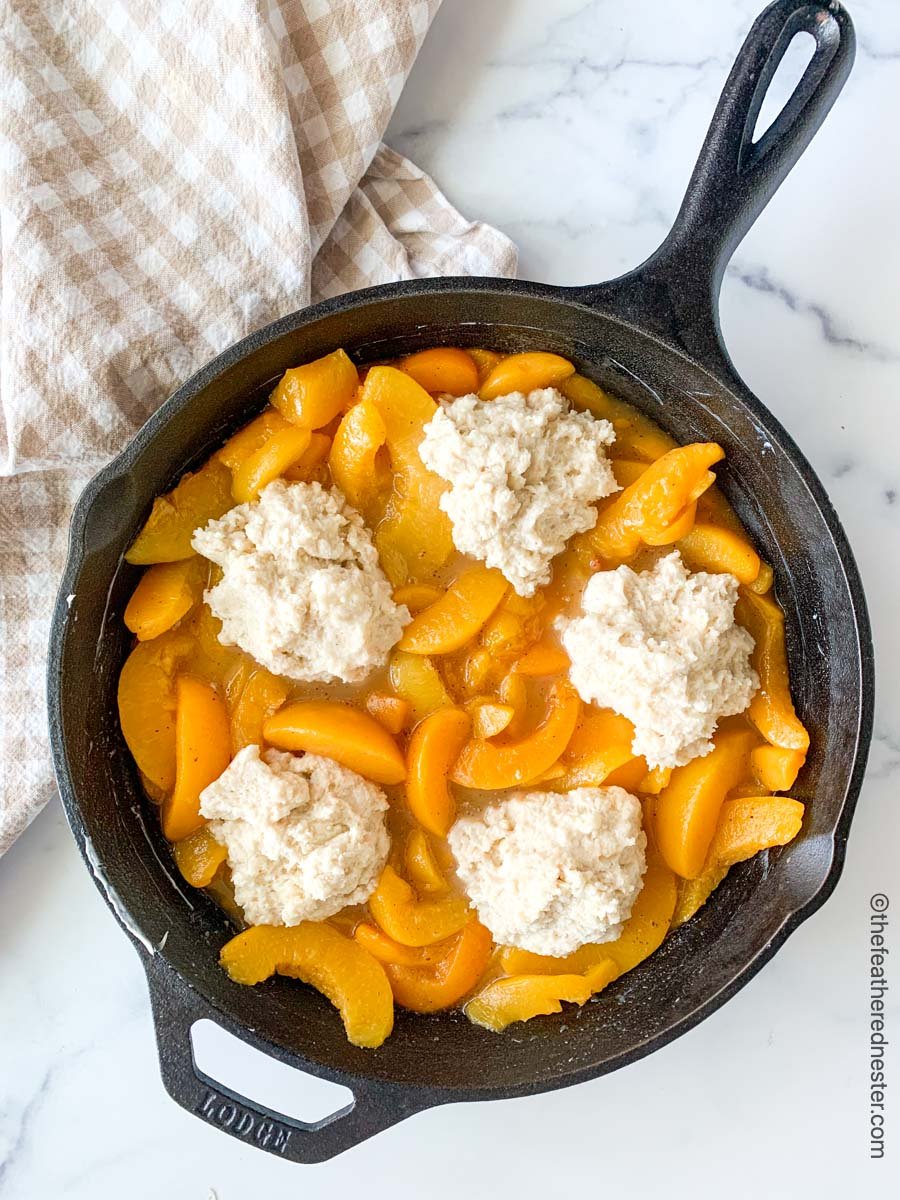
- First, preheat the oven to 375°F. Add the sliced peaches, cornstarch, 1/2 a cup of sugar, and lemon juice to a medium bowl. Stir to combine. Then, add the peaches to the bottom of the cast-iron skillet or oven-safe casserole dish. Bake for 20 minutes.
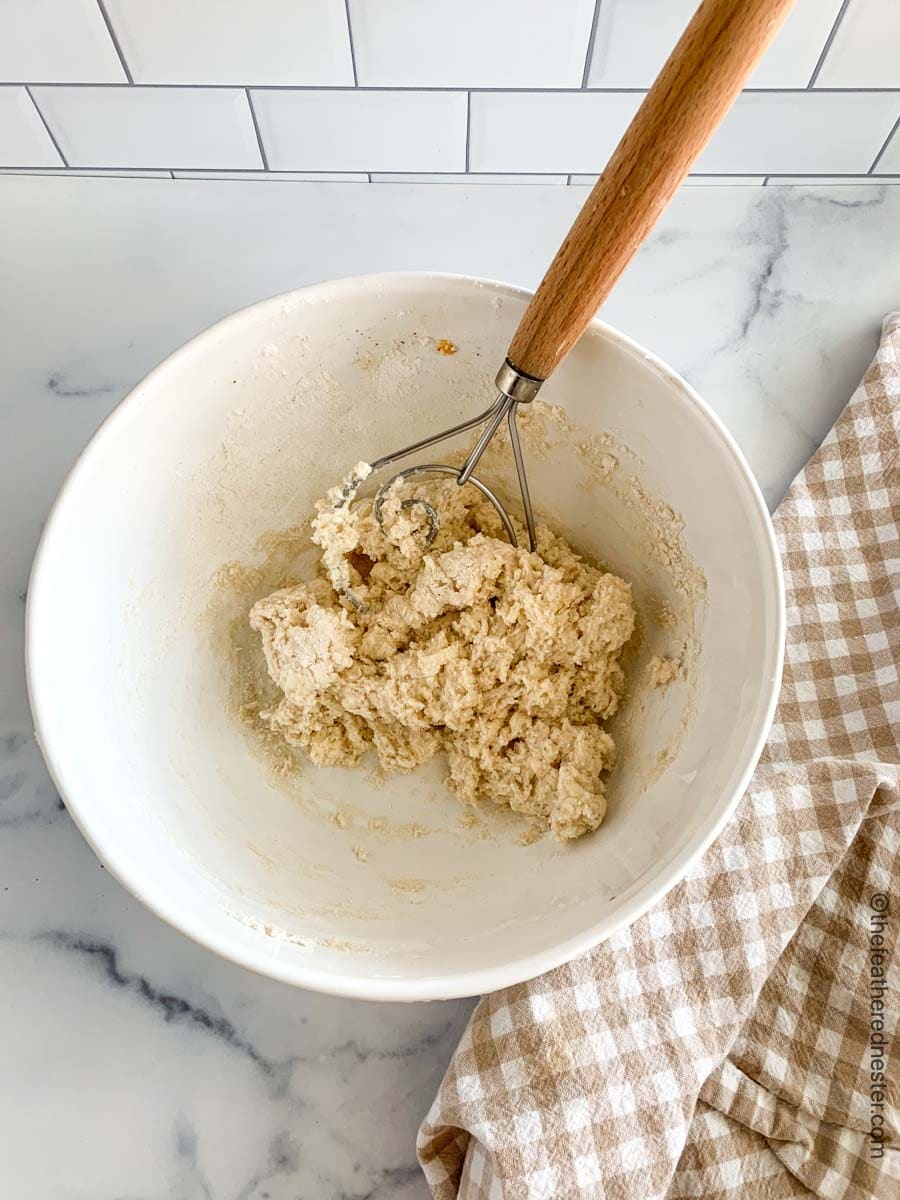
- Meanwhile, prepare the Bisquick topping: add baking mix, remaining sugar, milk, and butter. Stir until just combined. Drop spoonfuls of the batter onto the peaches, and use the back of the spoon to gently push down and submerge the topping.
- Bake for another 15 minutes until the peach cobbler is golden on top. Let sit 10 minutes before serving.
🎯 TFN Pro Tip
Check out our tips for the best cobbler:
- Don’t over mix the Bisquick
- Fruit always goes first
- You’ll know it’s done when the fruit is bubbling on the edges and the topping is a warm, golden brown.
Serving Suggestions
Bisquick cobbler makes for a delightful dessert that pairs wonderfully with a variety of main dishes. Our dinner suggestions are teriyaki ribs, oven fried chicken with mashed potatoes, pulled pork, buttermilk pork chops, shell steak, or even mac and cheese, this sweet treat is sure to complement your meal perfectly.
When serving cobblers, consider adding a scoop of vanilla ice cream or a dollop of freshly whipped cream on top. The contrast between the warm, fruity filling and the cold, creamy topping creates a delightful sensory experience that enhances the flavors and makes the dessert feel extra indulgent.
Additionally, serving cobblers in individual ramekins can add an elegant touch and ensure that each guest gets a perfect portion with a balanced mix of crust and filling.
Recipe FAQs
You can make bisquick peach cobbler with canned peaches! Use two 15-ounce cans of drained peaches, and increase cornstarch to 2 tablespoons.
You can use Splenda baking mix in place of sugar. Or mix half Splenda and half granulated sugar. However, be sure it is specifically the baking version, or your cobbler will not thicken properly.
1. Bake it until the filling is bubbly throughout.
2. Add the amount of sugar called for in the recipe. This combines with the fruit to create a thick, gelled filling.
3. Let it cool until the filling has thickened.
1. It could be that the filling or fruit was too cold and didn’t bake completely.
2. The cobbler wasn’t cooked long enough. Bake it an additional 5–10 minutes until the middle is bubbly.
Store leftover peach cobbler in an airtight container in the refrigerator for up to 4 days. Leftovers can also be stored in a freezer-safe container in the freezer for up to 3 months. To reheat, bake in an oven-safe container covered with aluminum foil at 350°F for 30 minutes.
Yes! Fresh peaches are perfect for peach cobbler with bisquick, no draining or thawing required just slice and they are ready.
Keeping frozen peaches in the freezer means you can make this recipe anytime! Simply thaw the peaches first and increase the cornstarch to 2 tablespoons.
Love Easy Dessert Recipes? Here’s More…
If you tried this bisquick peach cobbler recipe or any other recipe on my website, please leave a 🌟 star rating and let me know how it went in the 📝 comments below. Thanks for visiting!

Peach Cobbler Recipe with Bisquick
Equipment
Ingredients
- 4 large peaches, sliced and peeled (or 4 cups of frozen peaches, or two 15-ounce cans of peaches SEE NOTES)
- 1 tablespoon cornstarch
- 1 teaspoon lemon juice
- ⅔ cup sugar, divided
- 1½ cups Bisquick mix (see notes for a DIY baking mix recipe)
- ½ cup milk, whole or 2%
- 3 tablespoons butter, grated (semi-frozen butter is easier to grate)
Instructions
- Preheat oven to 375ºF.
- Stir together peaches, cornstarch, 1/2 cup of sugar, and lemon juice in a medium bowl. Pour them into the bottom of the cast iron skillet or casserole dish. Bake at 375ºF for 20 minutes (then we'll add the biscuit topping).
- Rinse the bowl, then stir together Bisquick mix, the rest of the sugar, milk, and butter. The batter will be thick, with a dough-like consistency.
- Carefully drop biscuit dough by large, rounded tablespoons (I use a small cookie scoop) on top of the peach mixture. Gently press down to submerge the cobbler topping. Continue baking for 15 minutes, until the filling is bubbly and the biscuits on top are golden.
- Let cool at least 10 minutes before serving. Top with vanilla ice cream, whipped cream, or cream cheese.
Video

Notes
- When serving cobblers, consider adding a scoop of vanilla ice cream or a dollop of freshly whipped cream on top. A wedge of cream cheese is also good. The contrast between the warm, fruity filling and the cold, creamy topping creates a delightful sensory experience that enhances the flavors and makes the dessert feel extra indulgent.
- Additionally, serving cobblers in individual ramekins can add an elegant touch and ensure that each guest gets a perfect portion with a balanced mix of crust and filling.
- Make your own Bisquick with my DIY baking mix recipe (linked).
- For frozen peaches: allow the peaches to thaw before using. Increase cornstarch to 2 tablespoons.
- For canned peaches: drain the peaches before using.
- Use Gluten-Free Bisquick to make a gluten-free peach cobbler with Bisquick!
- Follow the instructions on the box of gluten-free Bisquick to substitute Original Bisquick in this recipe. No other substitutions are needed to make this GF-friendly peach cobbler in a cast-iron skillet.
- Store leftover peach cobbler in an airtight container in the refrigerator for up to 4 days.
- Leftovers can also be stored in a freezer-safe container in the freezer for up to 3 months.
- To reheat, bake in an oven-safe container covered with aluminum foil at 350°F for 30 minutes.

Kerri says
Such a quick, easy, and delicious dessert!
Jeff says
Such an easy and quick way to make a cobbler. Bisquick makes it a snap.
Erik says
Already had bisquick in my pantry, so this was perfect. Super easy and the fam loved it!
Rhonda Graham says
I gave a can of rhubarb strawberry pie filling I’m going to use… gonna wing it a bit… thank you for the recipe…
MacKenzie says
This reminds me of something my mom used to make. I absolutely loved it. I plan on making it again this weekend.